Showing posts with label Copic Markers. Show all posts

Monday, September 16, 2024

Fall Forest Whimsy with The Cat’s Pajamas


Well Hi!  Today I’m bringing you the most charming whimsical little Autumn scene!  It’s created with The Cat’s Pajamas stamps and digital images, and lots of Copic colouring.  I started with creating a Fall themed background with TCP’s Fall Foliage digital stamp set, arranging the leaves, acorns and toadstools in a fun layout.  


Next I also took some of those same leaves and shrunk them down really tiny so that I could add them to this retired stamp set scene, giving it the feel of a windy Autumn day where the leaves are swirling (its very west-coast with gigantic leaves!).  These little leaves are trimmed out after colouring and added to the Copic coloured scene.  Aren’t these little woodland animals darling dressed in their cozy sweaters and scarves?  


The main image is popped up and I’ve added texture to the background with a plaid style die, as well as a few enamel dots to accent.  It’s the perfect all occasion card for Fall!  


Tuesday, April 16, 2024

Two Techniques with Crafty Meraki!


Hello Crafty Meraki friends!  Today I’m back with week THREE of my Guest design posts for Crafty Meraki , and this week we’re all about techniques!  I have two designs with two different techniques but similar colour palettes to show you today.  

First up, I created a design that showcases foiling, ink blending, and a faux spotlight technique with a lovely result.  

I began by ink blending the background of white paper with Distress Oxide Inks in blues to raspberry shades in an ombre feel.  I heat set the paper and then foiled the beautiful 
Crafty Meraki Elegance Hot Foil Plate onto it with my Glimmer Machine in silver.  I foiled the image a second time on Copic XPress it Blending paper, and used that for Copic colouring part of the image.  


When my colouring was completed, I trimmed out the part of the image that I wanted to use as a type of “spotlight” of the design, where just part of the image is coloured, and attached it with foam dots.  


I also foiled the sentiment from Handmade Love.  I die cut a sparkly silver frame to add attention to the Copic coloured part of the design, which also serves to anchor that part of the card, and finally added some silver enamel dots for more shimmer and shine.  

My second card showcases embossing and watercoloring!


I have loved watercolouring for so many years, so it was high time I pulled it out again!   I began by heat embossing the lovely arrangement from the stamp set Reason to Smile onto watercolour paper with Embossing ink and a heat tool.  The raised silver embossing creates a “border” for the watercolouring to sit in which makes painting the small sections a quick process.  I used Daniel Smith watercolours for their beautiful vibrancy.  


I painted in a very soft wash of background, some paint splatter and then white acrylic paint splatter to bring some texture.  


The embossed sentiment is included in the set and I added it onto a coordinating colour of cardstock, trimmed it out and popped it up on the design with foam dots, and a few enamel dots to match.  That soft creamy white is such a lovely backdrop for the vibrant flowers!  

Thanks for joining me today!  

Thursday, February 1, 2024

Hogs and Kisses with MFT


Well since tomorrow is GroundHOG’s Day, I thought a punny piggy would be in order for a card today! I’m playing along with MFT’s Sketch Challenge this week, as well as Simon Say’s Stamp Monthly Challenge with Ink Blending. I pulled an adorable set from MFT called Piggy Pebbles illustrated by Stacey Yacula, stamped a number of images in the set and coloured them with Copics.  


I took inspiration from the rainbow of colours in the umbrella for the ink blended background that mimics a grass to sky background with a little misty rain falling, and then lined up the images to match the sketch.  The clouds in the centre panel are created with the Cloudy Double Card Front Die from Concord & 9th.  It ties in perfectly!


It’s perfect for a Valentine card, or a kid's birthday, lots of cute “Hog" themed possibilities!  

Friday, January 20, 2023

From Our Nest to Yours


One of the most common birds found at our bird feeders are Chickadees and I enjoy watching them take shelter from the cold tucked in each day.  This little cutie from Power Poppy called My Little Chickadee is such a fun and easy one to colour up, that its perfect for the latest Blossom Challenge: Clean Slate theme for clean and simple cards. He’s ruffled up and on this winterberry branch ready to sing a song!  

I created a mini-slimline design with blocks of colour in patterned paper that coordinated with the colours I used with Copics.  


Some soft pointillism dotted blue-grey background is a soft touch, and the accents are simple die cut branches from The Greetery which I added mica flakes to, to simulate sparkly icy snow.  


You get a sense of the sparkle on this view, it’s really shimmery in real life!

I hope you can join us for The Blossom Challenge:  Clean Slate HERE!  

Sunday, June 26, 2022

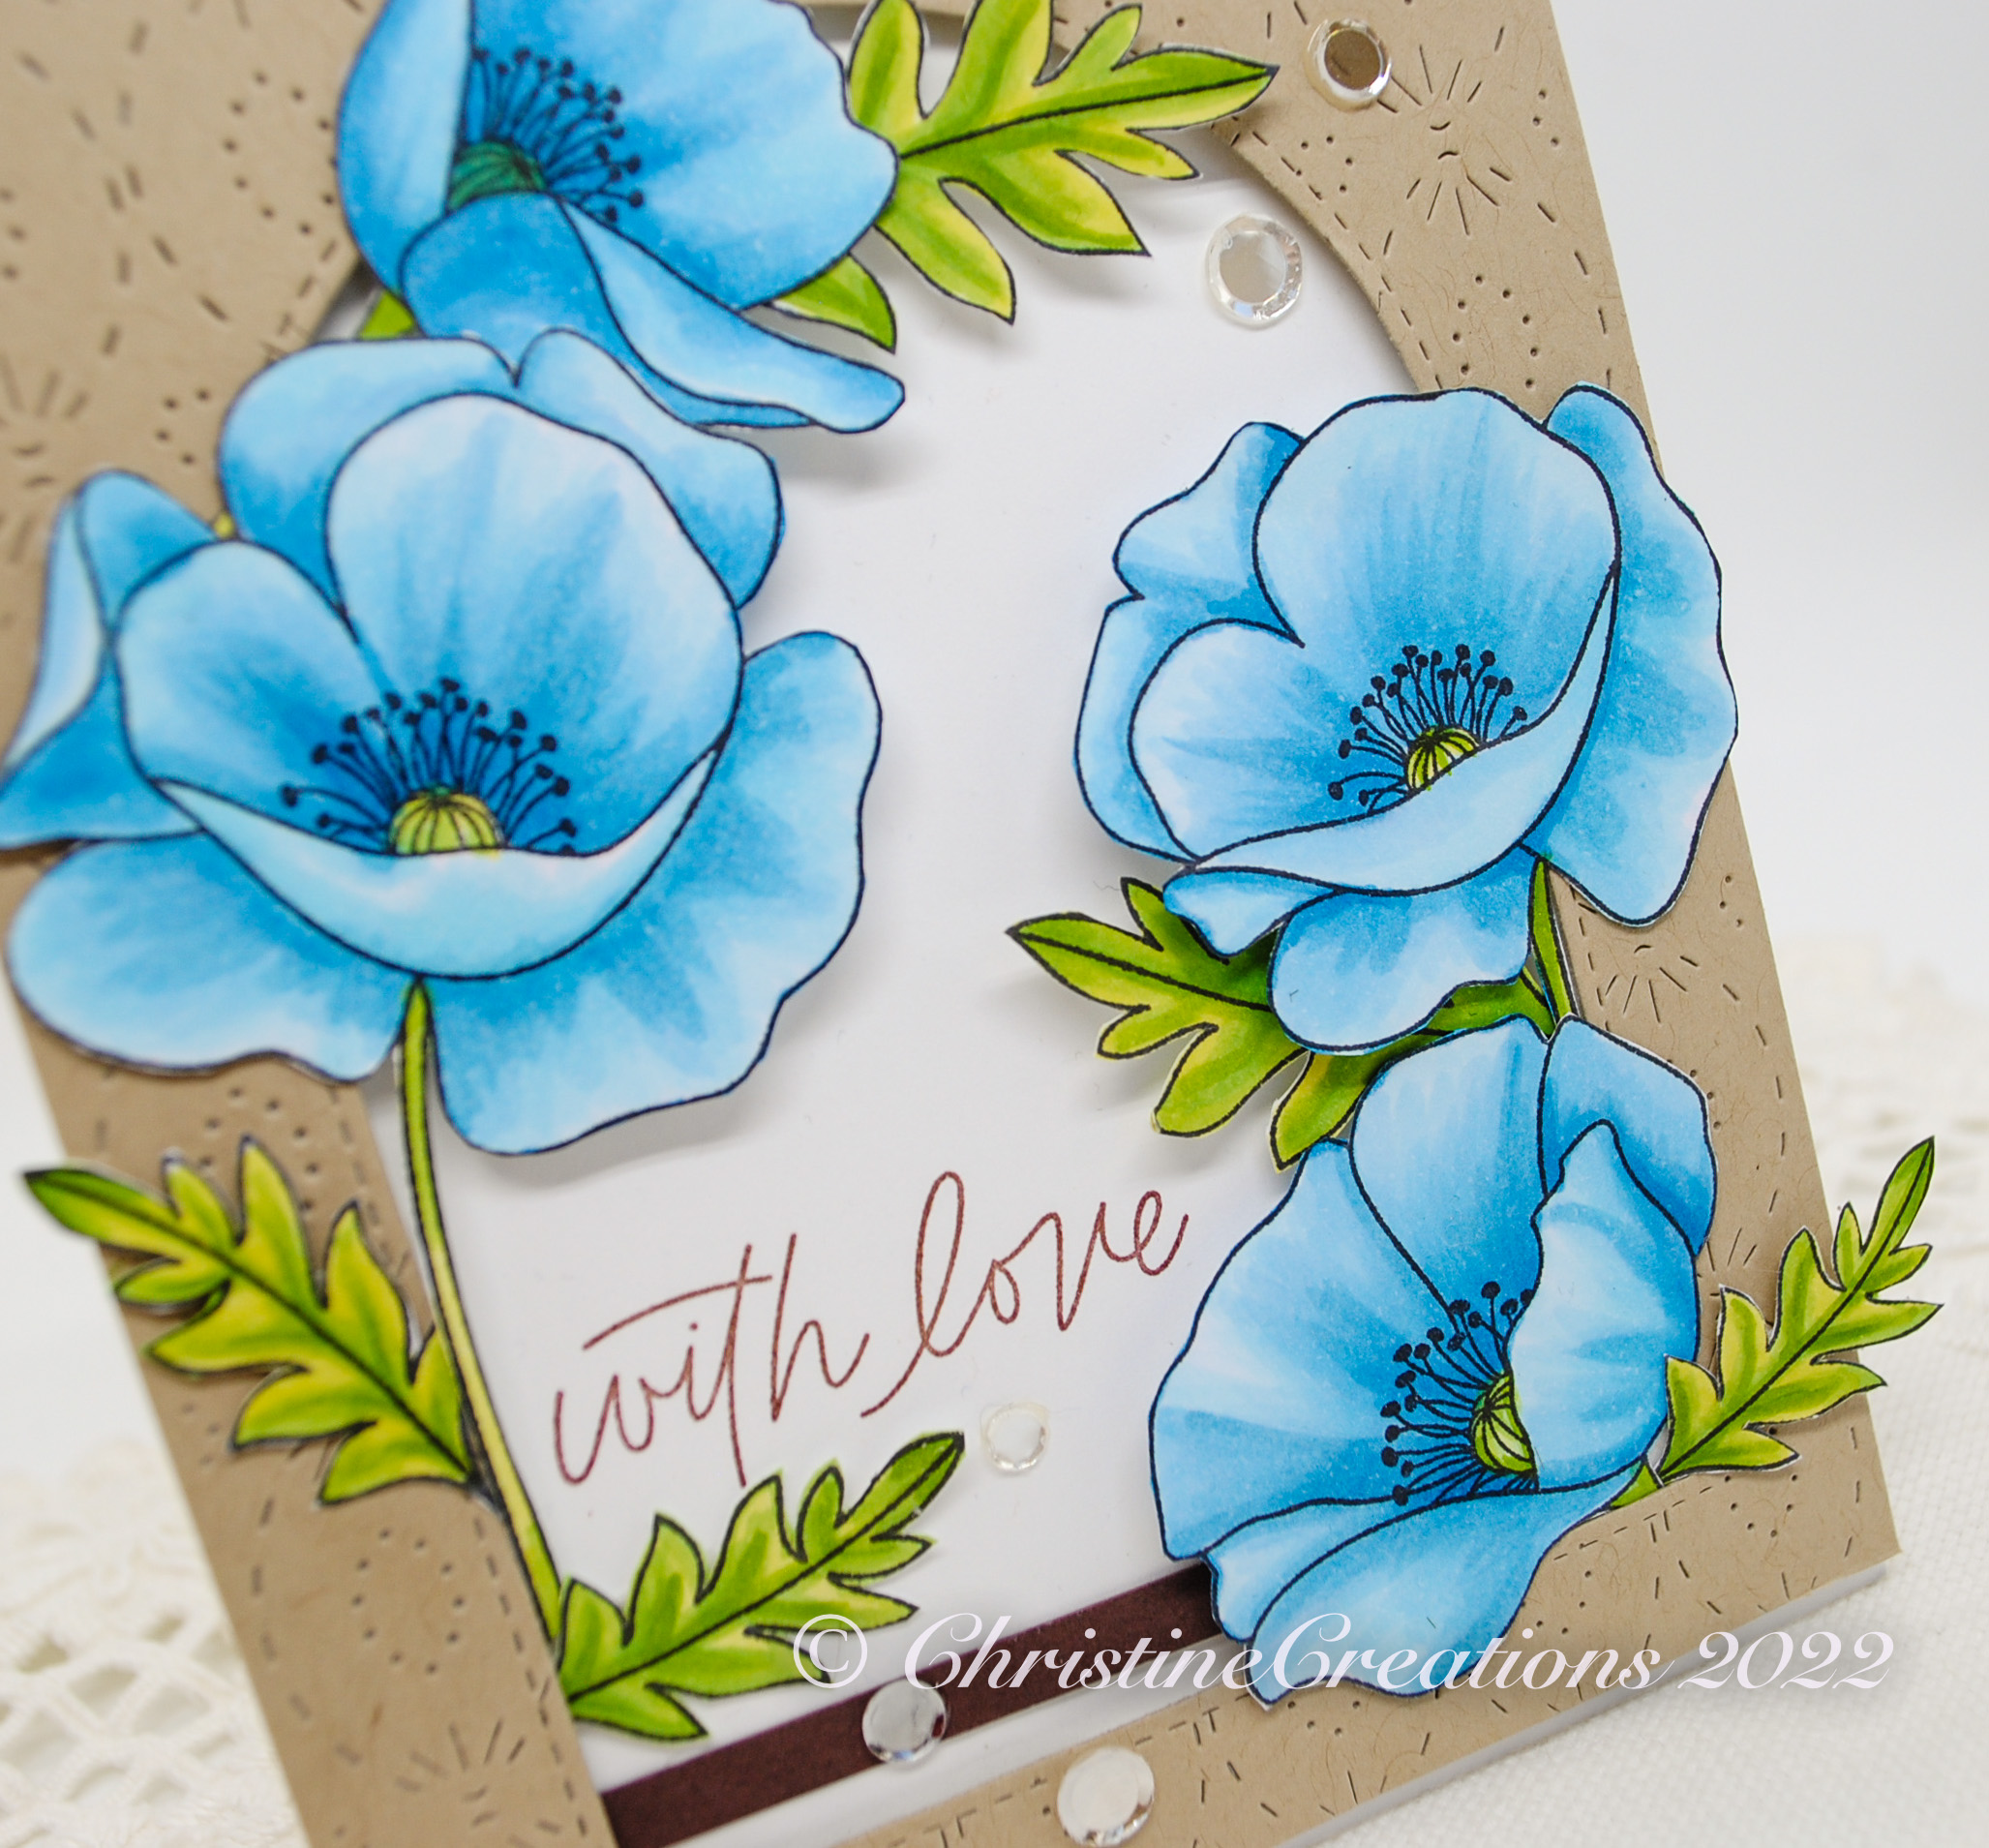
Blue Poppies from MFT


Greetings and Welcome!  Today I’m showing off some amazing poppies from MFT called Pure Poppies.   It’s such a lovely set with simple lines and big open petals.  I’m always a fan of traditional red poppies, but I also wanted to play along in MFT’s color challenge of Kraft, Milk Chocolate,  Lazy Day and Prickly Pear, so blue poppies it is!  Did you know blue poppies are real?  They’re rare, but absolutely exist in nature.  I’d love to see some in person.  

I began by colouring the petals and leaves with B00, B12, B14 and YG21, YG13 and YG25 Copic markers.  They I used a Coverplate from Pink Fresh’s Intricate Stitched Ovals and the Inside & Out Stitched Arch from MFT.  


Next I added the blooms all around the arch and stamped with MFT’s beautiful Everyday Scripted sentiment in Chocolate ink, and a few mirrored sequins to sparkle it up.  Makes for a simply elegant card!  My friend turned 60 this week, so this is perfect for the party!  

Thanks for joining me!

Monday, November 2, 2020

Sparkly Snow Bears


We’re bringing on the sparkle this week with an adorable polar bear from The Cat’s Pajamas, and some super sparkly paper I picked up.  This month’s challenge at TCP is called Tag It and all you need to do is create a Tag or have a tag on your card design.  

So I pulled out the Warmest Wishes Bundle with this little guy and his friends, and coordinating Dies are included.  I was just going to create a tag (as you’ll see below), but then I decided that I would use the tag on a card design.  


But, its just as cute when it’s on it’s own.  I’ve added TCP’s Five Snowflakes Die, behind the sweatered bear, and a cute bow using TCP’s Easy Stitched Bow to top off the Wish Tag from TCP as well.  It makes tag making super slick.  


Some embossing in the background, a cute sentiment label from the Fancy Flip Dies, a couple of holeless sequins finish it off.  

So, please join us in the Tag It Challenge this month!  You could win a $50 Gift Voucher from The Cat’s Pajamas just for playing along!  

Tuesday, September 22, 2020

TCP Release Week: Follow Your Arrow


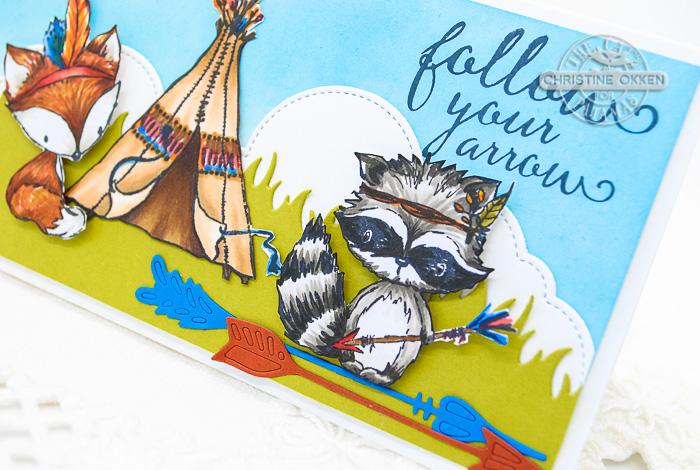
I’m excited to pop in with Sneaky Peek Week at The Cat’s Pajamas!

Today’s set is called Follow Your Arrow, and I think it’s adorable with it’s sweet whimsy.  You’ll find some cute woodland critters and lovely encouraging sentiments.  I’ve created a slimline design that also incorporates a few of the dies we’ll be releasing this week as well.  They make slimline so fun!  


I’ve coloured the fox, raccoon and teepee with Copics, sponged in a summer sky and then added the Slimline Basics clouds and grass hill in the background.  


For accent I’ve added some diecut arrows from TCP’s dies Lacy Arrows in colours to coordinate with the card.  I think they add just the right touch of colour and interest.  


Such a sweet sentiment to encourage others to dream and forge ahead.  We could all use a little of that these days!  

Here’s a peek at what these cute new goodies look like.


And now it’s your turn!  Are You In It To Win It?  


All you have to do is comment on today’s post at you’re entered for a chance to win a $10 TCP Gift Code! Comment on this post and my Instagram Page for an extra chance.  Winners will be announced  tomorrow on the TCP Blog

For even more chances, comment on the rest of the Kitties playing along today.  

Julee
Cristena
Kerry
Melissa
Christine (you are here)
 Brenda

Friday, September 18, 2020

Thankful Harvest Pumpkins


Greetings friends.  Today I’m popping in with a card that moves into Autumn so beautifully.  It’s a great stamp set from Power Poppy called Fortunes of Fall .  You can also get this design in digital version here as Pumpkins and Pears.   In Canada Thanksgiving comes in October, so this is perfect for the upcoming holiday.  And this would be a beautiful centerpiece for a Thanksgiving table wouldn’t it?  


I brought it to life using Copics, finishing off the design with Prismacolour Pencils to give that purple background glow, and give the shadows in the pumpkins a little more depth.  


It’s paired with some fall themed colours in the patterned paper, and accented with this pretty ric rack paper die (MFT) and a few die cut leaves and enamel dots.  A pretty curve along the top of the patterned paper adds interest and mimics the curve of the pumpkins.  


Gratitude is such a gift.  It blesses the recipient, and I think it equally blesses the giver too!  

For more Power Poppy inspiration today be sure to pop by and see:


Friday, August 28, 2020

Power Poppy’s New Healing Bouquet


We’ve got another WOW set at Power Poppy to show you today called Healing Bouquet.  It’s a creative mix of citrus (lemon or lime), lotus flower, eucalyptus, elderberry, and lavender. 

I chose some pretty delicate tones and decided to go with a lime for this arrangement.  I love lime.  All the colouring is with Copics and I kept the other details of the design quite simple so the focus would be on the beauty of the floral and fruit spray.  


The sentiment is from the lovely Power Poppy set, Simply Camellias.  Touches of lace and polka-dotted paper give it an elegant feminine touch.  

For more WOW with this set, please pop on by to see what the rest of the Bloom Brigade has in store for you.  
Christine (you are here)

Thursday, August 27, 2020

Power Poppy’s New Aloe and Oranges


We are so excited to begin the introductions to the NEW Release from Power Poppy with a collection called Fresh Squeezed Scents!  Today we’re beginning with the beautifully unique set Aloe and Oranges!  Isn’t it just dreamy!?  Marcy illustrated such a beauty here!  When she first showed it to us she designed it to run in a vertical fashion, but as I played with it I found it also worked perfectly in this horizontal direction as well.  I printed the image onto Copic XPress it paper in a light grey so it’s about halfway between no-line colouring and a typical printed image.  That’s the transparency of line I like to work with best, and one of the great things about digital images, you can adjust them!


I’ve given it lots of deep rich colouring with Copic Markers and then added detailing in with Prismacolour Pencils.  To give the orange realism and texture I’ve coloured it with a blend of pointillism, and added juicy highlights to the cut orange.  I love the colour contrast between the blue greens of the aloe and the vibrant oranges of the fruit.  Can’t you just smell the citrus fragrance now?  

I’ve added a sentiment stamped with Power Poppy’s Tea in the Garden Stamp Set, and surrounded it with a scalloped edge die and a deep purple layer to really highlight the background and make the images pop.  

Truly a stunning image don’t you think?  

There’s lots more inspiration with the new Bloom Brigade in store....just click on these links to be amazed, and I’ll see you tomorrow with more inspiration!  

Christine (you are here)

Monday, August 24, 2020

Have Yourselfie A Happy Birthday


Hello All!  I’m popping back in with a card I made for my brother’s Birthday this week.  We celebrated with him last night in an outdoor family get-together.  These are times when we all miss my Mom, because she was such a good “celebrator”.  But, we are also grateful to be able to still celebrate.  

So I made him this bright and bold card with the adorable newer set BB Picture Perfect Party Animals from MFT Stamps.  These polaroid style selfie pics are really cute, and I played along with MFT’s Color Challenge this month.  It helps jump-start my creativity when I’ve not created much to play along in some challenges.  

We’ve got a fun gorilla and lion party-ing it up with some celebration banners (County Fair Dies from The Cat’s Pajamas) and then some sequins to give it some party sparkle.  The background paper is MFT’s Party Patterns.  


Colouring is all done with Copics (Gorilla - E71, E74, E77, E79, W2, W5, W7, R14, R17, R29, Y13, Y17, Y38) and Lion (Y32, Y35, E97, E99 and R14, R17, R29, Y13, Y17, Y38).  

See you later this week with an ALL NEW and amazing Power Poppy Release!  

Saturday, August 22, 2020

It’s Pawty Time!


Popping in with a cute little Birthday design using a new set from My Favorite Things called - MFT Pawty Time.  I think Stacey Yacula is a great whimsical illustrator and I’m always in need of more BD cards.  

For this design I coloured up that cute little kitty with Copics, paired it with TCP’s Party Plaid patterned paper  and a sweet sketch from MFT Sketch 503.  I trimmed him out and placed him on a stenciled star card base with the Card-Sized Star Confetti Stencil.  


To match the sketch I added a couple of cute embossed presents in the circle features and a bit of pretty baker’s twine to complete the design.  


Sweet and simple!  

Monday, August 17, 2020

A Bank Robbery


Howdy again Pardners!  I’m back with another Western Slimline design for The Cat’s Pajamas Challenge this month.  This time we’ve caught the sunset Bank Robbery in progress!  This trio of trouble have held up the bank and are running off into the sunset.  I’ve used TCP’s Western Digi Stamp Set cause it’s so darn cute.  

All the colouring on the town and penguins is done with Copics.  


For the background layer, I sponged layers of sunset colours onto the Great Outdoors Stencil  with TCP’s Big Beautiful Blending Brush and some Distress Inks (Rusty Hinge, Wild Honey, Spun Sugar, Blueprint Sketch), and then added a bit of Prismacolour Pencil to give the clouds some extra definition.  It gives it a bit of the look of an aged scratchy photo.  


For some colour I added some stars with the Liners CutUps and accented the sentiment with some Bitty Banners.  


Some twine at each end adds to the rustic western feel, and finishes it off.  

Join us in the Slimline Challenge this month and you could win a $50 Gift Code to The Cat’s Pajamas Store!  

For more Slimline Fun please pop on over and visit the other Kitties in the Cat Pack playing along today. 

Friday, February 16, 2018

Hope Abloom


I think Marcella Hawley is upping her artistic game.  Truly!  She has always brought us such beautiful and whimsical creations for card making, but WOW, it seems she’s taking it to a whole other level lately.  Today’s amazing illustration is brand new from Power Poppy, a stunning digital image called Heart Abloom, part of her Color Stories series this year.  Just look at the beauty!  

Here’s how Marcy described all the details:  A tapestry of spring flowers fill a large, lush heart shape in this Color Story adventure! The flowers for this heart were expressly chosen to celebrate yellows, greens, blues, and purples. We have Daffodils and Narcissus, a myriad of single and double Hellebores, Trout Lilies, and then the surprise guest: Blueberries! 

It was an outright joy to colour this one up in a very spring-like palette.  I happen to really love hellebore - or lenten roses, as I’m sure I’ve mentioned before.  They are so delicate, but also so varied in the colours they come in.  I used a pretty cohesive palette focussing on deep pinks and purples, with the pop of yellow in the narcissus. I’ve mentioned before this combo really works because the yellow and purple are complementary colours.  


I decided to trim the whole heart out with a wee border and place it on a intricate oval die which I covered in glitter.  It helps create the feeling of a victorian Valentine.  To soften the yellow cardstock, I added a layer of embossed vellum behind the heart.   Check out those gorgeous blueberries nestled in there...and then that sweet little snail!  


The image comes with the center banner blank, and with the word hello in it.  I chose the blank one and then added the word hope in bounce lettering, which I’m practising more of.  I wouldn’t say my lettering is super successful because of the curve of the banner - that was a bit harder to letter in a way that made the proportions look right, but I still love the word hope embedded into all these spring flowers.  It gives in an Eastery feel.   

I used a crazy amount of Copics, 34 I believe, so I took two photos of them.  


For more beautiful inspiration today, be sure to visit the rest of the Bloom Brigade playing along, and for more of Heart Abloom, check out the Instant Gardeners Team from Power Poppy, they’ve done some beautiful work with the images from this set!  

Christine Okken
Julie Koerber
Stacy Morgan

and Marcy at the Power Poppy Blog