Showing posts with label Thanks. Show all posts

Sunday, November 24, 2024

Thankful for You with Simon Says Stamp


With being gone all of October, I really didn’t get enough time to create with Autumn themed designs, so I’m sneaking in a couple more this week.  Today’s design uses Simon Says Stamp’s Fresh Air Fall Flowers.  The variety of leaves and flowers give you many opportunities to mix and match.  Once I found a colour palette I liked, I did all the stamping and die cutting. 


Sometimes card designers can feel like florists don’t you think?  Playing around until we find an arrangement we like?  I placed the layers on a card base with The Greetery’s Herringbone Parquet Die.  It adds great texture.  


The sentiments in the set are really great, especially for the season.  Have a happy Monday!  
 

Wednesday, November 6, 2024

Berry Grateful Wreath with The Stamp Market


Wreath Shaped card with 3d leaves and embossed sentiment

Hello!  We had our first snow that stuck (for a day) this week.  It’s put me in more of a Christmas mood....while still wanting to hold on to Autumn as long as possible.  And while we’ve had Thanksgiving already in Canada, its always good to be full of thanks no matter the circumstances.  So today’s card is a bit of a transitional design between Thanksgiving and Christmas with new goodies from The Stamp Market.  This is the October Kit from The Stamp Market, and it includes a gorgeous oblong wreath for a shaped card design, lots of dies to accent the wreath and a coordinating sentiment set, dies and paper in the kit.  It’s a beauty!  


I went with some cool greens from the kit to design my wreath, and rather than flowers in the wreath, I only used the flower centers to create berries for the greenery.  Perfect to lean it more toward Christmas. Each bit of greenery was ink blended to give the leaves some extra dimension and colour.  


The sentiment is a lovely one, and I embossed it in silver and used the coordinating dies to cut it out and pop it up with foam.  With such great texture and colour, it didn’t need anything else to still be a gorgeous shaped design.  

Tuesday, September 24, 2024

Mush-room for Gratitude with The Greetery


Mushroom Gratitude Greeting Card

Hello and Happy Tuesday evening!  I don’t know where you are but we are getting a few extra days of Summery weather this Autumn and it’s a delight to enjoy.  However, my creative hands are much more interested in all the Fall colours and textures.  Today I have a card created with The Greetery’s Botanicuts Toadstool Garden dies.   I began by cutting out the toadstools in a variety of warm colours along with some grass with a retired die from The Cat’s Pajamas.  


After assembling the toadstools, I added some Copic marker accets to increase the dimension on the fungi, and placed it all on a Lemongrass background which I ran through The Greetery’s Pierced Plaid Pierce Plate.  My goodness, does that ever give you beautiful texture!  I created an “interior frame” with a stencil and white ink, and also incorporated a cross-stitch frame with The Greetery’s Hoopla Oval Die, outlining some of the woodgrain details in the frame with a Copic marker.  


The sentiment is from The Greetery’s Thankful Heart Stamp and Stencil set.  And just to balance the design I added in a wood veneer butterfly which I added some colour to with ink, Copics and a white gel pen.  It’s definitely feeling Fall!  

Thanks for joining me today! 

Thursday, September 12, 2024

Covered in Blossoms with Pinkfresh Studios


Hi!  I’m back with a another Summer card for this week.  Even though the weather today was decidely Fall-like, I’m bringing the blossoms with this lovely set from Pinkfresh Studios called Handpicked Flowers.   I was totally inspired by one of the sample pictures on the Pinkfresh site that I both had to have the set, and then did my own version of one of the cards.  

I started by using the coordinating stencil for the set on various parts of the cardstock in warm summery shades to cover most of the layer.  


Then I embossed the stamp set over the stencilling in white to give some definition to the petals.  I cut a tiny strip of white for the smaller sentiment, and added in a leafy vellum branch beneath this layer for a bit of whimsy.


And finally, I added the larger sentiment from the set cut with the coordinating die for this stamp set.  No extra embellishments needed with the romantic pattern of the flowers!   Thanks for stopping by! 

Saturday, July 13, 2024

Stitching Saturday Delphinium


After a bit of a break, I’m back today with another stitching Saturday design.  This time it’s some towering delphinium just like I have starting to bloom in my flower beds.  This bluey-purple shade are my favourite!  I loosely followed a pattern I found on the web, using The Stamp Market’s adorable Embroidery Hoop dies.  


The blue cardstock is run through Simon Say’s Stamp’s Pincushion Plate Wafer Die, to coordinate with the holes of the cross stitch die.  Then I added in a frame of green 1/4 inch Quick Strips from The Stamp Market.  


The foiled sentiment is a really pretty one also from The Stamp Market called Best Wishes Foil Plate.  

It makes for a sweet little Summer thank you note!  

Thursday, July 11, 2024

Big Thanks with Concord & 9th


Slimline Thanks Card with Floral background

Hi!  Earlier this Spring I purchased enough from Concord & 9th to get a little add-on paper pack.  Well, on this paper pack was a lovely “Thank you” lettering as part of the packaging.  Well, you never see a cardmaker wasting anything pretty, so I set it aside for just this occasion!  

I paired the colours of the big THANK word with Concord & 9th’s Flower Medley stamp set and stamped a whole bunch of blooms, die cut them with the coordinating dies and then made a little arrangement around the slimline sized card.  Colours are Dragonfruit, Clementine, Oceanside, Tidepool and Parsley.  


Next the letters are popped up on foam tape, and I added the “you” that is part of the sentiment in the stamp set on top of the K so it would complete the words.  To fill in some of the white space, I stamped a few of the tiny petals in.  Some white gel pen accents the letters too, creating the illusion of shine.  


Feels very bright and cheerful, and such a fun way to make use of packaging!  

Tuesday, April 23, 2024

Empire Inlaid Colour Bunch with Concord & 9th


Hello again stampers!  Sometimes you’ve just got to go for all the rich saturated colour!  Today I did!  I recently purchased some wonderful things from Concord & 9th including the Empire Inlaid Card Front Die and this wonderful bouquest set called Flower Medley (Bundle), and then just went for a fun colour combination to create.  


The inlay is not complicated, but just takes some time and patience, and honestly there are so many ways you could use this die, simply as texture on a single colour, to intricate arrangments.  It’s a scene stealer for sure!   I added the pretty scripted sentiment from C & 9th’s Short and Sweet Dies.  They are just the perfect size for a card.  All the flowers are inked with coordinating inks and then die cut and placed in an arrangement that makes the most of the background.  


Thanks for your visit today! 

Sunday, April 14, 2024

Monday Sunshine with Concord & 9th


Hello!  How about some sunshine to get ready for Monday morning?!  I have a cutie here from Concord & 9th with their newest Turnabout Stamp called Folkart Flower.  These stamps are a nice way to create your own layers of colour in a patterned paper style of print with up to 4 colours of ink, or you can stamp with less colours, even monochrome.  And this one is extra fun because you can choose to remove the center of the stamp to make space for a focal image.  I picked a fun colour combo I liked that sang Spring to me.  


I’ve paired the background stamping with some pretty die cute flowers from the Build a Bloom Dies to coordinate with the stamping.  This card is a 5 x 5 size.  


The sentiment is from the Turnabout Stamp, and I’ve added some extra enamel dots and leftover paper pieces to accent the middle like confetti.   

Thank you for dropping by!  

Wednesday, January 31, 2024

Flower Power Patterns with Concord & 9th


I am so inspired by colour and pattern.  I think it comes from my history having a mom who was a seamstress.  We were often in fabric stores and I loved looking at all the designs, patterns and colours.  Something would always catch my eye!  Today I’ve created two sweet card designs with the same flowers and colours, but in different arrangements of pattern.  

For both of the cards I used Concord & 9th’s  Parcel of Petals  and  Flower Medley die sets.  I’ve been thinking about this colour palette for a while and how lovely it would look on cream and on navy, so I did one of each!  


Each card base begins with die cutting C & 9th’s  Basket Weave Card Front for texture on the card base.  It makes a great starting point for all the flowers.  On this cream design I went for a completely random bunch of flowers and then the sweetest little sentiment from the new Short and Sweet dies.  


Amazing, but there are NO stamps on the entire card!  Just sweet little enamel dots on some of the flowers. 


For the Midnight cardstock design I sent for a more arranged bouquet style.  Still quite random in all the flowers coming together but a little more recognizable as an arrangement of flowers.  


The sentiment also from the Short and Sweet dies makes the anchor of the mini bouquet.  You know those little sentiments that are just the right size?  Yeah, this is one of them.  


There you have it, random on cream, or arranged on Midnight.  Which one is your favourite?  

Sunday, January 21, 2024

Silvered Anemones with Spellbinders


Hello!  The magic of foiling is something I’ve really enjoyed these last months.  So, over the Christmas season of sales I picked up a few foiling dies that I thought were lovely.  This one, the Anemones Etched Dies  was one of them. And wow what a pretty design it is!  

I chose to foil on Copic XPress It Blending cardstock so I could colour the petals with purple shades of Copics.  I foiled and coloured the image a couple of times and then split it apart to be able to add the arrangement in 3 sections.  


I knew I wanted to layer the flowers over dark cardstock, so I also embossed this black layer with a Spellbinders Origami Folded 3D Embossing Folder.  The texture is perfect for the flowers.  
 

I added another foiled sentiment from Spellbinders to border the bottom from the Mini Everyday Sentiments.  I’m really loving this silver foil, as it turns irridescent as it catches the light!  Makes for such a great effect!  


Wednesday, January 3, 2024

White on White with Simon Says Stamps


It’s a clean slate for a new year!  Simon Says Stamps has a fun Instagram Challenge to use white on white for your design, so today I played with a little snow!  It seems crazy that we had a brown Christmas here!  Unheard of in all the years I can remember, so honestly I would love to have a snow day!  The peacefulness of it and the hush it brings to the world is so special.  

For this design I used numerous snowflake dies that were retired from The Cat’s Pajamas Stamps and layered them over one another with different papers - vellum, cardstock, glitter paper to create a really dimensional flurry of flakes.  


The base layer is a beautiful die from Simon Says Stamps called Pincushion Plate.  It creates a beautiful layer of texture for the snowflakes which works perfectly for a white on white card design.  


I’ve added foam dots between the layers of snowflakes to give more dimension, and a lovely little foiled sentiment from Spellbinders called Must-Have Sentiments Glimmer Hot Foil plate and die set.   Done with some sparkly foil it is a perfect touch.  The holeless sequins add another layer of sparkle and die into the holes in the background plate.  Such frosty elegance!  


Monday, November 20, 2023

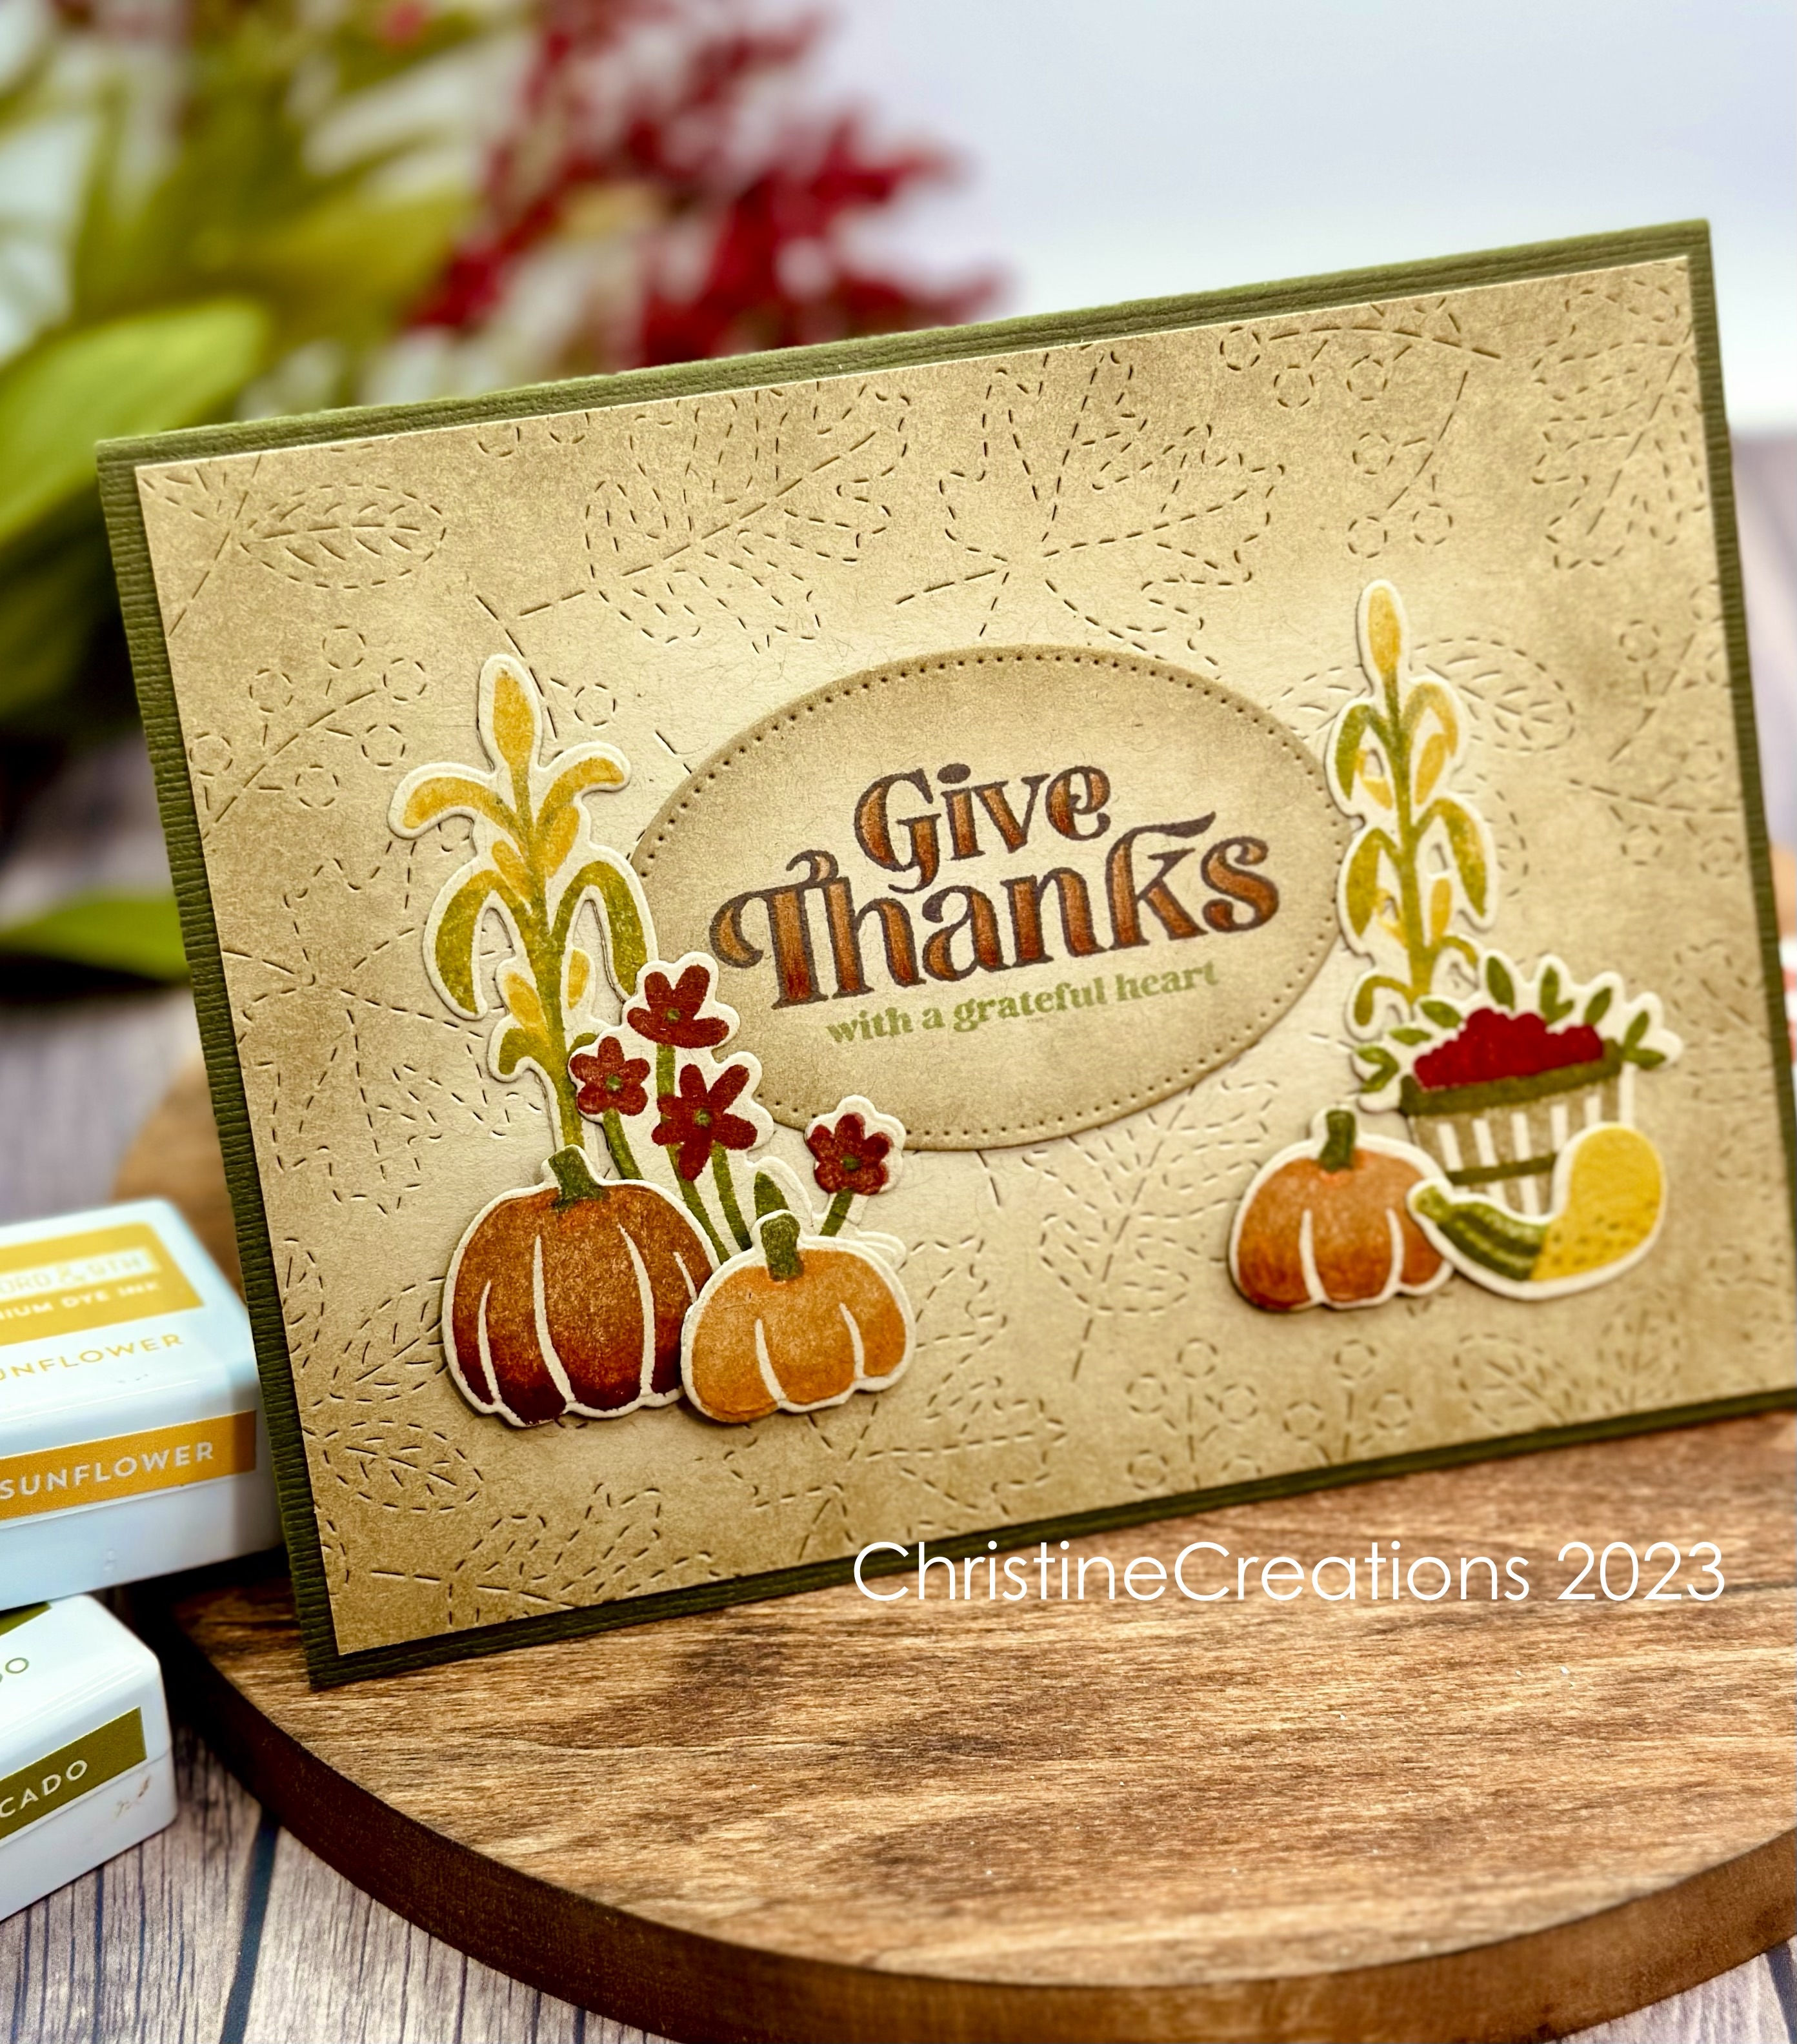
Give Thanks with The Greetery


A few weeks ago I was the speaker at a ladies retreat, which was a great event to be a part of.  So, I just popped this warm and rustic card into the mail to say thank you to them for having me.  I used The Greetery’s Thankful Heart Stamp and Stencil to create a simple mailable design.  

I used the elements in the set to make a little harvest scene, placing it on a kraft coloured background cut with Concord & 9th’s Stitched Leaves Card Front Die.  A match made in heaven!  


I added a little extra colour to the harvest elements with prismacolour pencils, and stenciled in the colour for the sentiment.  


Sweet and simple, but heartfelt!  Happy Thanksgiving to my American friends!  


Monday, September 25, 2023

Floral Cross Stitch Hoops


Hello!  I’ve just returned from a work trip to the US, and picked up a few goodies while I was away.  Saves me so much in Duty to have it shipped to where I’m staying, so I have all kinds of good things in store for the next few weeks.  I’m starting with this beautiful product suite from The Greetery from July called The Handiwork Collection.  Since my Mom was a seamstress and our daughter is a cross stitcher...and I dabble in both, it has so many lovely elements that combine for great textile themed cards.  

For this design, I used the Hoopla Oval Die, the Rose Tapestry Stencil (dreamy!) and the Aida Texture Plate with some lovely colours to create this pair of hoops.  I love that all the hardware for a hoop is included, and you can see the woodgrain texture on the hoop.  


I also created a background design to match the colours in the stencil with the Floral Sampler Stamp Set,  adding in a layer of vellum between the layers to soften the colours and patterns.  


The gratitude sentiment is stamped and stenciled with The Greetery’s Thankful Heart Stamp and Stencil, making it perfect for a Thanksgiving design.  All of those florals have such a great vintage feel!

Thanks for joining me today!

Sunday, August 27, 2023

Hollyhocks on the Fenceline with The Greetery


Hollyhocks are such a welcome sight in late summer.  The other day it was raining and my hollyhocks on the back fence were just glowing against the wet cedar wood.  It made such a pretty sight, I thought I’d try and recreate it in card form.  I pulled out The Greetery’s Botanicuts Hollyhocks and my Concord and 9th inks and blended the stems and blooms.  


Here are my hollyhocks on a sunny day with the fence in the background so that gives you a bit of the idea of where my inspiration was coming from.  


I ran the background layer through a woodgrain plate and sponged some green ink overtop, and paired that with The Greetery’s Wood Slice Hearts dies to capture that warm wood feeling of the fence.   


The sentiment uses The Greetery’s Thankful Heart stamp set, with just a bit of colour added using Copics.  Hope you in enjoyed my inspiration journey!  

Tuesday, August 8, 2023

Gratitude Plaid with Power Poppy


Oh it’s inevitable isn’t it?  Autumn is coming.  I’m just not ready!  But today we’ve had a rainy day and tomorrow it will be the same and it feels a little bit like fall is not so far away.  This pretty design is a Power Poppy digi called Bittersweet Thanks.  The combination of Sunflowers, Chinese Lanterns and bittersweet is a pretty one, especially with that lovely gratitude banner floating through.  Colouring is with Copics, and then fussy cut out.  


Layered up with pretty rich colours and layers of die cut Plaid Card Front Bundle from Concord & 9th.  It adds such great texture and pairs all the colour together beautifully.  The woodgrain banner uses an old embossing plate from PaperTrey Ink, and the little heart sprig uses PTI’s All You Need is Love.  

So, I’m easing into Autumn a little reluctantly, but also full of gratitude for all the lovely things ahead.  

Thursday, August 3, 2023

Stencilled Summer Combo


Hello Summer!  Today I’m bringing you a fun colour palette that speaks summer to me.  It’s using the new Cottage Garden Bundle from Concord & 9th .  As soon as I saw that cute stencil I knew it had to be mine.

For this design I used a number of inks from Concord & 9th, in sunny colours: Honeycomb, Sunflower,  Artichoke, Dragonfruit and some touches of Black.   After stencilling I spritzed the cardfront with water and lifted the ink with a paper towel, producing a lovely mottled effect.  


To tie in the sentiment strip saying “You’re the Best Ever”, I lined it up with the stencil as well, it gives it a nice bit of “camoflauge” to the card background.  To accent around the popped up sentiment I used the Quilted Cardfront die above and below the sentiment.  Playing along this month in the Simon Say’s Stamp IG challenge for Stencils!