Showing posts with label Wedding. Show all posts

Friday, April 25, 2025

Peony Sunshine with Pink Fresh Studios


Happy Friday!  Today I’m bringing a little floral sunshine with this pretty new set from Pink Fresh Studios, it’s called Peony Perfection.  In my garden I have 7 different peony plants, and one of my favourite ones is called Coral Charm, so I coloured the blooms with that variety in mind.  The set comes with coordinating dies, which I used to cut them out.  


I stamped the background layer of the card with the set, then added texture with the Dotted Chevron Coverplate Die.  Each of the blossoms are popped up.  


Isn’t that sentiment a lovely one?  A perfect way to congratulate someone, or use as a Wedding design.  

Thursday, January 30, 2025

Love Letters with Honey Bee Stamps


I love looking at stamps and products in a new way!  When the postal strike was on in Canada, my Christmas order from Honey Bee Stamps was delayed well over a month, so the very lovely Floral Noel Honey Cuts and stencils didn’t arrive until Christmas was over.  That felt disappointing, so I wondered if there was something else I could spell with this pretty floral lettering.  And....creativity struck!  I could Valentine the set by adding in a “heart” for the V in LOVE.  Perfect!  


The letters are stencilled, ink blended and cut with the coordinating die set, along with the extra flower sprays.  I also ink blended a ombre argyle die background to look like lattice.  


With some pretty sequins and pearls its fancied up for Valentine’s Day, or a wedding perfectly!  

Friday, August 30, 2024

Cozy Sweater and Red Rose Drama with Crafty Meraki


Well Hi!  I’ve got a fun surprise today as I am guesting with Crafty Meraki’s August Release called the Bountiful Release!  I have two cards to show you today, one with lots of texture and one with lots of drama!  

First up is this pretty clean white design showcasing the new dies called Strip Suite Chevron Chic.  Its a fantastic set of dies that come in three chevron patterns for borders - or as I’ve used it on this design, a whole card front.  To me it has the look of a cableknit sweater.  


After adding the chevrons to the cardbase, I also cut out a little bit of foiliage with the Olive Leaf Meraki Para-Dies, in deep green cardstock, and then the sentiment with the Meraki Moments Hello Para-Dies, in sparkly white glitter paper.  It’s simplicity is so striking.


To accent and keep it simple - I added one tiny red “chevron” piece, that I think reads like a sparkly red heart!  
Next up some bold colouring drama! 


This pretty flower spray uses the gorgeous previously released Birthday Bouquet Stamp Set , I stamped the image on Copic XPress It Blending paper, and only used a portion of it, colouring it with Copics and coloured pencil.  


The card base is treated with some deep mushroom ink blending to deepen the surface, then I added the brand new Zig Zag Zoom Die cut strip to the card base in varying widths.  It makes a great backdrop to the flowers!


The card is finished with an embossed sentiment from the stamp set, and a few enamel hearts which make it perfect for a Birthday - or a Wedding!  

If you pop on over to my Instagram page you’ll see lots more inspiration on the Hop for Crafty Meraki today!  And YOU COULD WIN a gift certificate to the Crafty Meraki store!   

Thanks for joining me today!

Tuesday, August 20, 2024

A Washi Bouquet with Pinkfresh


Hello!  I’m popping in with a card for the monthly challenge at Pinkfresh Studios!  This month it’s theme is Washi Tape.  And if you buy washi tape from Pinkfresh, it’s no regular striped or dotted tape of old, this particular one I used is called Artsy Floral, and it coordinates with their suite of products in that theme.  It’s a gorgeous blend of florals with touches of shimmery gold.  I pulled out a section of washi and taped it onto white cardstock, and used the coordinating Artsy Floral die to cut the flowers out perfectly.  


I created a lattice background for my flowers with the Elongated Lattice die, placed it over the white card base, and then added some sparkly framing with the Rounded and Braided Rectangle die.   Then it was a matter of floral placement.  


It’s perfect for a wedding or a birthday with the pretty stamped sentiment from the coordinating stamp set.

Monday, June 10, 2024

Bridal Shower Flower Set


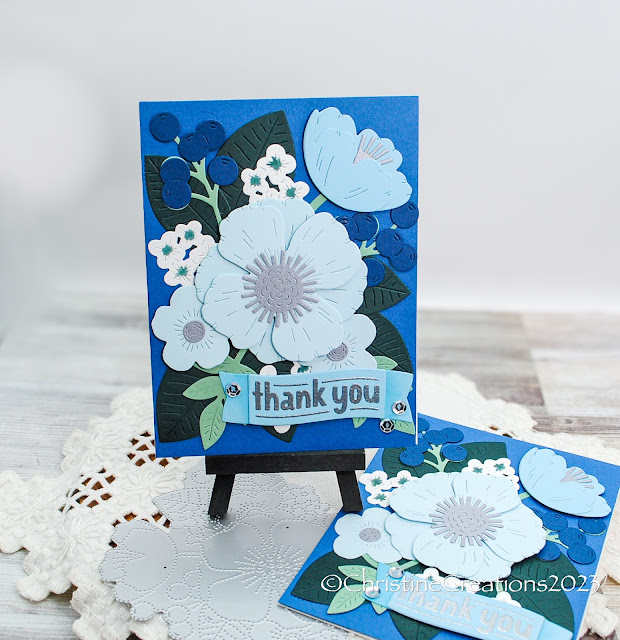
As I mentioned last week, we attended the graduation and wedding of our nephew in Colorado Springs recently.  There was also had a bridal shower for our new niece and I was glad we could attend it as well - it was a really special way to get to know her through the people that love her.  For part of her gift I made a coordinating set of thank you cards.  Eight of them in 4 styles.  You can always use thank you cards from a wedding!  So I started with Concord & 9ths beautiful bundle, Primrose Garden, and then all the coordinating colours from the wedding.  Then it was a delightful time of arranging the blossoms!


For this first design, I made an arrangement and then laid it out on a Quilted Card Front Die background of white cardstock.  The large flower centre is cut from metallic silver cardstock and the sentiment is embossed in silver on the banner.  I added silver sequins on all the cards for a bit of bling.  
 

This second design makes use of the imprint die pattern from the larger die (pictured beneath) and the flower are arranged on top of it.  The layering comes together so quickly with that dotted imprint.  


The cardstock colours I used for all the designs are Powder, Harbor, Blueberry, Midnight, Eucalyptus, Rainforest and white.  


This third design is also layered on the Quilted card base, with a more minimal flower arrangement.   


You can see I added some Copic colouring to the tiny white flower centers so they wouldn’t get lost in all the colour.  


This last design is my favourite because I used the main die to cut out the card front shape, so it has the most unique style.  You can also see by the flatlay card on the right, how much dimension is between the layers.   


Lots of extra volume in the flowers and berries on this design.  


And here are the eight cards together! It looks like a beautiful flower garden!  And an easy way for her to send a thank you card to someone on her gift list.  

Thanks for popping by today!  

Sunday, May 26, 2024

Blue Peony Wedding with Pinkfresh


Hello there!  Next week we’ll be celebrating our nephew’s graduation from the Air Force Academy, and his wedding two days later.  We have known this nephew since the day he was born and our families are close.  Our sons are groomsmen and we’re looking forward to a great celebration.  The colours of their wedding are blues and greys, so of course as cardmakers we always want to coordinate!  I pulled out the very lovely Peony Fantasy Bundle, including the Hot Foil plate, the stencil and coordinating dies, and worked with pretty blues and soft greens on white cardstock.  I added in a little coloured pencil blending in a few spots to soften the effect or deepen the blues.  Next, I also embossed some peonies in silver onto vellum using the stamp set and ink blended colour on the back of the vellum.  


I used the Braided and Rounded Rectangle Dies from Pinkfresh to form a frame for my flowers, and also used the Dotted Chevron Coverplate die on the blue cardbase for more texture.  Then it was all about arranging the flowers on the frame!   The sentiment is Mini Everyday Sentiments Glimmer Hot Foil from Spellbinders and I stacked two small sentiments together foiling them to create a little banner.  

Just a couple of silver enamel dots accent the design.  Looking forward to celebrating this delightful occasion!  


Tuesday, April 30, 2024

An All Dies Wedding Design with Crafty Meraki


Hello and Happy Tuesday!  Today I’m bringing you my last design as Guest Designer for Crafty Meraki this month.  It’s been a joy to create with these beautiful products, and I hope you’ve had fun being inspired with me.  


My design today is ALL about the dies!  I began with this gorgeous intricate floral called Peony Artisan Floral Para-Dies.  It really captures the intricate and feathery petals of a peony.  I die cut it two times in different shades of peach and glued all the layers together combining the colours to get some depth in the design.  Next I formed the leaves and added in Olive Leaf Meraki Para-Dies in both the golden yellow-green and the deep peacock blue.  All the layers were attached with glue or foam dots for a bit of dimension. 

This colour combo packs a big punch!  I love the rich colour contrasts!  


The sentiment is foiled in a deep turquoise using Crafty Meraki’s Handmade Love Hot Foil Plate.  It’s perfect for a wedding or just to tell someone you love them.  


Sunday, April 28, 2024

Rose Gold Flower Garden with Pink Fresh Studios


Hello!  Today I have a pretty design that could be beautiful for a wedding or birthday design using new products from Pink Fresh Studios in the Artsy Floral Bundle.  I haven’t made use of Washi Tape forever, but their gorgeous detailed tapes are stunning with all of the watercolour-y details and gold foiling, I’m really glad I tried them out.  This is Artsy Floral Washi and coordinating die.  It really makes for a quick and polished group of florals to play with.  I used the washi tape on vellum and then trimmed out with the dies.  


Next I made a circle card design and used the Intricate Stitched Ovals Coverplate to add texture to the base, and ink blended a bit of green ink on this layer.  Then I die cut an inner circle out of rose gold glitter paper to play along with the PFS April Challenge of circles and used that as my frame for all these luscious petals.   The sentiment is from the Artsy Floral Stamp set, embossed in Rose Gold.  Lots of shine and shimmer in this one!  


Finishing touches included a few rose gold sequins and gold enamel dots to accent the design.  Such a pretty flower garden!

Tuesday, April 9, 2024

Petite Flower Frame with Alex Syberia

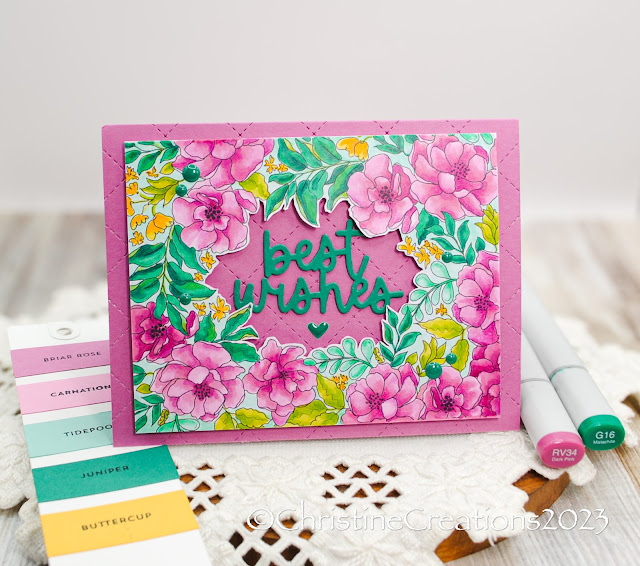
Floral Framed Best Wishes

Hello on this Wednesday Eve!  I’m back with some more pretty and petite flowers from Alex Syberia called Grateful Heart it’s a digital design and right now Alex Syberia is working on a reopening, so I won’t be able to link the image, but oh isn’t it the sweetest?  I love the little flowers in a frame.  


Colouring is done with Copics and finished with coloured pencils, and then I fussy cut out the center of the design to make room for the background of the card base in this pretty Briar Rose colour from Concord and 9th.  That layer is run through the Quilted Card Front Die.  


I die cut the sweet sentiment from Concord & 9th’s Everyday Expressions dies, layered 3 x for some thickness.  Then a few enamel dots to sweeten the finish!    Pretty cute!   

Monday, January 15, 2024

Cupids Forever with TCP!


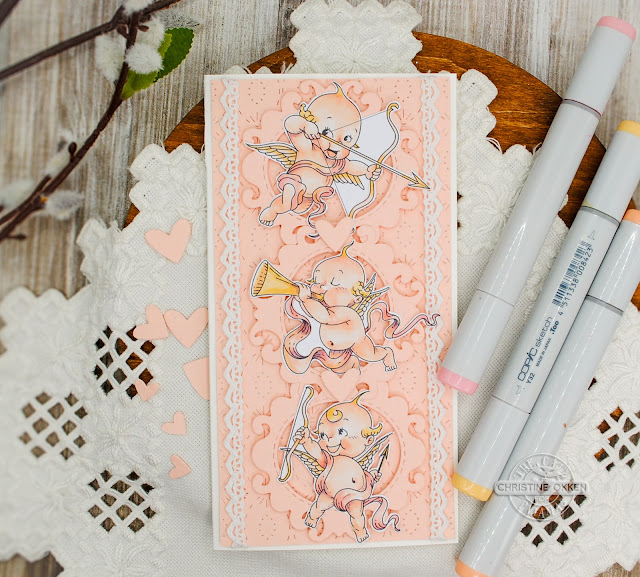
Well hi again!  I’m back today with an adorable design for Valentine’s or a Wedding that I think you’ll love!  It’s got so much classic vintage Valentine flair!  It’s new from TCP this month and is called Cupids Forever.  I think they are just adorable.  

I started with some Copic colouring in peachy shades with a nod to Pantone’s 2024 Colour of the year this year “Peach Fuzz”.  I happen to LOVE peachy shades, so you might see more of these glowing peach colours ahead!  Each image was fussy cut out, and then placed on a mini slimline design with retired TCP dies to be vintage “windows” for each of them.  


I’ve added some little hearts as accent between the cupids.  I chose not to add a sentiment because then it is open for use for Valentine’s and for a wedding.  To make it a bit more vintage I added some pretty crochet lace.  There are so many more cute cupids in this set too!  


 Aren’t they all just precious!  Thanks for joining me today.  


Sunday, July 30, 2023

Indigo Blues with Pinkfresh Studios


Hello!  In a recent purchase from Pinkfresh Studios, they included a lovely freebie called Indigo Vines stamp set.  It’s a lovely combination of sketchy leaves and sentiments that was a really nice surprise.  When I saw it I knew it would be a great set to watercolor, and you can’t get any more simple than stamping the image in ink on watercolor paper, then using a brush with water to spread out the colour.  


After watercolouring I trimmed out each leafy piece and created an arrangement I liked.  I found a great sketch from Freshly Made Sketches that made the design shine, with all the action up top and a clean bottom half of the card.  A little like a mullet (wink!).  


For the bottom of the cream cardstock base I ran it through Pinkfresh Studio’s Intricate Stitched Ovals.  The sentiment is from Spellbinder’s Yana’s Sentiments foiled in gold.  It’s a lovely classy touch.  To tie in the gold foiling I did a little gold splatter for a lovely elegance!  Thanks for stopping by!  

Monday, June 5, 2023

Be Happy Blossoms from TCP

Floral Frame Card with Gold Embossed Sentiment

Hello TCP Friends! Im bringing you a new round of inspiration for the beautiful summer season of flowers!  

Today’s design uses the beautiful TCP Polymer set called Sketchy Flowers (retired).  Its one of my all time favourite sets from TCP with its loosely lined florals and leaves.  I stamped an arrangement I liked using my Misti Tool and Memento Desert Sand Ink to really fade away with a no-line look.  

Floral Frame Card with Gold Sentiment

But there is nothing fading about THESE blooms!  I gave them a lot of vibrant colour with Copics, and this time I chose not to blend out the colours as much  between the values as I usually do, and let it be really graphic, almost Andy Warhol illustration style.  It allows all those saturated colours shine! 

Flat lay view of floral framed card showing gold foiling and embossing

Once I was done colouring, I added a gold foiled frame over the flowers, cut out the centre of the colouring layer, creating a “floral frame”.  Beneath the floral frame, I used a cover plate to emboss the cardbase, and then embossed the pretty sentiment and heart from TCP’s Scripted Sentiments (retired) in gold.  

Flatlay Floral Framed Card

A few irridescent holeless sequins finish off that touch of sparkle!  Its a FUN summer design!  

Monday, August 15, 2022

The Blossom Challenge: Sentimental


Hello Friends and Welcome to the August edition of the The Blossom Challenge.  I’m bringing you this month’s The Blossom Challenge, and we’re Going Sentimental, focussing on Power Poppy’s beautiful selection of sentiments.  

Today I’m bringing you two inspiration cards with Sentiments as the focus.  

First up is a design I made for a recent wedding.  


For a lot of years my husband and I were youth pastors and it’s been fun to see our former students get married over the years.  This wedding was a delightful one with the bride from Indian-Canadian descent and the groom from British-Canadian descent, the mix of cultures and colours at the wedding was gorgeous.  This palette reflects the colours in the wedding of orange, pink, coral and red.  I’ve utilized two beautiful Power Poppy sets,  Hummingbird Paradise as the beautiful floral frame, and then one of my ALL TIME favourite polymer sets from Power Poppy Big Scripts.  Did you know that this set features hand drawn sentiments by Marcy?  I just love her scripty writing.  


To highlight the sentiment I embossed it on white cardstock, then sponged warm shades of Distress Oxide Ink, Seedless Preserves and Abandoned Coral around it, wiping the ink off the sentiment once it was done.  The floral frame is fussy cut out in a windowed design.  


Next up is a Clean and Simple design:


Dear friends of ours move away today to another city in the province.  We are going to miss them terribly.  Over the years we’ve watched them grow from a newly married couple to a family of four.  We’ve shared a love of creativity and the mountains, so this design is a bit of a nod to our friendship, and the fact that they are moving closer to the Rockies.  Similar to the first card, I created a background of a sunset sky using Distres Oxide Inks: Tumbled Glass, Wilted Violet, Abandoned Coral and Seedless Preserves, spashed some water on the background, then embossed this awsome encouraging sentiment from Power Poppy M-Powering Words (currently sold out in polymer) onto the beautiful colour of the background. 
 

I used a framed arch die to accent the sentiment, and then hand-drew in a silhouette of our favourite mountain range in Canmore, Alberta called the Three Sisters, filling it in with a black Sharpie, and added a punch-cut sparkly paper moon.  


You’ll definitely want to check out The Bloom Brigade’s creations this month, they are fabulous inspiration!  

And....Here’s a link to the Power Poppy Blog to enter your Sentimental Creation!