Showing posts with label Gift Ideas. Show all posts

Thursday, July 25, 2024

Waffle Flower Kit Guest - Merry Bookmas


Waffle Flower Book stack Christmas card

Hello!  I’m back with a fun surprise!  This month I’m guesting with Waffle Flower and their July 2024 Kit!  It is a darling little Christmas themed kit perfect for the reader in your life.  Since we are big readers in my family, this creative kit is right up my alley!  I includes \the Merry Bookmas Sentiments Stamp Set, Merry Bookmas Die and Stencil, and a 4 x 4 Grip mat, all in a handy project bag.  

And the sweet news is - Waffle Flower has given me the chance to give away a kit!  All you need to do is find this post on my Instagram page, follow and comment: @christinecreationsart  


I have two sweet designs today with the kit, a card and a little ornament/book mark.  Starting with the card, I used the book stencil in the kit and ink blended a stack of books in shades of cool wintery green, next I used the coordinating two-step die cut for the set and die cut all the details and outlines.  I cut it a second time with gold metallic cardstock and use that for my inlay into the books.  All I can think about is old fashioned books bound carefully with gold accents, so that inspired the gold.  I mean, look at the little book plates!  

I also took a gold metallic sharpie pen and added another layer of gold along some of the dashed die cut lines.  

I created the background with an additional die from Waffle Flower called Poinsettia Background Stencil,  only using the tiny details from one layer of the stencil.  Then I added texture with a diagonal shaped cover plate die.  Little gold dots give it an extra touch of sparkle, along with some pretty gold ribbon between the layers to act like tinsel.  


Next up is the sweet ornament/book mark I created using the reverse of the gold metallic paper left over from the previous card.  No stencilling on this one, I just layered tiny strips of cardstock behind the diecut cardstock, with a few layered overtop to give it some more colour.  I layered this over a another folded piece of cardstock which I ran through the die to create a card shape.  

The tiny sentiments from the set are embossed on the books.  Gold sharpie accents the books and swirly ribbon creates the tree hanger or bookmark tassle.  


Seasons readings to you!  I hope you enjoyed this cute kit!  

Monday, June 10, 2024

Bridal Shower Flower Set


As I mentioned last week, we attended the graduation and wedding of our nephew in Colorado Springs recently.  There was also had a bridal shower for our new niece and I was glad we could attend it as well - it was a really special way to get to know her through the people that love her.  For part of her gift I made a coordinating set of thank you cards.  Eight of them in 4 styles.  You can always use thank you cards from a wedding!  So I started with Concord & 9ths beautiful bundle, Primrose Garden, and then all the coordinating colours from the wedding.  Then it was a delightful time of arranging the blossoms!


For this first design, I made an arrangement and then laid it out on a Quilted Card Front Die background of white cardstock.  The large flower centre is cut from metallic silver cardstock and the sentiment is embossed in silver on the banner.  I added silver sequins on all the cards for a bit of bling.  
 

This second design makes use of the imprint die pattern from the larger die (pictured beneath) and the flower are arranged on top of it.  The layering comes together so quickly with that dotted imprint.  


The cardstock colours I used for all the designs are Powder, Harbor, Blueberry, Midnight, Eucalyptus, Rainforest and white.  


This third design is also layered on the Quilted card base, with a more minimal flower arrangement.   


You can see I added some Copic colouring to the tiny white flower centers so they wouldn’t get lost in all the colour.  


This last design is my favourite because I used the main die to cut out the card front shape, so it has the most unique style.  You can also see by the flatlay card on the right, how much dimension is between the layers.   


Lots of extra volume in the flowers and berries on this design.  


And here are the eight cards together! It looks like a beautiful flower garden!  And an easy way for her to send a thank you card to someone on her gift list.  

Thanks for popping by today!  

Monday, January 1, 2024

Postage and Foodie Mini Valentines with TCP


January Release Graphic

Happy New Year TCP Friends!  I'm kicking off 2024 with lots of love.  I think it’s the best kind of theme for a new year, and a brand new The Cat’s Pajamas release full of all things adorable for January. 


I’m starting with a set of mini Valentine cards in a postage stamp shape that are perfect for tucking in to a lunch, school Valentine’s or surprising your child or sweetie with a little note at any time of year.  I have 5 cuties to show you using the brand new Food of Love Digi set.  Oh my WORD, it’s just so darn cute!  Little pairs of food buddies and punny sentiments that have to make you smile.  


We’ll start with this adorable little mushrooms!  I coloured all of the images with Copics, and finished off the detailing and blending with coloured pencils.  

Because I wanted to make the images coordinate like a set, I ink blended a little soft blue around the edges of each little card as a nice backdrop, then I used a retired TCP postage themed die to cut out the shaped cards.  

Each card is stamped with a postage mark from a retired TCP polymer set, and a coordinating heart “stamp”.  


Each little card is then completed by cutting a folded inside just smaller than the postage die, and the coordinating sentiment from that pair.  I also created coordinating envelopes in the same theme, with blue patterned paper (cut 5”x 5”).  


Here’s the sweet tomatoes.  You can also see the front of the envelope has a smaller rectangle postage die to address with a coordinating heart stamp.  I love those sweet matching details. 


Love you...right down tomatoes!  


Next, you stole a pizza my heart!  For this savory pairing I added little pieces of cheese with a white gel pen. 


YUM, pepperoni!  


I also added a heart on the back of the mini envelope where you can close it.  


This one might be my personal favourite because I just love limes, and they were really fun to colour wiht the addition of highlights on the lime with gel pen.  


I AM so glad you’re mine :)  

And finally it’s a berry cute pair...


Blueberry and raspberries are perfect together.  


Because you are berry special.  Such a delight to create these cuties!    I’m including a peek at the whole set.  Just look at the cute shadows you can use too!  Thanks for joining me today!  


Thursday, November 30, 2023

Gift Card Holder Tutorial with TCP


12 Days of Crafting

Full Size Gift Card Holder with Polar Bear

Greetings TCP Friends!  I'm here today with another new idea for the 12 Days of Crafting at The Cat’s Pajamas!  If you’re like me, even though I love to give personalized gifts, there are times when you have to resort to a gift card.  Have you noticed that most gift cards these days on the rack at a store come much larger, with a section that hangs on the display rack?  I think this larger size is a bit better so that those gift cards don’t get lost. So, I decided to design a gift card holder that would accomdate that larger size.  

I'll show you a few pictures of the process and then some more pictures of the finished tag holder.  

Gift Card Holder Tutorial 1

Here you can see I’ve cut the holder from a piece of Kraft cardstock and scored it at 3 1/2, and then scored a little 1/2 inch tab.  Then it’s all about the decorating, I stamped some retired TCP postage stamps in white craft ink first.  

Gift Card Holder Tutorial 2

Next, I stamped some red postmarks, then added a retired TCP die cut postage frame.  

Gift Card Holder Tutorial 3

I used a circle punch to cut out “ticket” half circles, and brought in the Copic coloured image from the very cute I Like Big Gifts digi set from November’s Release.  I adore this cute polar bear!  

Gift Card Holder Tutorial 4

Here you can see the outside holder put together and the gift card insert I created to slide inside, it’s a great place to write your greeting for the gift card, and a neat feature is that the gift card “ties” into the tag holder using the baker’s twine.
 
Gift Card Holder Tutorial 5

You can see that the hole you use to hang it on the gift card dispay at the store makes a great spot to tie it into your insert!  

Close Up Gift Card Holder

This is a close up of the Gift Card Holder put together. 
 
Gift Card Holder Open

And now you can see the Gift Card Holder pulled a part, and you can just see a peek of blue where the gift card is behind the tag.  

Gift Card Holder Tag open

Gift Card Holder Flatlay

All in all, a pretty sweet and easy design for those last minute gifts!  Thanks for joining me for today’s episode of the 12 Days of Crafting! 

Wednesday, November 30, 2022

Snowy Village Decor

12 Days of Crafting Graphic
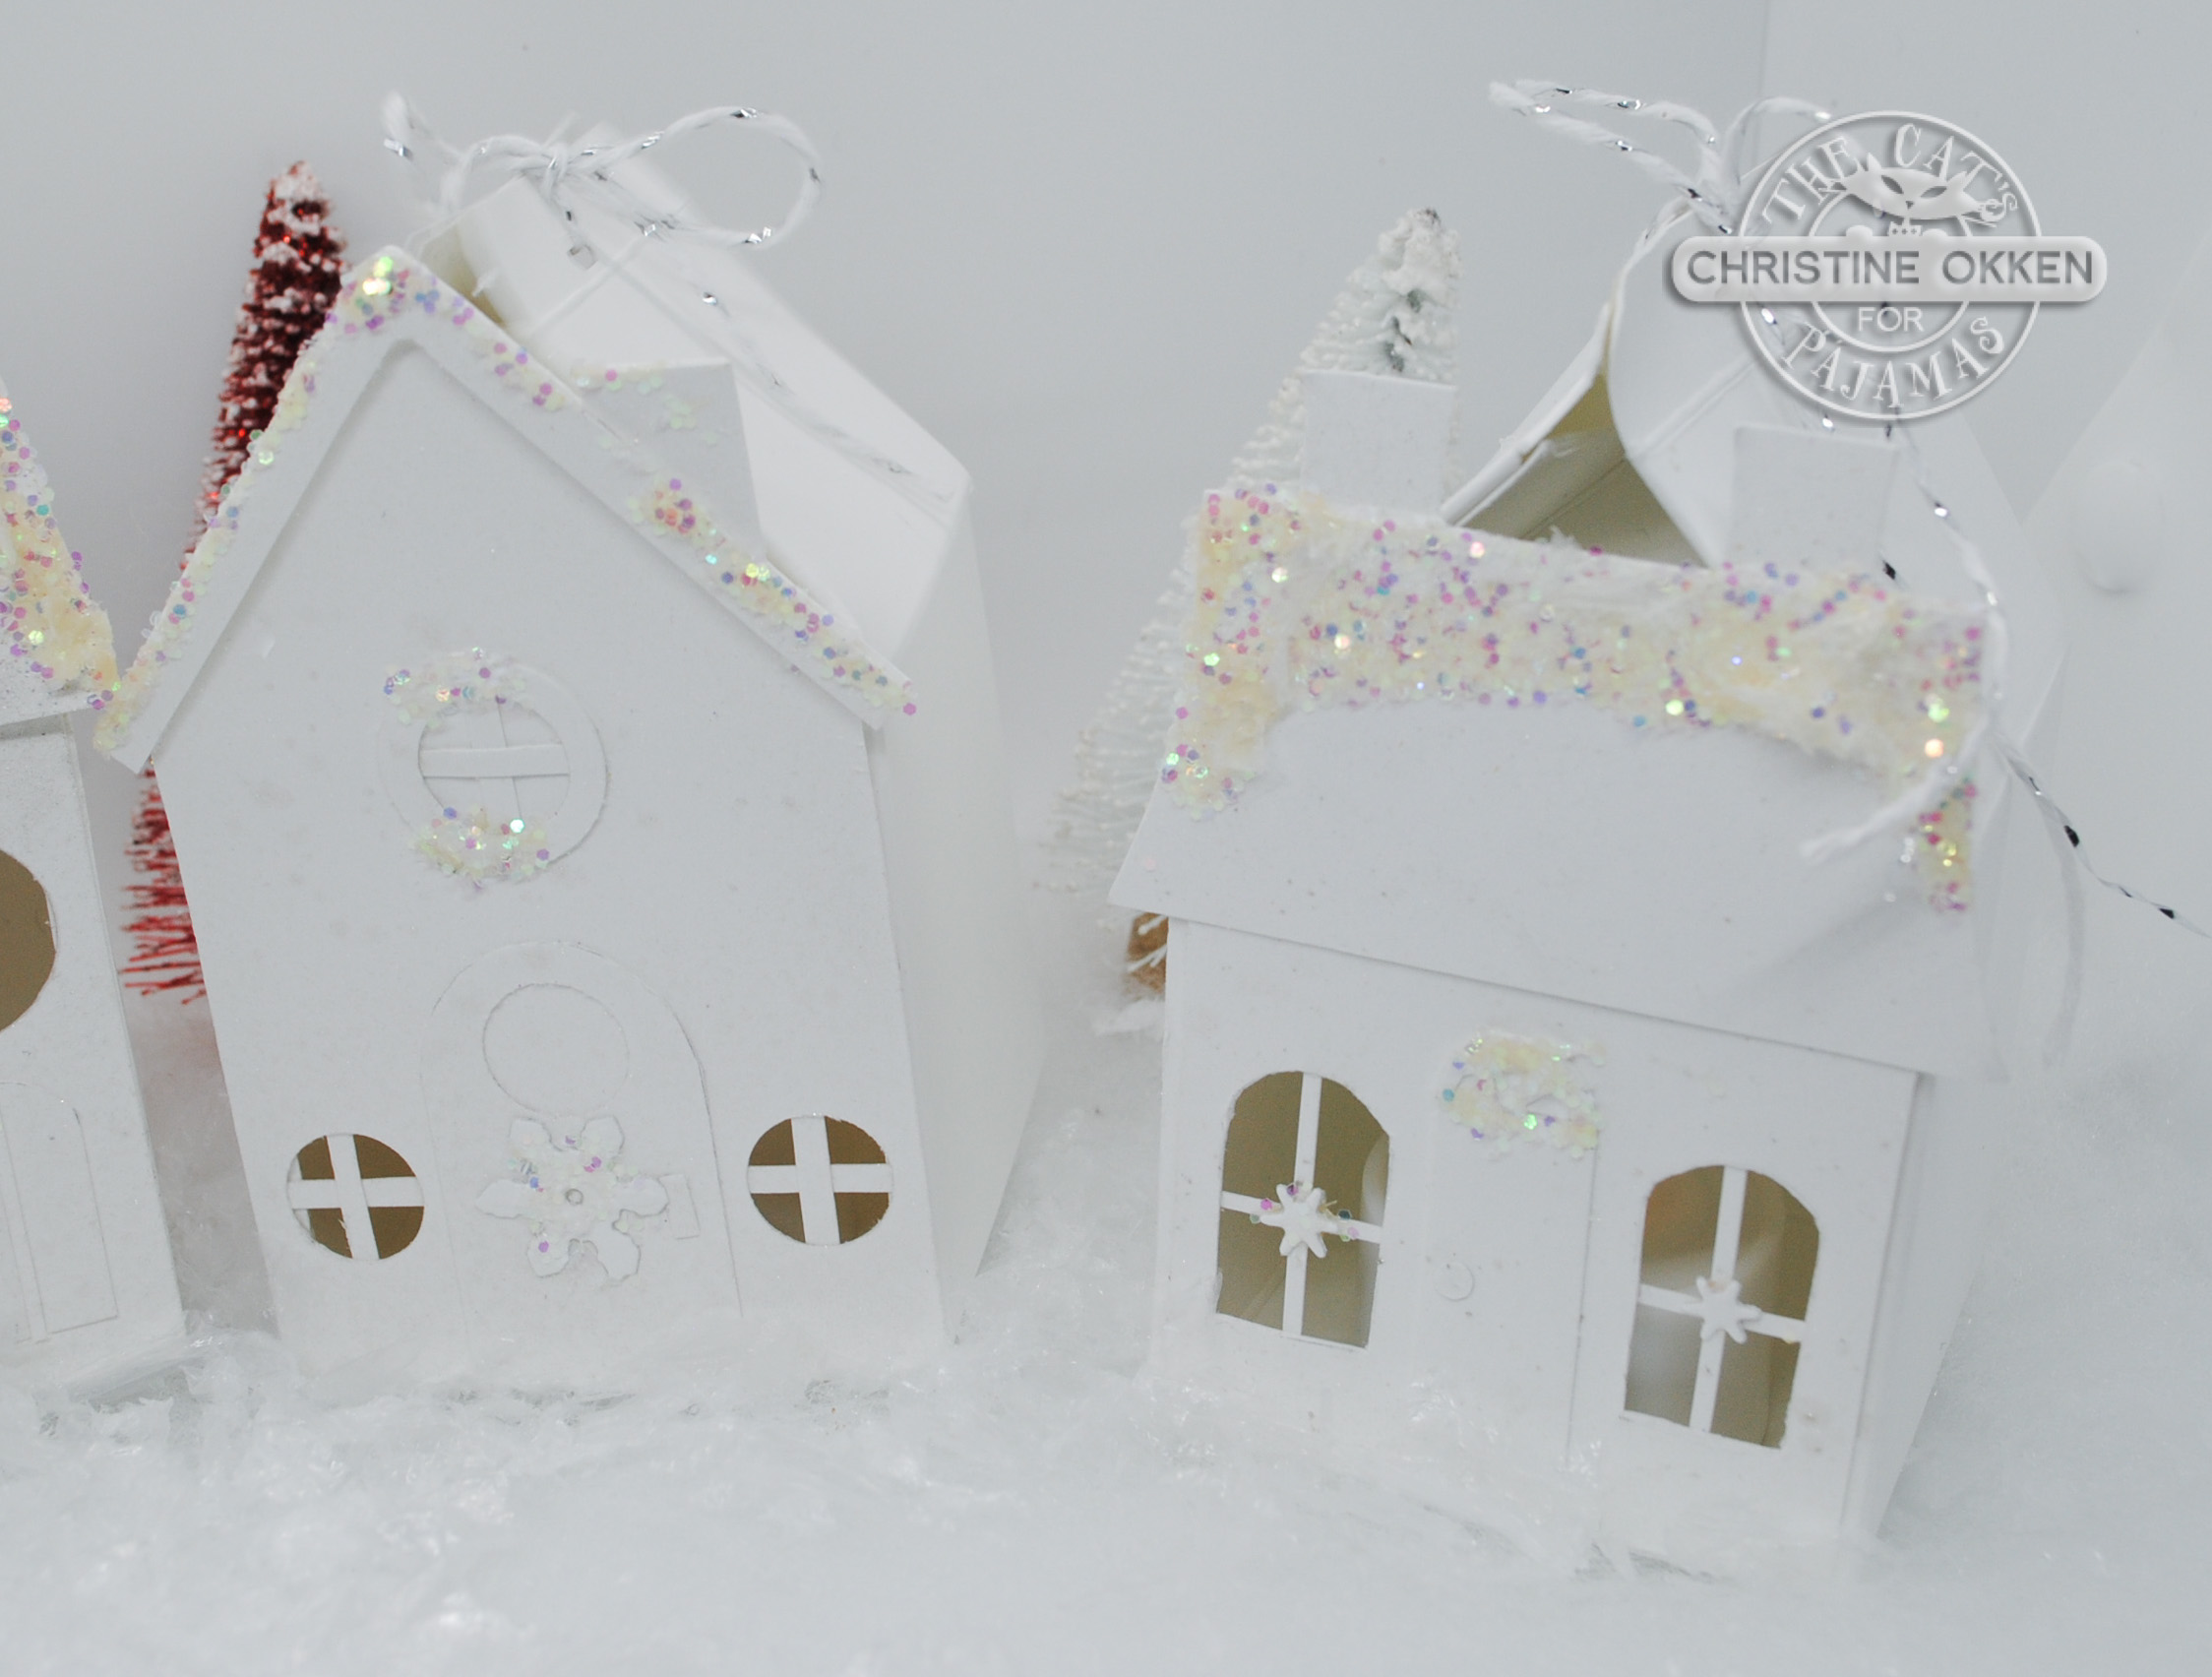
Frosty Greetings to you and yours today! We’ve had a snow day here with soft flakes falling all day long.  It’s so pretty, that is until you have to shovel it! With that snowy theme in mind, today I’ve created an adorable little Snow Village with brand new cutting files from TCP called Village Treat Boxes.  These cute .svg files can be cut, or print and cut, sized to your liking and can hold any little treat you’d like to put in them.  But I thought they’d be adorable to create a snow village to decorate a mantel or little corner of the house.  


Doesn’t it look cozy?  Each little box is about 3 1/2 inches high.  

I used the files to create the boxes, and then used the print and cut portion of the .svg files to make templates where I could cut out rooves, doors, windows and accents to decorate each house. Alma has created a great video that shows you how to put the boxes together.

I knew I wanted to add in battery powered tea lights into each little house, so I cut openings in each box so light could get through the doors or windows.  


Here’s a peek at the individual houses I created.  I spritzed them all with shimmery sparkle, so each house has lots of shine in person.  Then I added thick chunky glitter snow to the rooves and snowflake “wreaths” for the doors.  Each box is tied at the top with some silver threaded ribbon to hold it together.  


In the window you can see I’ve added the tea light in the box.  And how cute is that tiny snowflake wreath!  


And here’s a little pic of what it looks like in the dark with the tea lights shining.  Like a welcoming little Hallmark town!  


And here is what it looks like on one of my picture shelves in our entryway.  With some sweet little bottle brushes in-between it makes a cherry little welcome to our home!  

Here is what the houses look like in colour, and you can see that they look great sized up too.  


I hope you’ve enjoyed this little Snow Village Tour and are inspired to create one for yourself!

We’re inviting you to participate along with us in the 12 Days of Crafting!  Choose any of the days of the 12 to be inspired by, and create along with us! 

1. Upload a project to this link by December 24.

2. Be sure to let us know what day your project was inspired by.

3. TCP products are not required but are encouraged.

4. You may submit for any and all days but only once for each inspiration day.

5. Use #12DaysCrafting22 if uploading to social media.

Prizes include three $10 flash prizes and one $25 grand prize to be announced on December 30. 

Tuesday, November 29, 2022

TCP's 12 Days of Crafting - Pop Up Gift Card Box

12 Days of Crafting - Gift Card graphic

Pop Up Gift Card Box with Gnome

Greetings TCP Fans!  After a month long break from creating due to work travel and some vacation, I'm dropping in today for our fun 12 Days of Creating with The Cat's Pajamas!  Today our theme is a Gift Card Holder and I’ve got a cute project for you to try.  I've created a Pop Up Gift Card Holder Box that’s easy to make and gives you that little extra WOW when someone opens the box.  

Today I’m using two brand new November images from The Cat’s Pajamas, starting with the Gingerbread Latte Gnome on the outside of the box.  For this design I printed our cute little gnome and coloured him up with traditional red and green Copic markers, then trimmed him out.  I placed him on a die cut snowflake and added some die cut letters to make it especially JOY-ful!


Pop Up Gift Card Box with Gnome

To create the box I used a great tutorial from Splitcoaststampers from a few years ago  for the design. Before I did any cutting I embossed the heavy white cardstock, and then used the tutorial for cutting, folding and attaching together.
 
Pop Up Gift Card Box

What’s fun about this little box is the surprise you get on the inside!  

Pop Up Gift Card Box inside with Gnomes

Once you open the box a layer pops up on the inside to display the Gift Card standing up!  I’ve decorated the inside of the box with another of the new November digi images called Gnome Christmas Trees. They’re all lined up with Christmas tree hats and stars that are so adorable!  I also sponged some green stars in the background to embellish the design.  

Pop up Gift Card Box inside

What’s also creative about this box is that it leaves room for some treats in the front of the box to have with your “coffee gift card”.  Perfect for your favourite mocha flavour!  

Pop Up Gift Card Box Gnome Close up

Ready for some snazzy gift card giving!  

Here’s another peek at the new products I used:


Now we’re inviting you to participate along with us in the 12 Days of Crafting at The Cat's Pajamas!    

1. Upload a project to this link by December 24.

2. Be sure to let us know what day your project was inspired by.

3. TCP products are not required but are encouraged.

4. You may submit for any and all days but only once for each inspiration day.

5. Use #12DaysCrafting22 if uploading to social media.

Prizes include three $10 flash prizes and one $25 grand prize to be announced on December 30.