Showing posts with label Background. Show all posts

Sunday, June 9, 2024

You’re Zesty!


Hello!  I’ve got a cutie for today!  When I saw the inspiration prompt from Color Throwdown, I couldn’t get the citrus idea out of my head!  So, I pulled out my new products from Concord & 9th Citrus Bundle to create this cutie!  

I started with the background using the Turnaround Stamp with the color challenge selections, and layered some vellum overtop to soften the effect of the background.  


Next I stamped the sentiment in the three colours in an ombre style, softening the transitions with coloured pencil.  This color combo packs a great punch!  Then I made use of the smaller fruit dies in the set to create little oranges, lemons and grapefruit to accent the sentiment.  A bit of white gel pen gives some definition to the rind of the fruit, and the tiny segments of the fruit.  


Accents are just simple enamel dots on the fruit blossoms and a bit of twine to tie it all together.  So adorable!  

Sunday, May 14, 2023

Stencil Fun with The Cat’s Pajamas


Hello!  Today I’m showcasing some fun ways to stencil with some tried and true products from The Cat’s Pajamas.   I posted this on the TCP blog earlier this week and realized I hadn’t finished my post on my blog....so here it finally is!  

As I was perusing through some older TCP products looking for some inspiration, I found these cuties called  Yeti to Party that are retired, but oh so cute!  I coloured the Monster’s Ink-like pair with Copics and then created a background to match.  


I don’t think plaid will ever go out of style in cardmaking.  It provides the perfect way to tie colours together.  So, I used my TCP Plaid Maker stencil (retired), on my Make Art Station.  This board with its magnetic ability has been a game changer for me with stencils!  For this design I started with Salvaged Patina Distress Oxide ink.  


Then I did the diagonal with Wild Honey Distress Ink, and added in Copics for the red and teal lines.  I wanted the warm yellow to match better with my one-eyed dude, so I added some Faber Castell Coloured Pencils along that diagnoal to get a more orange tone.  


Next is a great design that shows how to stencil, without stencils!


Folk art is a fun trend in cards right now, and this lovely set from TCP called Folk Art Flowers celebrates those iconic floral patterns found in this style.  


So what do you do when you don’t have a stencil?  Well, its easy to create a temporary stencil from heavy cardstock with coordinating dies!  They aren’t as perfect and crisp as a regular stencil because the paper begins to soften and break down, but you can get a soft background effect that I stamped over with the stamps from the set.  


In this case, it is a nice colour tie-in to bring the card colours together.  For the sentiment, I die cut a circle in the card base and added a vellum layer with embossed sentiment into the card.  


Great sweetness for Spring!  Bloom, Grow and Blossom friends! 


Friday, April 14, 2023

Tropical Camouflage


Hello!  Is anyone ready for some green?  My husband and I have an annual membership to our botanical glass pyramids, so we can find green whenever we want!  I especially appreciate it in winter, or like now where Spring has not really sprung here yet.  Today in honour of my favourite colour of green I pulled out an older set from Power Poppy called Big Sexy Leaves, stamped it on Copic XPress It Blending cardstock and then went to work colouring with my Copics and finishing off the details with Prismacolour Pencils.  It is a riot of colour and pattern that is so delightful!  


Once the panel was coloured, I used a die from TCP saying “enjoy” in a nice script, cut it out of the main image, then stacked it on 3 layers of white cardstock cut with the same die.  The sentiment pops up nicely, but give you that camouflaged look that’s really fun.  


I’ve set the sentiment on the main card, with some sponged vellum behind the sentiment so it adds something for it to sit on.  Then the little coral sentiment is stamped from Power Poppy’s Go Wild Stamp Set .  

And how fun, on this flatlay view you can see just how camouflaged the sentiment can be!  A colourist's dream to work with!  Thanks for sharing it with me today! 

Tuesday, March 21, 2023

Mailable Background Series: Coffee Trio


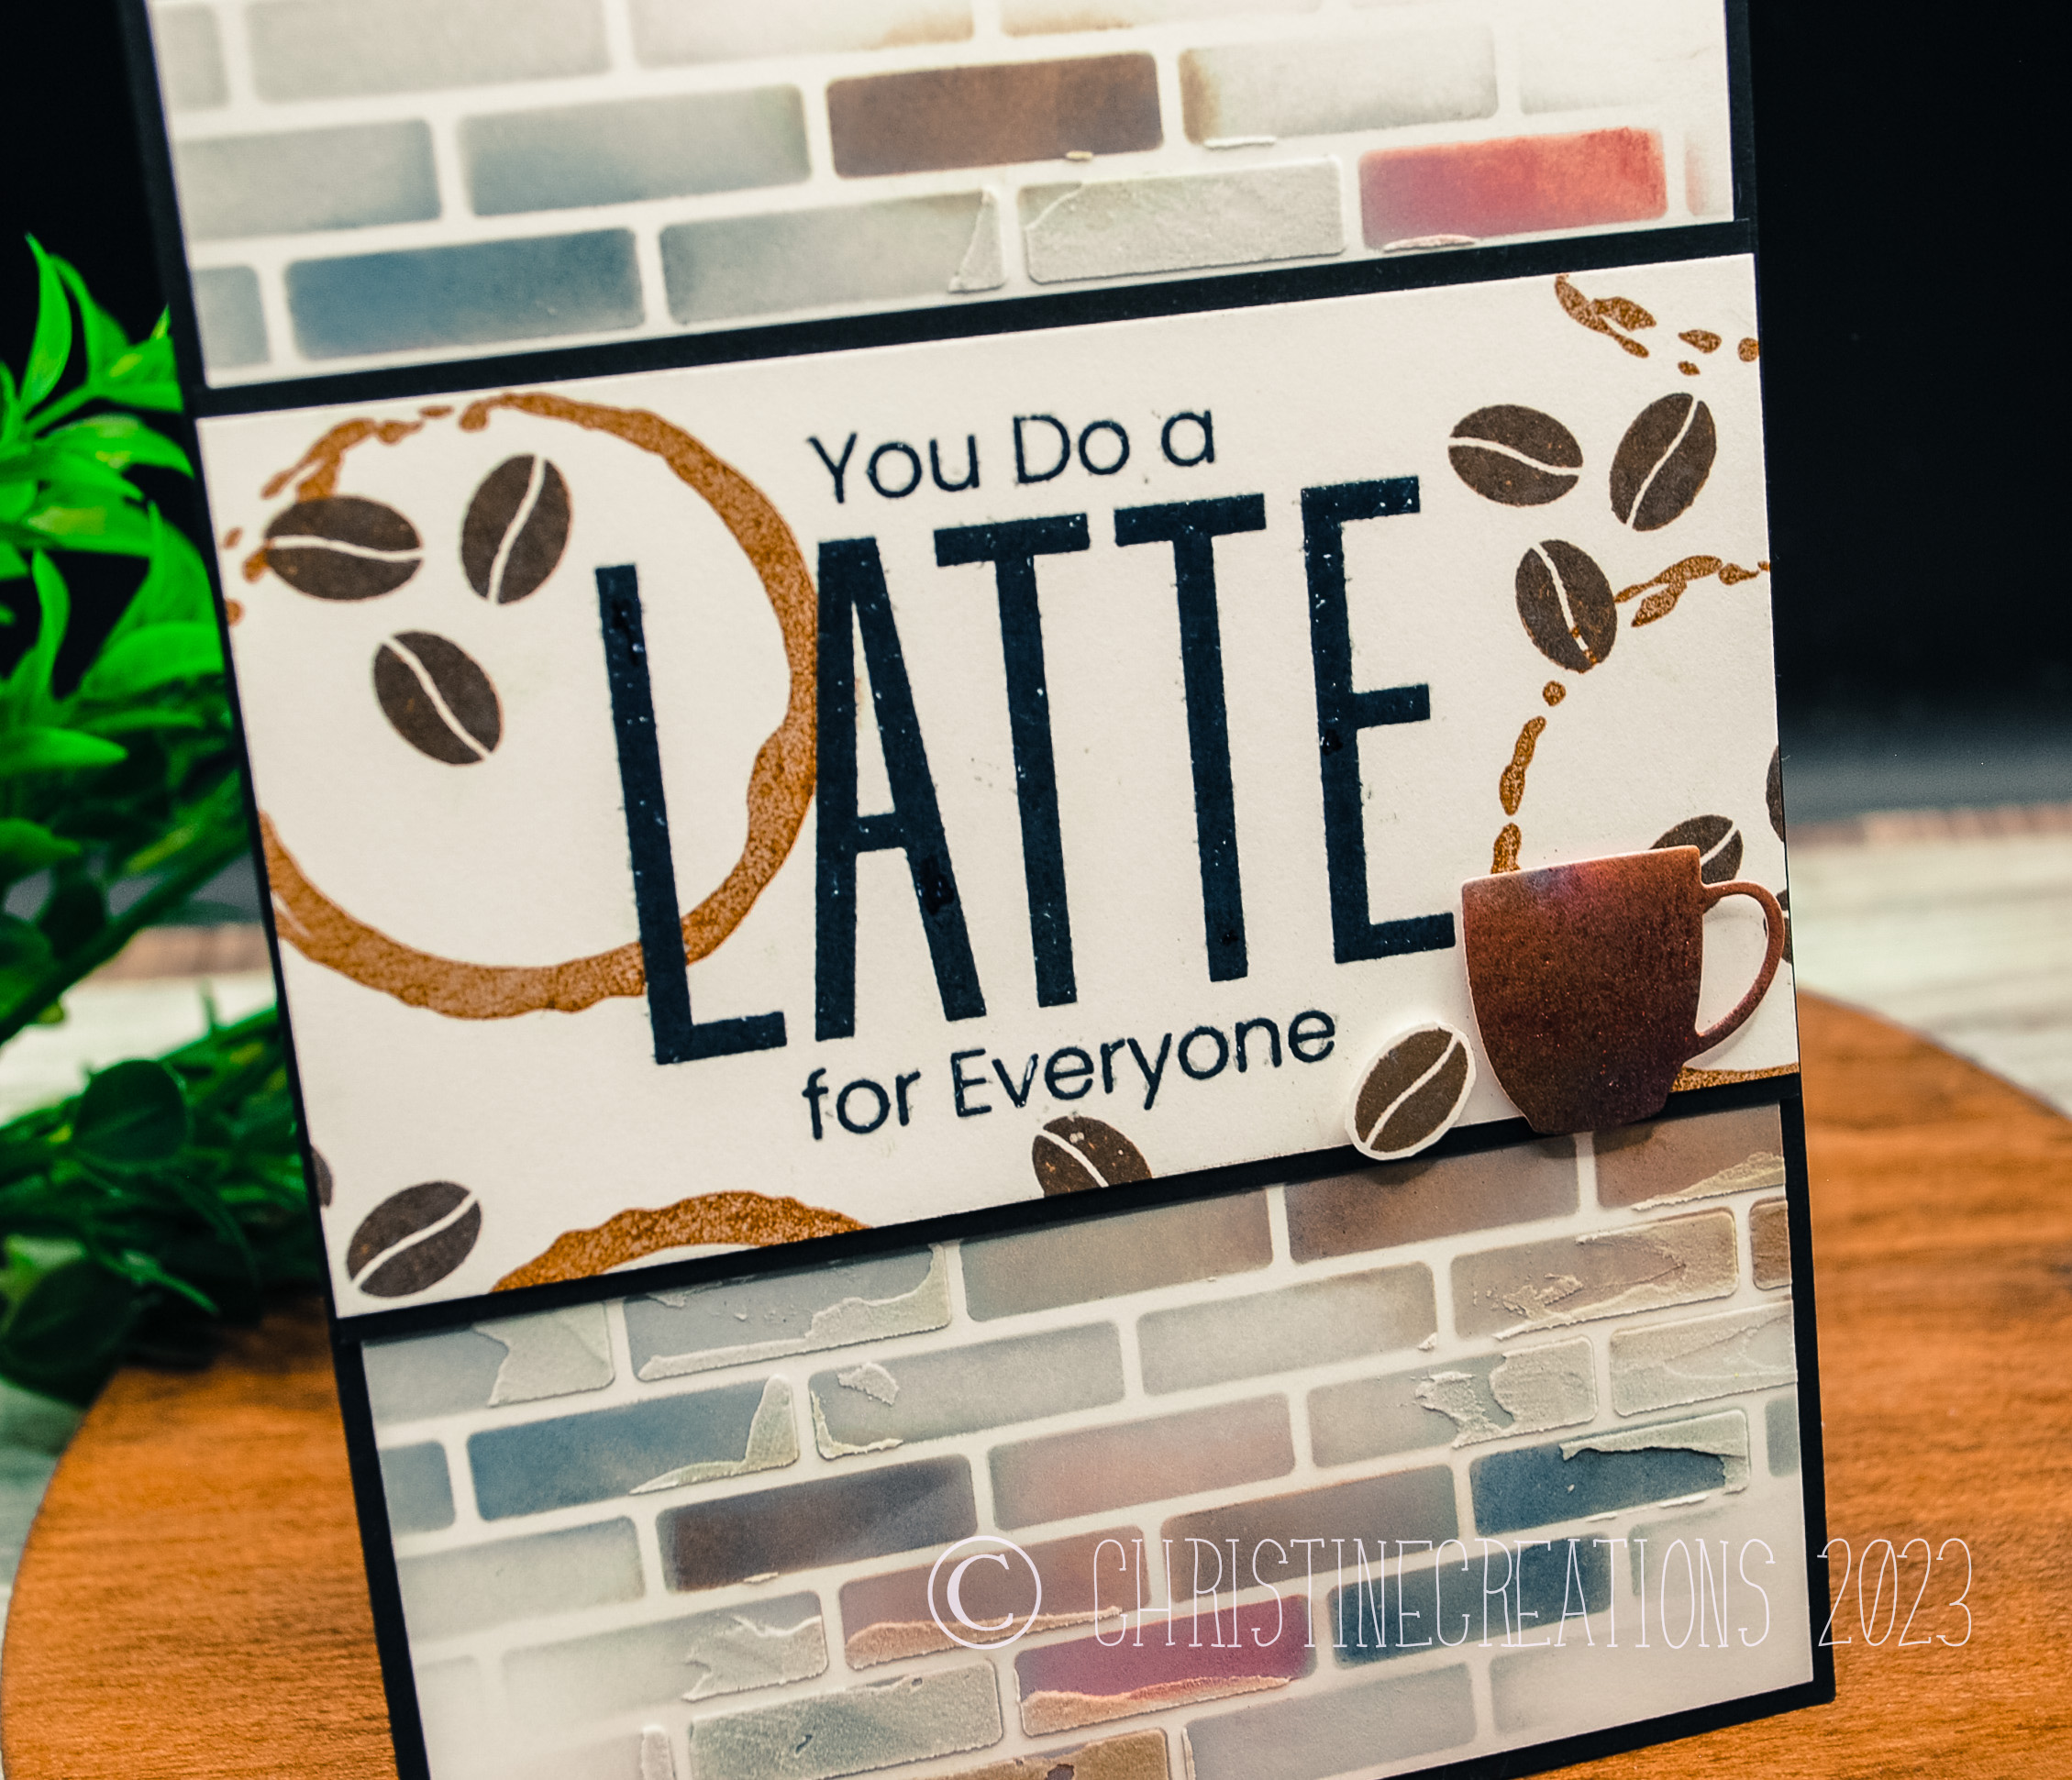
Hello!  Today I’m bringing you another group of thank you cards I created to be mailable for colleagues I work with.  Because I knew I’d be adding a gift card in each card, they need to be light and without a lot of embellishment, so I focussed on creating fun backgrounds to give that pop of colour and interest.  Today I have a coffee theme going using  MFT Coffee Break, and MFT’s Small Brick Wall Stencil.  Each card got a different inking pattern with the Brick stencil, and I did add some embossing paste in parts of the stencil for texture.  


I also used MFT’s cute little coffee cup die cuts called Mini Mugs, and treated them with Lindy’s Magical Powders on watercolour paper.  They give great pops of shimmer.  And aren’t those coffee beans from the stamp set awesome?


For this design I also brought in the coffee stain from the set.  


You can really see the shimmery details on this design from the Lindy’s Magical Powders, I embossed the sentiment to give it more glossy texture.  I think they feel really warm, masculine and make a fun trio!  

Monday, August 31, 2020

Panda Pedal Parade


September has rolled in on the calendar and at least in our area the weather has taken a decided turn to Autumn.  Though I’m hoping Summer temps will swing back in, I know it’s not going to stay for long.  All our kids are “back at school”, in the unique ways it looks for them.  Our daughter is a Grade 5 teacher in a Spanish as a Second Language classroom doing in-person school - for as long as that lasts, our middle son transferred to a new program in University online this semester, and our youngest son is (for now) doing in person Grade 12.  If there’s one thing that’s constant for all of us its change.  

Today I’m popping in with a new September Challenge at The Cat’s Pajamas.  This month it’s all about Animals.  Any animal is welcome!  So I’m using the adorable pandas in the I’m Not Fat set.  Our fluffy little dude is pedalling to a Birthday Party with gifts and balloons.  He’s coloured up with Copic markers.  

To create the little scene for him I used Distress Oxide Inks and the Great Outdoors Stencil, that I can’t get enough of to bring fluffy clouds and hills.  Then he’s cut out with the  Scalloped Duo Die, and I’ve added the Grass Die to ground the image.  A couple of balloons from the Birthday Set Die accent the image, tied with some black twine.  


For the sentiment I’ve used TCP’s One Liners Stamp Set, and a couple of Enamel dots to add some more black and draw your eye to the sentiment.  


So, pop on over to the rest of the Kitties in The Cat Pack playing along today for more Animal Inspiration and then play along with us!  You could win a $50 Gift Voucher to the TCP Store!  

TCP Blog

Nancy

Wendy

Julee

Cristena

Brenda 

Deborah

Christine (you are here)

Monday, August 17, 2020

A Bank Robbery


Howdy again Pardners!  I’m back with another Western Slimline design for The Cat’s Pajamas Challenge this month.  This time we’ve caught the sunset Bank Robbery in progress!  This trio of trouble have held up the bank and are running off into the sunset.  I’ve used TCP’s Western Digi Stamp Set cause it’s so darn cute.  

All the colouring on the town and penguins is done with Copics.  


For the background layer, I sponged layers of sunset colours onto the Great Outdoors Stencil  with TCP’s Big Beautiful Blending Brush and some Distress Inks (Rusty Hinge, Wild Honey, Spun Sugar, Blueprint Sketch), and then added a bit of Prismacolour Pencil to give the clouds some extra definition.  It gives it a bit of the look of an aged scratchy photo.  


For some colour I added some stars with the Liners CutUps and accented the sentiment with some Bitty Banners.  


Some twine at each end adds to the rustic western feel, and finishes it off.  

Join us in the Slimline Challenge this month and you could win a $50 Gift Code to The Cat’s Pajamas Store!  

For more Slimline Fun please pop on over and visit the other Kitties in the Cat Pack playing along today. 

Monday, February 24, 2020

Unicorn Smooches


Step right up for a sweet smooch from your favourite little unicorns!  I’m playing with this sweet little pair from The Cat’s Pajamas set,  Grab the Unicorn.  There are a bunch of fun ones to choose from in the set.  I coloured them up with just bits of gray and red, then trimmed them out to place them on this pretty frame from the TCP Die - Portrait of Mew.  


TCP has a challenge going on right now that is all about using Stencils...you have just 3 more days to enter for a $50 gift voucher to the store!  So, to bring you some more stencil inspiration, I thought I’d pull out the new TCP Pattern Builder  and create a plaid pattern with grey ink, the Big Beautiful Blending Brush and a red pen.  Really easy to use and fun to custom design your own plaid pattern.  I accented the design with a Heart Border, and then added a couple of patterned paper hearts with the Nested Hearts Die.  They sure are sweet!  

Monday, February 25, 2019

Bunnies in Flight


Kicking off this week with a bit of dreamy fun and some cute products from The Cat’s Pajamas!   

I started with my favourite bunny from TCP in the set Bunnies in Flight.  I love the collection of balloons taking him off on an adventure.  I coloured him up with Copics and cut him out with TCP’s Scalloped Duo CutUps Die.  I created a dreamy sky background with Distress Oxide inks.  It’s fun to blend the colours and see how the in-between shades come out.  This uses Twisted Citron, Mermaid Lagoon, and Wilted Violet inks, sponged, spritzed and then heat set.  To created the cloud edge on the upper portion of the card I used TCP’s Clouds and Balloons CutUps Dies so that the rounded edges and the stitched edges gave the effect of more cloud layers. 
  

A little strip of plaid paper on the right edge further pulls together all the colours.  I also sponged the  Cloud Border Cut Ups Die with the Distress Oxide ink, and then added some pretty Snowy Sparkle Holeless Sequins to accent.  I love these sequins because your glue doesn’t come out of the hole, and they have a lovely iridescent shine depending on which way you turn the card.  

The sentiment is from TCP’s Simply Stacked Sentiments  stamped with Mermaid Lagoon and Wilted Violet Oxide Inks.  


Have you stopped by the TCP Blog to meet all the NEW Kitties that are joining the Cat Pack?  Each day Alma will be introducing a new DT member so be sure to pop by and welcome them, plus be inspired by their TCP style!  

Friday, February 8, 2019

Bee Day Toile


Hi friends!  I hope its a happy Friday for you.  We have been in the deep freeze here so my heart is getting a bit of a longing for spring to come.  We’re no where near that, but I can dream with today’s card made with Power Poppy’s set Bee Kind Toile.  It’s such a magical and elegant set, where everything your little heart desires related to bees and to toile is packed in its mega size.  I created the focal piece with the honey cake included in the set, surrounded by some of the small toile and bee elements and coloured it up with Copics.  I die cut it with a stitched die that mimics a bit of a bee’s flight path.  

For the background I stamped a toile pattern and then coloured it up to match the main image, adding in a bit of B60 and B63 for softeness and contrast from the main image.  It’s such a pretty background - it was almost a shame to cover it up!  


Because the whole card is quite busy with all of the pattern, I decided to accent it simply with this lovely bow cut from a TCP bow CutUps die.  


There’s a little sparkle on the bee’s wings that you can probably catch in the top left of the main image.  Happy BEE day to you!  

Allison Cope
Christine Okken
Cindy Lawrence

Katie Sims
Stacy Morgan
Tosha Leyendekker

and Marcy at the Power Poppy Blog

Monday, June 11, 2018

Purple Mushrooms


If you’ve followed Marcy’s Instagram lately you know she’s found a new love of all things mushroom!  So her awesome mega set from Power Poppy, Wild Mushrooms is so timely to celebrate her new hobby!  What I really love about the set, is that each mushroom is beautifully illustrated, and if you research them, each has a unique style and colour.  So though you can colour them up in any way you like, if you want to do them realistically - there’s a lot of different colour variety to choose from!  

This gorgeous purple mushroom really does come in that dramatic purple - though it does change in what tone of purple over it’s lifetime.  I’ve given it a real pop of electric purple here.  I’ve paired the mushroom with a Distress Oxide Ink background done in Cracked Pistachio and Evergreen Bough, with a little Broken China done on the vellum circles.  All sprinkled with water and then dried with my heat tool.  


See them in the wild?  What an amazing colour!  


I’ve added some glittered Scor Tape, Nuvo Dots, and some Baker’s Twine as simple accents.  The sentiment is embossed in Wilted Violet.  I didn’t take a picture of my Copics, but I’ll list them here:  
Mushrooms:  V01, V04, V06, V09, BV00, BV04; greenery:  G14, G16, with the background in BG11.  


Friday, June 8, 2018

Making a Multi-Coloured Bouquet Work + Video!


Hello Friends!  Today the Power Poppy team is joining together to play along with Kathy Racoosin and her Daily Marker 30 Day Colouring Challenge!

Today I wanted to show you more of my process of making multi-coloured bouquets work together, so I actually have a tutorial video and two cards to show you!  Now, if youve been here a while you know I dont do videos regularly, but lots of people have been asking to see how I colour.  So,  its NOT super fancy, and Im using evening light - so it could be brighter, but youll see a bit of my colouring process.  Even though I cant see you when Im shooting the video, Im still imagining you as Im talking.  And it sometimes makes me forget my words!  Hopefully youre entertained!  


I’ve used the gorgeous new set Abundant Petals.  It is amazing how much Marcy packed into this stamp set.  It’s double a normal sized set, and the different flowers she chose are so beautifully done!  It makes a colourist so happy! 

What my video shows you, is how I take a floral bouquet which has many unique colours in it, and make it tie together cohesively.  I was inspired by this photo of a wedding bouquet.  


Amazing isn’t it?  I love the soft colours, and yet there are really a lot of different colours in the bouquet:  pink, coral, yellow, orange, blue, green.  My wedding bouquet was a lot like this  - though probably brighter deeper colours than these pastels.  I love the vibrance of a lot of colour, it’s also how I seem to colour everything!  


So, when I’m putting together the bouquet, each flower has it’s own distinctive colour, but it also has elements of a number of the other colours in the bouquet mixed into each flower.  By doing this the flowers work together.  You can take a look in the video..


Here’s the second card I made, put together with the initial “single color” colouring of each petal, and then in the video how I added some of the different colours in the bouquet to each flower.  

Both cards make use of Distress Ink, or Distress Oxide backgrounds.  I’ve just started to play around with those, and it’s fun to see how they turn out!  


I’ve embossed that empowering sentiment from Marcy’s new set M-Powering Words.  Man is that set awesome!  I love the words, and Marcy’s fabulous hand lettering.  

Now for a bit of SALE news, which is always fun....Marcella is offering a special on two stamps sets,  Burst of Kindness and Spring Meadow , Marcy has more on that in the Power Poppy Blog post as well.   Sale ends June 9th! 

Here is the fabulous Power Poppy line up colouring along today....

Barb Walker
Christine Okken 
(you are here)
Cindy Lawrence

Elizabeth Zaffarano
Julie Koerber
Kathy Jones
Katie Sims

Nancy Sheads
Stacy Morgan
Tosha Leyendekker

and Marcy at the Power Poppy Blog

Friday, May 18, 2018

Bee Kind Toile & Always Here


Another round of Power Poppy beautiful today!  I know I’m getting to sound like a broken record, but we’re only half-way through!  I have two more cards to show you with two amazing sets. 


We’ll start with the amazing set Always Here.  This is a previously released digital image - Heart Abloom, now available in polymer, with some beautiful sentiments included.  I love the variety of flowers and fruit included, and how each of the elements sing spring!  


I really had an awesome time colouring this one.  I wanted each of the flowers to have their own palette, and yet have everything tie together cohesively.  So, you’ll see how bits of colour carry over between the colour of the flowers.  After I had coloured the heart, I trimmed it out with a tiny border and set it aside because I wanted to create a funky background.  

I might have mentioned before that I’m not an “early adopter” of anything, so I know Distress Oxide inks have been around a while aready, but this was my first time using them to create a background.  This is Distress Oxide Evergreen Bough.  I sponged it onto the background in layers working on creating a Ombre feel.  So, more ink on top and less layers on the bottom.  I spritzed the cardstock to let the oxidation happen and then used my heat gun to dry between layers.  I really like the dreamy effect it has.  


After I layered the main image over the background I spritzed the whole thing with a shimmery spray.  You might be able to see a bit of it on this photo above.  It sure looks pretty in person!  


For accents I added some shimmery ribbon, twine and clear sequins.  


On the inside I added another thin strip of the background I worked on and a sweet little sentiment and snail from the set.  So cute!  

Now we’ll move onto what I think is the most unique set Marcy has in the collection this month!  


It’s Bee Kind Toile!  This amazing LARGE set has so many elements included to help you create your own toile designs, frames and focal elements, and showcasing BEES! It is so precious!  Since I have two friends who have bee hives, I know where some of these cards will go...
  

There’s something about toile that speaks French Country to me, so I tried to create that sort of elegant simplicity in the design.  I have a pretty frame made from parts of the set which I trimmed out carefully to frame the amazing bee skep!  I gave some grayscale colour to the design, with pops of yellow.  This card would perfectly for our B&Wwith a Splash of Colour Challenge going on right now, where you can win a $50 gift card to the store!  (perfect timing don’t you think?)


The set has a beautiful honeycomb stamp, which I can’t wait to use, but because I also had a honeycomb stencil, I decided to use it with some embossing paste to give it some rustic dimension.  After it was dry, I sponged some warm yellow ink and made it my background.  A lovely Spellbinders Radiant Rectangles die cut in black becomes the card base. 


A wee yellow gingham bow finishes off the design.  So sweet!  I am going to love creating unique designs with this set!


Have you seen Marcy’s amazing Giveaway News?  


The whole gang is bringing you design inspiration with these two sets today, be sure to visit!

Allison Cope
Christine Okken
Cindy Lawrence

Julie Koerber
Kathy Jones
Katie Sims
Stacy Morgan
Tosha Leyendekker

and Marcy at the Power Poppy Blog