Showing posts with label Boy. Show all posts

Monday, March 17, 2025

The Red Plane with RAM Stamps


I have distinct and nostalgic memories of being a little girl, laying on the grass in my backyard, or even at the school playground and looking at the sky and clouds.  Often I’d hear the buzz of a airplane, and see a red prop plane fly over.  For some reason, its a lasting childhood memory that makes me feel sweetly safe.  I’ve come to learn that it is a surveying plane, taking daily runs over our city to monitor the oil pipelines making sure everything is running properly.  

So its with a sweet nod to that childhood memory that I took this adorable little image from Rachelle Anne Miller called Little Pilot and coloured it up with Copics and coloured pencils.  It definitely has a very Canadian feel in the layout too!  


I used a cloud background die to add some texture, as well as some die cut and wood veneer stars to tie the themes together.  The white rivets are added with a white Sharpie pen.  The sentiment is from Concord & 9th and is layered on vellum.  
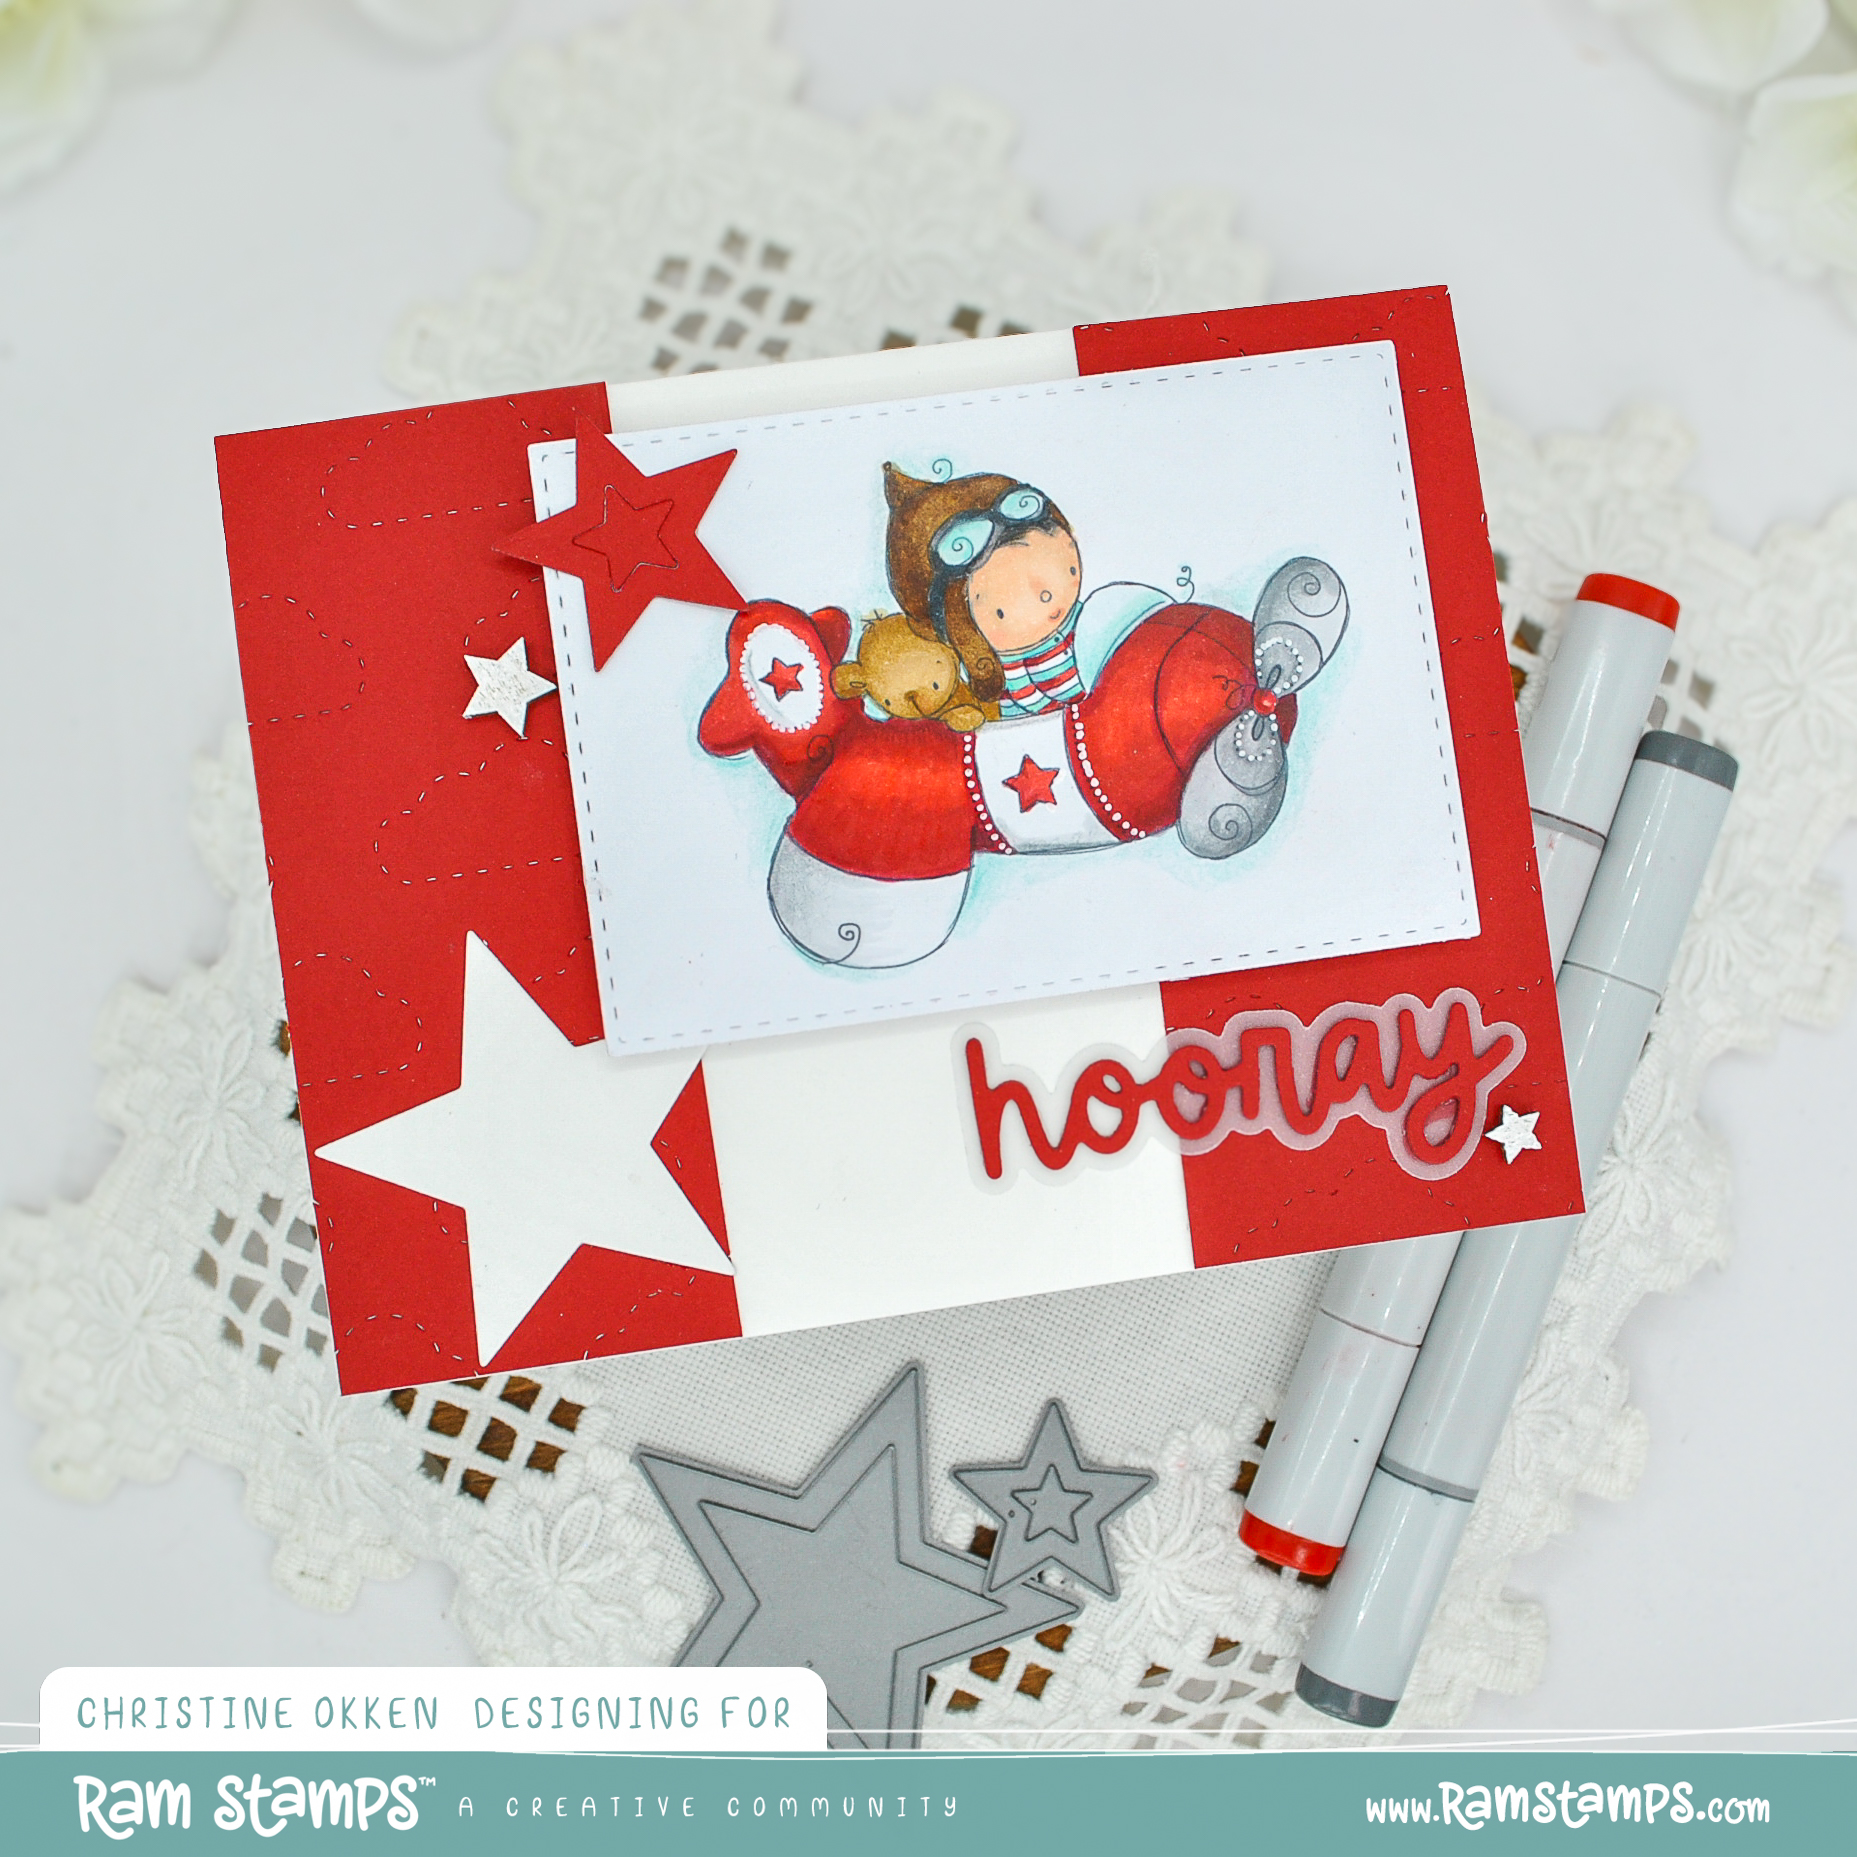

Created for one of our favourite 3-year old’s birthday!  

Thursday, March 16, 2023

PaRRty Like a PiRRAte


Time to PARRty!  We celebrated with friends of ours for their little guy turning 1 this week.  And because I was in the mood to colour something fun, I pulled out this cute set from MFT called Party Like a Pirate, it’s retired but ever so cute with its very pirate themed images.  I picked some fun Copic colours and after colouring, I trimmed out the pieces.  


I masked and sponged the background sand, sea and sky with Distress Ink, using an MFT Stencil for the clouds.  And then added in sand details with Copics.  A die cut frame helps anchor the image on the cardstock.    


Love the cute little details like the seagulls and gold coins.  


And here’s the stamped inside as an extra touch.  Kids are always such fun to create for!   

Sunday, February 7, 2021

Reapers Hockey for Kids


A few weeks ago was my Nephew’s 10th Birthday.  He’s following in the family footsteps by being a lover of all things hockey.  My brother and our sons play on a ball hockey team (when you can actually play sports) called The Reapers. My brother and his friend designed some really cool jerseys for the team, and then also designed the same jerseys for my nephew’s ball hockey team.  When I saw this cute little hockey boy from Jane’s Doodles, I just had to pick it up.   It was a freebie!  What I had fun with was re-creating the colours and crest from the Reapers jerseys.  It’s a pretty small space, but I think I managed to give it the look of the jerseys, and my nephew recognized it right away.  


I added in the stencilled number to look like crested numbers on a jersey using Embossing Paste, and then added some star stencilling in ink as well.  


A wood veneer heart makes a cute tie in to complete the design.  


Here’s the Copics I used.  Personalized kids cards are always so fun to create!

Monday, August 24, 2020

Have Yourselfie A Happy Birthday


Hello All!  I’m popping back in with a card I made for my brother’s Birthday this week.  We celebrated with him last night in an outdoor family get-together.  These are times when we all miss my Mom, because she was such a good “celebrator”.  But, we are also grateful to be able to still celebrate.  

So I made him this bright and bold card with the adorable newer set BB Picture Perfect Party Animals from MFT Stamps.  These polaroid style selfie pics are really cute, and I played along with MFT’s Color Challenge this month.  It helps jump-start my creativity when I’ve not created much to play along in some challenges.  

We’ve got a fun gorilla and lion party-ing it up with some celebration banners (County Fair Dies from The Cat’s Pajamas) and then some sequins to give it some party sparkle.  The background paper is MFT’s Party Patterns.  


Colouring is all done with Copics (Gorilla - E71, E74, E77, E79, W2, W5, W7, R14, R17, R29, Y13, Y17, Y38) and Lion (Y32, Y35, E97, E99 and R14, R17, R29, Y13, Y17, Y38).  

See you later this week with an ALL NEW and amazing Power Poppy Release!  

Monday, August 17, 2020

A Bank Robbery


Howdy again Pardners!  I’m back with another Western Slimline design for The Cat’s Pajamas Challenge this month.  This time we’ve caught the sunset Bank Robbery in progress!  This trio of trouble have held up the bank and are running off into the sunset.  I’ve used TCP’s Western Digi Stamp Set cause it’s so darn cute.  

All the colouring on the town and penguins is done with Copics.  


For the background layer, I sponged layers of sunset colours onto the Great Outdoors Stencil  with TCP’s Big Beautiful Blending Brush and some Distress Inks (Rusty Hinge, Wild Honey, Spun Sugar, Blueprint Sketch), and then added a bit of Prismacolour Pencil to give the clouds some extra definition.  It gives it a bit of the look of an aged scratchy photo.  


For some colour I added some stars with the Liners CutUps and accented the sentiment with some Bitty Banners.  


Some twine at each end adds to the rustic western feel, and finishes it off.  

Join us in the Slimline Challenge this month and you could win a $50 Gift Code to The Cat’s Pajamas Store!  

For more Slimline Fun please pop on over and visit the other Kitties in the Cat Pack playing along today. 

Friday, August 7, 2020

Moto Birthday


Yesterday was our youngest son’s 17th Birthday!  Like most of you, time seems to be going so quickly and I can’t believe my baby is going into Grade 12 in a few weeks.  One of the things he wishes he could have for his Birthday (nope-sorry bud), is a motorcycle.  He’ll have to work to achieve that dream on his own 😁.  But I couldn’t help dig out Power Poppy’s set Move the Soul for his card.  The sad news is that this set is retired, but since it’s perfect for our son, I thought I’d stamp it again.  


Our boy is full of life, and always looking for fun, and his favourite colour is still, after all these years, yellow.  So, it’s a golden moto colour in Copic Markers for the paint on this sweet ride.  

Everything is a bit canted angle on the card to give it the feeling of dynamic motion.  The stars in the bottom left corner are embossed and I’ve added the tire marks from the set on a gray strip to coordinate.  


Join the rest of the Power Poppy Bloom Brigade playing along today...


Monday, August 3, 2020

Slimline Cowboy Birthday


Happy Trails partners!  Today I’ve got a fun design from The Cat’s Pajamas for the new Slimline Challenge this month. I'm using the mighty fine re-released set Happy Trails Digital set from TCP to lasso some fun for a Birthday design.  And at $5 it’s a steal of a deal.  I’ve loved these retro cowboy designs since Alma first released them, but didn’t grab them at the time, so I’m so happy they’re in digital form now.  

I coloured up the cowboy, cacti and campfire images with Copics and then trimmed them out.  


I created the background scene with the Great Outdoors stencil, the Big Beautiful Blending Brush and some Distress Ink (Wild Honey, Antique Linen, Rusty Hinge, Tumbled Glass, Mermaid Lagoon).  That was a hoot to work with, and it worked really well for this Slimline design.  Lots more square footage to work with and it really gives you that wide open desert sort of feel.  


To make the design cohesive and add some dimension I drew in the small background cacti and popped a little Copic colour on them too.  In case you haven’t already jumped in on the craze, Slimline designs are 3 1/2 inches x 8 1/2 inches and fit into a regular business sized envelope.  


I accented the design with some twine and added the sentiment with TCP 3 x 3 Stars Die to mimic the feel of a sherrif badge.  It’s just so darn tootin’ cute!  


So please join us on the Slimline Challenge this month at The Cat’s Pajamas!  Enter with your card and you could win a $50 TCP Gift Voucher!  

Here’s more Slimline Inspiration today from The Cat Pack....

Tuesday, May 29, 2018

Come to the Zoo


As I was going through my stamps the other day, I came across this old set from There She Goes called (I believe) ZooPendous.  What a hoot!  As I was making a card for our son who just turned 19, I thought it would appeal to his goofier sense of humour.  So, I masked up a scene of animals in the zoo to welcome him to his 19th year! 

I added in some hills for the background with my multi-liner, and that helped tie it all together and feel more scenic that just images on a page.  


Their silly eyeballs just crack me up.  I coloured and cut out the ostrich and peacock and placed them, popped up on the foreground of the scene.  


Can you see my major faux-pas in masking?  10 points if you can figure it out!  I cracked up when I noticed it, knowing he probably wouldn’t catch it, and I knew after all that work I wasn’t doing it again!  Let’s just say that in masking - you should always pay attention to what should be foreground and what should be background! 


I did add this stamping on the inside but forgot to take a picture before I had my husband write in the card....so you get a bit of our heart for our son in there too.  


Here is our guy today at his birthday lunch.  His boss let him have the afternoon off and we could treat him to some lunch and conversation.  It seems so hard to believe how quickly the time is going with our kids, who are now young adults.  What a blessing to build relationships with them at this age.  He is becoming a good man, and we’re very proud of him.  

Thanks for popping by to our zoo!   

Wednesday, March 28, 2018

Kitty Cuddles


Sometimes it's the simple things that are the sweetest.  I found an old image from ADFD called Boy Kitty that I thought would make a sweet little design.  I love how toddlers lead with their chubby bellies when they walk.  It always makes me smile, as adults that never looks good, but on babies?  It’s all cuteness.  Something about this little image reminds me of that.  He just looks cute with his mussed up hair, snuggling that kitty.  

It’s coloured up with Copics, a simple sentiment from SU I believe, and then the patterned paper does most of the work to tie it all together (also SU from my stash).  


A wee bit of pennants, hanging from a corduroy button and twine make it complete.  


Wednesday, January 3, 2018

Birthday Bear Pops of Colour

I was talking with my kids the other day about what colours combined make other colours, why certain colours work together, and why hockey teams often choose colours that are complementary (across the wheel from each other) for their uniforms.  Colour theory is really interesting to me.  

Today I’ve got an example of complementary colours on this cute little birthday design, and they happen to be our NHL team's colours too, though unfortunately we’re not doing very well right now, much to the dismay of my boys.  I think blue and orange make a great combination particularly for boys.   


I pulled out the stamp Beary Special Birthday from My Favorite Things  because that little bear is just so cute.  I began by giving him some colour with Copics, making him a cozy brown, then I trimmed him out.  I used other elements from the set to create background for the layers.  I think these colours really pair well with white because it tones down the contrast and seems to pull everything together well.  


I placed him on a little scalloped frame (also from MFT) and added some white enamel dots for finish. 


And here’s the sweet and simple inside finish!  

I’ll list the Copics I used since I coloured on the fly and don’t have a good picture.  

Bear:  E11, E13, E15, E17, E18
Balloon:  YR14, YR16, R18
Present & Shadow:  B21, B23, B24


Monday, May 22, 2017

Super 15 with TCP


This week we have family visiting from the States, and the cousins are celebrating a lot of special occasions together.  The two oldest boys have birthdays at the end of May, so I thought I’d create this card for my 15 year old nephew.  It showcases The Cat’s Pajamas fun combination of Boom! CutUps, Comic Balloon CutUps and TCP’s stamp set My Hero.  My nephew loves green so this is a bit of a “Green Lantern” superhero card.  

Our bunny is coloured with Copics, trimmed out and placed on TCP’s Framed Up 2 CutUps.   I added a notebook edge with TCP’s Toppers CutUps.  


A few black enamel dots finish it off.  You don’t need a lot of embellishing with the pop of the comic book style colours and words.  The inside of the card reads “Dare to Be Who You Are” from the stamp set.  A good encouragment for a 15 year old.  


Here’s the Copics I used above.  

Did you new Sneaky Peek Week starts today??  All the TCP items are being previewed each day on the TCP Blog.  I’ll be up with all my new goodies next week!  Thanks for stopping by!  


Sunday, November 13, 2016

Yeti Spaghetti


First, a bit of a tangent.  Did your kids, or little people you knew ever watch the show The Backyardigans?  When my kids were little they did.  In the show colourful animated creatures would go on adventures, singing all the way through.  One of their adventures was to find a “Yeti”, and they kept rhyming yeti with other words, like spaghetti, if my memory serves me right.  When I was making this card the kids happened to be home and were reminded of that Yeti hunt, a sweet little memory!  

Alright...back to card making.  I purchased this sweet little set from MFT called Beast Friends, illustrated by Birdie Brown.  She is still one of my favourite illustrators for her sweet whimsical style.  I thought these adorable little creatures would work for a cute birthday card I made for one of my younger son’s friends birthday this last week.  

Stamped on XPress It Blending cardstock in a softer warm grey ink (Memento Gray Flannel), then coloured up with Copics and trimmed out.  


He’s just so cute!  I placed him in a little snow scene cut with a new TCP die, Hill and Dale CutUps, adding on the coloured trees.  I created the snow in the sky with white dots and on the trees with flicks of a white sharpie, and also gave his teeth some white polish with the white sharpie too.  Layered together with some stitched dies, a little fishtale pennant flag and some ribbon and twine and he’s complete!  The sentiment seemed fun for a 14 year old, while still remaining cute. 


Inside includes some of his footprints because those yetis are so hard to find!  


Here’s the Copics I used.  He was really fun and honestly really easy to colour.  

Thanks for dropping over today.  See you soon, and I hope you have a great week ahead.  


Monday, June 13, 2016

Ballooning for Boys


This past weekend we got to celebrate with a friend who has adopted a 3 year old son!  It’s a beautiful story, but it’s not been an easy journey.  A group of us who were all together in a leadership study a year ago gathered together and threw them a "welcome to her family shower," and I made the card that we gave to them.  I wanted it to be all boy, full of joy with a dreamy summer feel.  

I started with The Cat’s Pajamas - Drop In stamp set.  I knew it would be perfect for the a "precious-but-not-so-little-boy".  We decorated for the shower with a world travel theme, so it was a good pairing.    

Stamped onto XPress Blending Cardstock, paper pieced with Simple Stories So Rad dp, and then coloured in with a little bit of Copics.  The sentiment is from TCP’s Words of Love set.  


To finish it off I added some of our TCP Stitched Clouds CutUps, ‘cause they’re my favourite!  Then a button and twine finish it off.  


Here’s the Copics I used.  


Don’t forget that you too can join in on our Summer TCP Challenge, you have one week left to create!  And, by entering you can win up to $15 Cats Cash for the TCP store!  

Brenda Nakandakari
Christine Okken (you are here)
Deborah Anton
Jessica Rone
Julie Elak
and Alma at the TCP Blog!

Wednesday, January 27, 2016

Tons of Fun


My sweet little nephew turned five this weekend and we celebrated with a party together.  He just cracks me up, he is such a character.  Right now he is slightly nutty about Star Wars, as was his Dad before him....a long time ago in a galaxy far, far away.  He’s also sweet, silly and snuggly and we love him.  He has a stuffed animal aptly named “Elephant”, who is of course, and elephant.  So, despite his Star Wars addiction, I went with this sweet little elephant from MFT called Adorable Elephants.  

I masked off our sweet little elephant and added 5 balloons, masking them as I went as well.  I think he’s pretty cute.  I used an older MFT sketch for the design, embossing the sentiments and popping them up.  


Just some simple enamel dots finish it off.  I chose to keep it really simple on the details as his little 5 year old self is really more concerned with the nerf gun that was wrapped inside :)  


See you back here tomorrow for some Power Poppy fun!