Thursday, January 28, 2010

Flourishes Friday Favourites

Wow, where did this week go, we're already at Friday!?!  It's been a busy one at our household, so it's good to be at Friday - though my husband is away again this weekend, this makes it 3 out of 4 weekends in this month.  But at least at this one he'll be home each night for a couple of hours :)

Today Leslie Miller challenged the Flourishes Design Team to showcase for you our favourite things in the Flourishes store.  Well for me that's both easy and hard!  I love pretty much everything in the store!  So the hard part is choose which to showcase!


I am IN LOVE with this card.  Is that bad to say?  It just is so ME.  The vibrant colors, the piercing, lots of space to color a beautiful beautiful image, the ribbon.... I'm happy with how it turned out. 

Last week when I was putting a few projects away I had three ink pads in my hand and they looked really good together, so I put them in my "to do" idea list so they inspired the colors.  (Night of Navy, Kiwi Kiss and Melon Mambo)

So what are my Favourite Flourishes items here?   Well I couldn't narrow it down to one.

1.  The STAMPS of course :)  This is the Waterlilies Set an absolute beauty. 
2.  Eclipse Tape - Getting this tape has made my life SO much easier.  It is seriously the best for masking images, and it lasts forever too.  My roll is almost a year old, and I've used maybe 1/2 of it. 
3.  Copic Markers - Flourishes really does all the work for you by setting up the Color Family Collections so well in the store.  In this card I've used Hollyhock Collection, Delphinium Collection, Evergreen Collection (out of stock right now), and a bit of Spring Greens
4.  Silk Ribbon - there's nothing like it to give richness to a card.  And it ties so beautifully! 

Oh, did I mention also on this card is another Favourite - Basic Grey (Lime Rickey) DSP, and gems....see I could go on and on!   I added some beautiful piercing with an Ecstacy Template and also sponged some Navy ink onto the water to give it even greater depth. 

Be sure to stop by the Flourishes Blog to see how Leslie showcases her favourites today, and these DT members are showing their favourites too:  Julie Koerber and Laura Fredrickson

Wednesday, January 27, 2010

February 14 Flower

A friend of mine has asked me to make some Valentine's for some women in a Beth Moore study they are doing.  So I'm adding to the stash with this one, and today's Sketch Challenge at SCS :)


She's so cute :)  I colored this little girl with Prismacolor pencils and a blending stump.  The color gets washed out a little in the photo...it's less white on the background of the girl and there's a soft sky colored in behind the cloud.  Pulled out my sewing machine again for a little sewing.  The sentiment is from SU's Happy Heart Day. 

Here's a huge close up....


Thanks for popping in...I have tons to do today, including a very large pile of laundry.  Yesterday we did a bunch of work in the basement converted a spare bedroom into a spare bedroom/toy room, so my family room space downstairs isn't always all about toys!  I've still got a lot to do on that...but it's a big improvement. 

Recipe:  Stamps:  - MFT Pure Innocence Flower Girl, SU - Happy Heart Day;  Ink:  Memento Tuxedo Black, Soft Suede, Ruby Red;  Paper:  Ruby Red, Soft Suede Textured, Soft Suede Patterns DSP, Bella Rose DSP, Sewing Machine, Buttons, RHR Taffeta Ribbon, Bow Easy, Glue Dots, Dimensionals, Circle Punches Sponge, Prismacolor pencils.

Tuesday, January 26, 2010

His Eye on the Sparrow

Well, today is a fun day because at the Our Daily Bread Designs Blog you get to spend a little Time With ...ME :)  And I'm going to show you a sneak peek of a set being released in February!

This is what I created for today and it's very much a card with a story, so read on if you like :)

There was a time about 5 and 1/2 years ago that my husband and I were on a Staff Retreat at a camp on an Island, called Keats Island off the coast of Vancouver, BC.  It's a beautiful place, you can only get there by boat, and it's right on the Pacific Ocean.  An amazing location with luscious scenery. 

For us it was a very important time, we had only a few months previous, left our jobs at another place.  They were jobs that paid the bills and kept us "secure", but the working environment was very toxic, emotionally and physically.  And we were still very bruised...I've alluded to this time in our lives before if you've been with me for a while. 

But since that time, we had been hired "Interim" at our church to work with Student Ministries:   Junior High, High School and College Age kids, and really sensed this was a renewed calling in our lives, we loved these kids we were working with.  And we were on the retreat with this staff at our church (all wonderful people).  During this retreat we had a talk with our Executive Pastor and Senior Pastor and they offered us the permanent postion to work together as Pastors of Student Ministries at the Church, so in that we were thrilled, but the offer came with a significant cut in pay from where we were at before.  So much so that we just weren't sure we could survive on it.  We just didn't know what we should or could do.  

There was one afternoon after we found this out, where my husband and I sat on the patio of the retreat center, in a big Adirondack chair looking out at the ocean, sitting under the overhang of the building.   We spent a long time there, well over an hour, talking about the job offer, talking about how on earth we could make it financially, still feeling bruised over our last job, trying to seek what God wanted us to do, was this really where we were supposed to be?  Feeling fear for our family, thinking about our 3 kids, feeling such uncertainty.  We just didn't know what to do.  We cried we prayed....and after a while I sensed something above me.  I looked up into the rafters of the building's overhang, and saw a sparrow up there, "sitting with us".  That little bird was there the whole time, and it was still.  And it stayed there the entire time we talked.  And the song just swept over me "His Eye is on the Sparrow.....and I know He watches over me"...and the verse from Matthew came into our heads and we knew that we too could say "So don't be afraid; you are worth more than many sparrows" (Matthew 10:31).

We really knew in that moment that God had sent that sparrow to remind us of His truth.  We knew that God would care for us, and we knew what decision He was leading us to. It was a profound moment for us.   We accepted the positions for us, and God has abundantly taken care of us these past 5 1/2 years.  I can't imagine my life any other way.  This is where we are supposed to be.  I won't say it's always been easy, but I know for certain that He watches over us.  And we feel very blessed.

So today, if you find yourself at the end of your own rope - I would encourage you to take a step of faith toward a God who loves you and desires to show you how precious you are to Him as He takes care of you. 


So, today I'm giving this card to another young couple, just starting out in their marriage and ministry - not sure where God is leading them, feeling like they have more questions than answers, I hope it will be an encouragement to them as it was to us.

Thanks for stopping by friends!

Recipe:  Stamps:  Our Daily Bread Designs - He Watches Me;  Ink;  Memento Tuxedo Black, Rich Razzleberry ;  Paper:  Rich Razzleberry, Basic Black, Flourishes Classic Ivory, SEI Juliette Velvet Paper, SU - Lovely Flowers DSP;  Accessories:  Big Shot, Labels 2 and 3 Nestabilities, Scallop Edge Punch, Stitched Satin Ribbon, Basic Grey 1/2 Pearls, Prismacolor Pencils, Blending Stump, Sponge, Martha Stewart Rings Corner and Border Punch, Dimensionals.

Saturday, January 23, 2010

Grace

"My chains are gone, I've been set free, my God my Saviour has ransomed me
and like a flood His mercy reigns, unending love, Amazing Grace"  - Chris Tomlin


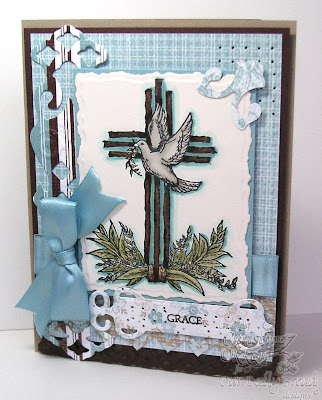
LOVE that song.  Check out my inspiration link too:  Floral Bliss from a great site called Echo.  It's such a beautiful room. 

This design really came about because of these gorgeous papers.  I haven't used them in so long, but they're really so lovely, and the texture really adds something to the design.  I colored the Cross and dove from the Confirmation set with Copic Markers to mirror the colors in the paper, I like how the Baja blue with the deep brown of the cross. 


The Sentiment is actually just a part of Confirmation and  Baptism Verses, I took the word Grace from one of the verses and inked it with a Chocolate Chip marker in the center of the Fancy Tags die. 

Thanks for stopping by again today....see you soon!

Recipe:  Stamps: ODBD - Confirmation, Baptism and Confirmation Verses;  Paper: Kraft, Chocolate Chip, Parisian Breeze DSP, Flourishes Classic Ivory, Baja Breeze;  Ink: Memento Tuxedo Black, Chocolate Chip;   Accessories: Copic Markers, Big Shot, Deckled Nestabilities, Lattice Borderabilities, Fancy Tags, Baja Breeze Satin Ribbon (Valet Ribbon Originals), Dimensionals, Bow Easy, Glue Dots

Shining the Light!

Hi Everyone!! The day has finally arrived for the reveal of our new Challenge Team at Our Daily Bread Designs!!! On Saturday February 6 we will begin our first challenge as a team. These challenges are weekly and there is lots of fun planned, so be sure to stop back!!

Today the new team has a lot of fun planned for you with a blog hop and scavenger hunt!!! You will have the opportunity to meet our new challenge team, view their creations and hunt for the items for the scavenger hunt. One blessed hopper who emails Chris Olsen the correct items and places to find these items will randomly be chosen to win the Light of the World stamp set!!!

Now, this is a challenge, so you do have a little bit of work in this scavenger hunt...here is what you need to find on each of the Challenge Team members blogs for the Scavenger Hunt:

1. red ric rac 
2. Psalm 28:7
3. mittens
4. damask
5. palm trees
6. daisies
7. polka dotted tea pot
(please note all items are on sidebars or heading bars and backgrounds, not in the posts themselves).

Now, here is the list of the challenge team members who will be participating in the Blog Hop and where the items for the scavenger hunt will be found, so take note of where you find them. If you find missing links, simply check back here for the next person in the list and mention in your comment that you were not able to comment on that person’s post. This is meant to be FUN FOR ALL…. NOT frustration, and we understand if someone’s blog is “down”. Often you can try again later and get on… but if you try and can’t leave a comment on someone’s blog, simply tell us in your end comment who you were not able to get and we’ll still enter you in the drawing!

Here's my new team!  Fabulous ladies everyone of them!

Christine Okken- ChristineCreations  ....you are HERE :)
Natalie Dever- Dougnat Diaries
Francie Gumprecht- Francies Fancy
Sabrina Jackson- SJButterfly Dreams
Patter Cross- Triple the Scraps
America Kuhn- Cards By America
Chris Olsen- Twinkles Glow With Stamps our new Team Coordinator :)

And here is what I've created for you today.  I really LOVE lighthouses, and this one is no exception.  I decided I wanted to try an ATC converted to a card again, so I started with the lighthouse and the ATC size (2.5 x 3.5 inches). 

I colored this lighthouse scene with Copic Markers twice and cut out the Lighthouse and one rock to pop up on the main image.  I love what dimension does for a creation.  I added a folded out scallop along the bottom accented with a tiny strip of paper and some hemp. 

Then I converted it to a card.


I wanted to keep that really nautical feel so I added a Octagonal Nestie shape in striped patterned paper to balance the lighthouse, with some wide striped ribbon and hemp.  On the main card I inked up my Texturz Plate with Vanilla Craft Ink and ran the Baja Breeze layer through my Big Shot.  It adds texture and ink together.  I stitched this layer together and then added some nautical knots with the brads. 

I love just adding a portion of the sentiment verse too...reminding us to Shine Out our Light! 

Now remember, all you have to do to be eligible to win is:

* Complete the hop, leaving comments on each blog and returning to the ODBD Blog  to tell us you have visited each blog and left a comment. * Email our fearless leader Chris Olsen at chrisolsenodbd@aol.com with the names of the items and the blogs you found them at. (eg. Kelley-loaf of bread) * Do this by Thursday Jan 28 at 8 p.m. EST * Check back on this blog on Saturday January 30 to see who the winner is!!!

Now you can head over to Natalie's Blog and see what beautiful thing she has created! 

Recipe:  Stamps:  Our Daily Bread Designs - Light of the World;  Paper:  Blue Bayou, Riding Hood Red, Baja Breeze, RHR Striped DSP, Gina K Pure Luxury;  Ink:  Vanilla Craft;  Accessories:  Copic Markers, Scallop Punch, Octagonal Nestabilities, Dimensionals, Texturz Plate, Big Shot, Vintage Brads, Linen Thread, Striped Grossgrain Ribbon, Hemp.

Thursday, January 21, 2010

Victorian Violets

Well it's another Flourishes Friday which I always love to say.  Today on the Flourishes Newsletter, Cindy is showcasing some beautiful ways to give a card a vintage - victorian look to it.  I know she'll have some beautiful things to show you, so you'll want to hop over there in a minute and take a look.  I wanted to play along today, so here it is....


What makes a design Victorian/Vintage?  I think it has a lot to do with color - most Victorian creations have muted tones and subtle patterns.  And with embellishments too, lots of laces, ribbons, ornate embellies.  So that's where I went with this card.  These beautiful Violets are colored with Prismacolor pencils and a blending stump.  Then I cut out my image with a Labels Four Nestie and gave it some Orchid Opulance sponging on the edges.  I accented this image with the Lattice Pendant,  with some new Looped Ribbon behind, and sewed the base together with a zig zag stitch then I sponged the edges to give it an aged appearance (this is new Basic Grey Nook and Pantry paper).  I added a small section of Basic Grey Euphoria with a Eyelet Border punch edge and added the crochet ribbon threaded with Satin Ribbon and a gorgeous Finishing Touches Brad


Yum!  Thanks for stopping by!  I'll be back tomorrow :)

Recipe:  Stamps:  Flourishes - Sweet Violets;  Ink:  Memento Tuxedo Black, Creamy Caramel;  Paper:  Confetti Cream, Orchid Opulance, Basic Grey Nook and Pantry, Euphoria DSP;  Accessories:  Big Shot, Labels Four Nestabilities, Lattice Pendant Die, Eyelet Scallop Border Punch, Crochet Ribbon, Satin Ribbon, Loop Ribbon, Sewing Machine, Bow Easy, Copper Finishing Touches Brad, dimensionals, sponge, Prismacolor Pencils, Blending stump, BG 1/2 Pearls

Wednesday, January 20, 2010

Sweet Lemonade Baby Quilt

Well, since I recently made all the animals in Noah's Ark blue for a boy, I thought I'd see if it would also work in pinks for a girl.  A family in our church just had a little girl that they've been longing for and this is for them. This cute Noah's Ark and animals are all colored with Copic Markers.


My mom gave me her sewing machine that she used to sew clothes for us all our growing-up years.  For me it's really special.  It just came back from the repair shop and as I was threading the needle to make this card I was thinking about the times when she'd ask me to thread the needle for her as her far-sightedness had kicked in.  In my youth I thought it was such a pain (oh the perspective years can bring), so far for me... no far-sightedness, but I so appreciated my mom more in that moment.  I only sew on paper now, but it's so fun to use her machine.  I decided I wanted this to look like a little girls' baby quilt, so I took out lots of papers, mostly from Basic Grey Lemonade, but also from a variety of BG papers.  I set out the pattern I'd like, adhered it down and then zig-zagged it on. 

When I think of baby quilts I think of gingham, scallops, pretty ribbons and buttons too, so I added them as accents.  And tied the sentiment buttons with the tiniest of bows made of thread (ask me how long that took to get right?!)


Now for a special Our Daily Bread Designs Announcement...there will be a special blog hop starting at the ODBD Blog on Saturday morning January 23rd at 8 AM EST. We are celebrating the start of a brand new Challenge Design Team....you'll have to tune in on Saturday to find out more!  Prizes involved! :)
Recipe:  Stamps:  ODBD - Noah's Ark;  Ink:  Melon Mambo, Memento Tuxedo Black;  Paper:  Regal Rose, Melon Mambo, Whisper White, Gina K Pure Luxury, Basic Grey - Lemonade;  Accessories:  Big Shot, Labels Five Nestabilities, Fancy Tags, Satin Pomegranate Ribbon, Pink Gingham Ribbon, Eyelet Border Punch, Sewing Machine, Buttons, Glue Dots, Thread, Copic Markers, Dimensionals, Bow Easy.

Tuesday, January 19, 2010

Flowers to You

Just popping in to show you an almost SU only card....I did this for today's Color Challenge at SCS.  Ruby Red, Soft Suede, Bashful Blue.


I pulled out my Fifth Avenue Floral set and watercolored the flowers with reinkers in Ruby Red.  2 are popped up and I masked and added a light touch of Bashful Blue to sponge the background, then a heavy sponging of Soft Suede. 


The Sentiment is from Best Yet and I sponged the Ruby Red layer with Soft Suede to give it a bit of depth.  The background layer is textured and overstamped with the flower in Soft Suede, with some pretty piercing and ribbon to accent the layers.  I added the brads in the top corner to "weight" the card better and help your eye travel down to the different parts of the card.

Sweet and simple...off to do some errands :)

Recipe:  Stamps:  SU  - Fifth Avenue Floral, Best Yet;  Ink:  Brown Stazon, Soft Suede, Bashful Blue;  Paper:  Ruby Red, Soft Suede Textured, Bashful Blue, Bashful Blue Prints, Soft Suede Patterns,Watercolor paper;  Accessories: Big Shot, Deckled Rectangles Nestabilities, Circle Punches, Piercer, Striped Bashful blue Ribbon, Dimensionals, Vintage Brads, Piercer, Reinkers, Aqua Painter.

Saturday, January 16, 2010

White as Snow

Remember this Hymn?

"What can wash away my sin, nothing but the blood of Jesus.
What can make me whole again, nothing but the blood of Jesus.

O precious is the flow, that makes me white as snow,
no other fount I know, nothing but the blood of Jesus" 

That hymn has been bouncing around in my head all day :)  The power of being forgiven and restored because of my Saviour is life changing. 

So that shaped this card design.   This is also for the Featured Stamper Challenge as well, jdmommy and here's the card . It's a beautiful design full of texture and simplicity, and lovely ribbon.


So the card started here with the ribbon.  We received a Christmas gift with this pretty white and gold ribbon attached to it.  I loved it so much I knew I'd save it for a card.  This was the day!  I embossed the dove from Our Daily Bread Designs' Confirmation set in gold, cut it out with a Labels Three Nestabilities, edged it with a Zig Painty and then framed it with the Scalloped Rectangle which was embossed with Finial Press Folder.  This then was put on a layer of Gold Metallic paper with the Martha Stewart Rings Punch around the page. 


The deep red velvet ribbon is to symbolize what Jesus did for me, a heart ribbon slide is in the center, surrounded by two knots.  I love how it turned out!  Have a beautiful Sunday!


Recipe:  Stamps:  Our Daily Bread Designs - Confirmation;  Ink:  VersaMark;  Paper:  White, Gold Metallic;  Accessories:  Big Shot, Labels 3 Nesties, Scalloped Oval Punch, Oval Punch, Dimensionals, Gold Embossing Powder, Zig Painty Pen, Basic Grey Pearls, Ribbon Slide, Red Velvet Ribbon, White/Gold Trimmed Ribbon (source unknown), Bow Easy. 

Lemon Mint Tea

My very sweet friend Julie sent me something so pretty for Christmas, and I've been dying to use it ever since!  I finally was able to use it for today's Inspiration Challenge, a web-store called Nell's Hill.  They had a pretty cup and saucer set that reminded me right away of this stamp. 


This stamp is just GORGEOUS, and so fun to color!  The combination of the saucer, delicate napkin, the tea in the cup and the lemon and mint is so pretty!  I used my prismacolor pencils to give it lots of light and life.

For the other parts of the card I used my brand new Spellbinders Fleur De Lis pendant behind the main image and also my Martha Stewart Rings punch to mimic the lace edging on the napkin.  And LOOK I sewed on the top layer to give it a subtle accent. 


To me it's a little touch of spring. 

Recipe:  Stamps:  Impression Obsession: Lemon Tea Cup  Flourishes - Tag Lines;  Ink:  Memento Tuxedo Black, Kiwi Kiss;  Paper:  Barely Banana, Regal Rose, Flourishes Classic White;  Basic Grey Lemonade DSP, Lily Kate DSP;  Accessories:  Big Shot, Labels Three Die, Modern Label Punch, Martha Stewart Rings Punch, Fleur De Lis Pendant Die, Basic Grey Pearls, Green Organza Ribbon, Bow Easy, Glue Dots, Dimensionals, Sewing Machine, Prismacolor pencils, Blending stump. 

Friday, January 15, 2010

Lovely!

Ready for some beautiful shopping? The Flourishes Store is open!

Classic Lace

Clouds
Background

Angelic Love

Tag Lines - a perfect match to Spellbinder's
Fancy Tags!

Thursday, January 14, 2010

Love and Lace

I have a lovely set to show you today.  This one designed by Becky Fleck, and it's all about the romance of Lace.  It's called Lace Edges and I think it's a beauty.  This first card I took one of the lace stamps and stamped it in a row 3x's on Flourishes Classic White paper and then colored it with my Copic Markers Pastel Collection, also adding a little Spica pen for some glitter. 


Because it was such a romatic stamp, I went for some very romantic touches in the accents, I used the Martha Stewert Rings Around the Page for the top Amethyst layer and also for the Soft Sky layer under the lace stamp.  Some pretty satin ribbon with a Finishing Touches Ribbon Slide.  The sentiment is done on Vellum Cardstock and uses the new Tag Lines set from yesterday on the Fancy Tag, and I've accented the top with a fancy Floral Accent done in the Spring Silhouettes DSP from SU. 


On this next card I wanted to see how another couple of the stamps from this set would look embossed.  And I love how it turned out!


I embossed one of the lace stamps in a Spellbinders Labels Four and tucked it behind the ribbon, to offset to sentiment on the Fancy Labels die. 

I embossed the long section of lace on Kraft paper with White Embossing Powder and trimmed it out.  I accented it with Crochet ribbon, Suede Ribbon, a ribbon slide and Basic Grey Gems


A really classy stamp set!  So versatile for many occasions!

Now you'll want to head over to the other girls' blogs to see what they've been up to with this lovely lace!

Cindy Lawrence, Julie Koerber, Latisha Yoast, Leslie Miller, Stacy Morgan and to the Flourishes Blog for your chance to win this set today! 

And join us tonight for the Power Hour Release party at the SCS Forum, 8:00 PM Mountain time! 

Recipe:  Just a Note:  Stamps:  Flourishes Lace Edges, Tag Lines;  Ink:  Basic Grey, Memento Tuxedo Black;  Paper:  Basic Grey, Almost Amethyst, Soft Sky, Spring Silhouettes DSP, Flourishes Classic White, Vellum Cardstock;  Accessories:  Big Shot, Finial Press Embossing Folder, Spellbinders Floral Accent Shapeabilities, Fancy Tags Die, Martha Stewert Rings All Around the Page Punch, Silver Brads, Satin Ribbon, Silver Finishing Touches Ribbon Slide, Dimensionals, Copic Markers, Spica Markers

Embossed Lace:  Stamps:  Flourishes Lace Edges, Tag Lines;  Ink:  White Craft Ink, Bravo Burgundy;  Paper:  Kraft, Bravo Burgundy, 7 Gypsies Savannah DSP;  Accessories:  Big Shot, Lattice Borderabilities, EK Success Scallop Punch, Basic Grey Gems, White Embossing Powder, Fancy Tags Die, Crochet Lace, Suede Ribbon (Stamp Simply Store), Gold Finishing Touches Ribbon Slide, Labels Four Die, Dimensionals

Wednesday, January 13, 2010

Sneak Peeks - Love You

Today is the 2nd day of Sneak Peeks with Flourishes.  I really love this sentiment set today, it's called Tag Lines.  For one it has wonderful font, and it has so many sentiments I would use regularly.  Ones I NEED :)  And the best part of all, this set was designed specifically to fit into Spellbinders Fancy Tags, there's not much than can make a cardmaker happier than to see things fit together.  Of course they'll work in many other applications, but I really love my Fancy Tags, they add such class to any card. 

We often say that to each other or our kids, a quick "Love You".  When we say goodbye, when we say hello, just for the sake of saying Love You :)  I don't care how old you are, you can never get tired of being told you are loved. 


I think I'll give this Valentine to our daughter because it's bright and cheery.  On this card I actually used my Ribbon Tag Trio Two  because I wanted a little extra stamping space.  I stamped the butterflies from the Gerber Daisy set alongside the sentiment.  Underneath the sentiment is a Lattice Pendant cut in half. 

I also overstamped the sentiment on the patterned paper accenting this with some pretty Kaiser Pearls


I also added some dry embossing on the patterned paper as you can see above. 

My mom asked me to make a card for my Uncle, he'll be celebrating his 75th Birthday in a few weeks and we're going to a surprise party for him, which is always fun.


I went back to one of my favourite Flourishes sets, Home Tweet Home.  I watercolored the branches and leaves, and the bird separately, and cut out and popped up the bird.  I wanted to give it all a masculine feel.  Nothing too frou frou (cause my Uncle is definitely not frou frou, lol!).  I picked the color palette from these 7 Gypsies papers, Nottinghill and Savannah.  Doesn't the sentiment look perfect in this die?  It's a combination of two separate words put together, that way you can do Happy Anniversary, etc. 


I washed in a soft sky in the background too, you can see it a little above.  I think he'll like it. 

Well, these wonder women on the Design Team have lots more for you to be inspired by today:  Cindy Lawrence, Julie Koerber, Latisha Yoast, Leslie Miller, Stacy Morgan

And would you like to win this fabulous set?  See the Flourishes Newsletter to enter today!

And don't forget tomorrow night is the big party!  The Release Party starts at 8 PM Mountain Time at the Flourishes Forum on Splitcoaststampers.  Hope to see you there!  It's always fun!

Recipe:  Love You:  Stamps:  Flourishes Tag Lines, Gerber Daisies;  Ink:  Kiwi Kiss, Bermuda Bay;  Paper;  Bermuda Bay, Kiwi Kiss, Kiwi Kiss Patterns DSP, Thoroughly Modern DSP, Whisper White;  Accessories:  Big Shot, Spellbinders Ribbon Tag Trio Two; Lattice Pendant Die, Dimensionals, Kaiser Pearls, Bermuda Bay Dotted Ribbon, Kiwi Kiss Satin Ribbon, Finial Press Embossing Folder

75 Years Young:  Stamps:  Flourishes Tag Lines, Home Tweet Home;  Ink:  Stazon Timber Brown, Brocade Blue;  Paper:  Brocade Blue, Night of Navy, Close to Cocoa, 7 Gypsies - Nottinghill and Savannah DSP, Flourishes European Watercolor paper, SW Markers, Aqua Painter, Big Shot, Spellbinders Labels One, and Fancy Tags, Satin Ribbon, Basic Grey Pearls, Corner Rounder, Piercer.

Tuesday, January 12, 2010

Flourishes New Releases Angelic Love & Clouds

How would you like some sweet Sneak Peeks of some new LOVE sets from Flourishes?  Today I have two samples for you, almost opposite of each other. 

Here we have a very soft pastel sunset with 2 new sets, Clouds background set and Angelic, which is a very sweet Valentine and Friendship set.  I colored the angel softly with Prismacolor pencils and the sunset in the clouds is done with various shades of craft ink smushed on the stamp giving you different layers of color.  I also stamped the clouds on the background vellum layer too. 


The angel is popped up, and the sentiment is on vellum as well.  Some Basic Grey gems and silk ribbon and its softly sweetly done.   I thought the silk would give it a cloud like look too. 


Now this one has some drama in it.  I wanted to take advantage of this great new paper at Flourishes, it's called Metallic Board, and comes in a variety of colors, here I've used the silver and red.


It's really mirrored - so it's not easy to get a good picture, but you can see I've used the Silver Metallic Board paper and embossed the locket onto it, and then I've used the Red Metallic Board for the framing, using a Spellbinders Foliage Frame embossed and also the Borderabilities Lattice with satin ribbon woven through.  I love how this paper takes dry embossing.  It's very classy.  And on the heat embossing, I just advise using an embossing buddy before stamping so stray embossing powder doesn't stay on the paper. 


I stamped "I Love You" from the set in Stazon black, and then tried to give it the look of a chain with some mettalic cording.  I was reminded of this idea last week when I saw my friend Tosh's pocket watch she made some time back for her Dirty Dozen Gallery.  Isn't she the smartest?  Mine looks different but I have to say she was my inspiration!

Well, there are many more wonderful samples to see with the Design Team, and if you want to win this set....enter your name at the Flourishes Blog today!  And don't forget there's still time to enter the New Release Contest to win the entire new release!


Recipe:  God's Angel's Disguised:  Stamps:  Flourishes - Angelic and Clouds Background;  Ink - White Craft, Only Orange, Regal Rose, Lovely Lilac and Ballet Blue Craft Inks, Memento Tuxedo Black;  Paper:  Lovely Lilac, Cardstock Vellum, Flourishes Classic White, Whisper White;  Accessories:  EK Success Scallop Punch, White Silk Ribbon, Basic Grey Square Gems, Prismacolor Pencils, Dimensionals, Bow Easy

I Love You Locket - Stamps:  Flourishes - Angelic;  Ink:  VersaMark, Black Stazon;  Paper:  Whisper White, Basic Black, Metallic Board Red and Silver, SU Patterned Paper;  Accessories:  Big Shot, Lattice Borderabilities, Foliage Frameabilities, Silver Cording, Silver Embossing Powder, Silver Brads, Dimensionals, Satin Ribbon, Bow Easy

Monday, January 11, 2010

Spring Birds

Well the weather yesterday made me think of spring, as soon as that thermometer gets above freezing, I get that anticipation, longing for spring. 

Tonight I'll be swapping with my 10 for 10 friends so I put together some spring-like cards and colors for them. 

I pulled out some old In Colors for this set.  Wild Wasabi and Soft Sky.  This Spring Silhouette SU patterned paper was one of my favourites when it was in the catalogue, so elegant, with a real romantic feel.

Quite simple cards, I'm on a CAS kick I guess!  I stamped the damask from this set on the background of the card, stamped the bird twice and cut out and popped up the soft sky bird, and added simple accents with the Soft Sky Ribbon and these old Vintage brads. 


Back again tomorrow, one of my favourite times of the month!   Flourishes New Releases! 

Recipe:  Stamps:  SU Friends 24-7; Ink:  Wild Wasabi, Soft Sky;  Paper:  Wild Wasabi, Soft Sky, Whisper White, Spring Silhouettes DSP;  Accessories:  Scallop Punch, Circle Punch, Scalloped Circle Punch, Dimensionals, Soft Sky DS Ribbon, Vintage Brads.

Bella Thank You's

In the 10 for 10 that I've been a part of for the past 7 years or so, one of our members lost her husband this past Christmas season.  My heart goes out to her.  As a group we decided to make her bundles of cards so that after the funeral she can send thank-you's out to others if she needs to. 

I wanted these to be simple, and yet classic.  The CAS Challenge at SCS today is to have something "cut out" on your design, and I had an idea right away.


I think this stamp set gives that really dramatic statement, but is so elegant at the same time.  I stamped the flower in Barely Banana and Certainly Celery.  I used an "out of the box" cut on the right hand side for some added interest.  Then I stamed the center of the flower again, cut it out and then sponged it with Apricot Appeal, then added it with a dimensional. 


I don't usually do pastels, but I thought the yellows were great for the flower, and hopeful feeling.  Here's another look at the dimension. 


Sorry for the slightly dark photos, it's nice and warm here today, but totally cloudy, so my OTT light had to do.  I sponged the outside of the card layer to give it depth.  So, simple, but I think classic.  Thanks for stopping by, I'll be back tomorrow, hope you will too!  :)


Recipe:  Stamps:  Bella's Blossom;  Ink:  Barely Banana, Apricot Appeal, Certainly Celery;  Paper:  Barely Banana, Apricot Appeal Prints, Apricot Appeal, Whisper White, Certainly Celery;  Accessories:  Eyelet Border Punch, Dimensionals, Sponge, Banana Grosgrain Ribbon, Modern Label Punch

Saturday, January 9, 2010

Welcome Baby Gideon!

Welcome to the Our Daily Bread Designs first challenge of the year!  I'm excited to be a part of this new venture!  Today's challenge is an easy one for you to jump in to. 

Our sweet nephew was born earlier this month, and we were so thrilled he was a boy, he joins his one oldest brother and 3 sisters, I think to make the family complete :)  to welcome him this is what I made to send along with his birth announcements that I made for them as well.


I really love how this card turned out.  I decided to go really whimsical and color all of the animals in blues and whites to really emphasize the boy factor.  The ark and animals are colored with copics and are popped up on the oval for some nice definition.  The scalloped sentiment punch gives you almost the feeling of a cloud.  And what's a baby card without gingham ribbon and buttons? 


Always fun to create a baby card don't you think? 

So we invite you in on this challenge too, the requirements?  To use the color BROWN and to use PUNCHES in your creation.  The keyword for online galleries at SCS is ODBDC110 which stands for Our Daily Bread Designs Challenge January 2010.

All entries for the challenge should be entered in Mr. Linky on the Our Daily Bread Designs blog. You have until January 23rd at 8 p.m. to link to Mr. Linky.  You do not have to use Our Daily Bread Designs stamps to enter but if you have them we really would love to see them.   There are two prizes of a $15 gift certificate toward stamps at the Our Daily Bread Designs store. Woo Hoo!

And also remember To celebrate our new Member Company status at Splitcoaststampers, we're giving away a BIG prize!!! If you visit the ODBD Welcome Forum and leave a comment by January 10, you will be entered in a drawing to win a $50.00 Gift Certificate to the ODBD Store! So you have until tomorrow to participate!!"

To celebrate kicking off these new challenges you'll want to go for some inspiration to these lovely ladies blogs:  America Kuhn, Angella Crockett, Angie Zublionis, Becca FeekenChris OlsenConnie McCotter, Dawn Lusk, Debi Southard, Deborah Saaranen, Grace Nywening, Julie Warner, Kathy Jones, Lorelie Kim, Sabrina Jackson, Sandee Shanabrough

Thursday, January 7, 2010

Love Notes - Lunchbox Style

Oh I've missed my Flourishes Fridays!  But we're back and ready for a New Year with you!  Today it's a fun Friday - because it's a Pre-Release Challenge, next week Wednesday through Friday is our January Release, and it's a sweet one filled with lots of love!

This challenge is all about feeling the love in our card making! The kind of project, color and feel is all up to you, just make sure that whatever type of card you make -- it's perfect for the season of LOVE!  You'll want to join in because if you do, you have a chance to win the whole NEW Release next week!  See the Flourishes Newsletter for details!

I've been wanting to make some Lunchbox Notes for my children for a long time.  I think it's so important for kids to hear a word of encouragement, what they're doing well at, a praise for a job well done, a little word of kindness and affection and a little note in the lunch is a sweet way to send a little love at lunchtime. 


Now I know that my boys at least may love the note, but then just deposit it in the trash after lunch (I think my daughter might put them in her locker though :)  )....so I didn't want to make them too extravagent, but just a sweet little 3 x 3 note.  I've taken various Flourishes sets and watercolored the smaller images to make something sweet.


This little bee has glitter on it's wings and some fun honeycomb shapes


This little hopper shows you his jumping with some piercing and faux stitching. 


These orange slices have a drop of glitter.


And this little strawberry has some lovely Flourishes mirrored paper to frame the image. 

You'll hopefully see some more of these Love Notes, lunchbox style from me over the next months.  It's one of my goals for the year ahead :) 

Now, head on over to these wonderful Flourishes Girls for their LOVE inspired creations today: 


Recipe:  Stamps:  Life Love and Lemons, Peony, Lilac, Strawberries, Lampost Greetings;  Paper: 
Flourishes European Watercolor paper, Baja Breeze, Basic Grey - Urban Prairie, Always Artichoke, Old Olive, Basic Grey- Lemonade, Only Orange, Basic Grey Lime Rickey, Real Red, Memory Box - Rhubarb Tart, Flourishes Red board Mirrored paper, Ink:  Black Stazon, Baja Breeze, Green Galore, Accessories:  SW Markers, Aqua Painter, Sponge, Wide Baja Ribbon, Piercer, Mono Multi Glue, Dazzling Diamonds Glitter, Scallop Punch, Martha Stewart - Rings Corner Punch and Rings Punch, Oval Punches, Circle Punches, Kaiser Pearls, Buttons, Glue Dots, Dimensionals, Various Flourishes Ribbons, Kiwi Kiss Striped Ribbon, Baja Wide Grosgrain Ribbon

Tuesday, January 5, 2010

Certainly Here for You

Hi Everyone!

While we had a wonderful Christmas and New Year, I have several friends who have lost someone in their family this season.  My heart just goes out to them.  So I have a few sympathy cards to make. 

Today I used the color challenge colors, Handsome Hunter, Certainly Celery and Bermuda Bay.  They have a lovely monochromatic feel to them while still standing out from each other. 


I used this lovely SU set, Friends 24-7, and stamped the flowers on watercolor paper, watercolored them with SU Markers and then cut them out.  The dimension of the flowers really makes the card I think. 

I finally broke into my textured paper.  I love how it looks, yet I seem to horde it rather than use it.  I stamped the damask image on that.  It has a really nice look on the textured paper.

I used my new Martha Stewart Rings punch that my sweet daughter gave me for Christmas to edge the Handsome Hunter section. 


Above you can see I sponged the Oval Nestie shape too. 

Thanks for stopping by.  I'm off to do some errands with my sweetie. 

Recipe:  Stamps:  SU - Friends 24-7;  Ink:  Black Stazon, Bermuda Bay;  Paper:  Certainly Celery, Bermuda Bay Textured, Handsome Hunter, Watercolor Paper, Whisper White;  Accessories:  Big Shot, Oval Nesties, Martha Stewart Punch Around the Page Rings Punch, Bow Easy, White Satin Ribbon
, Basic Grey Pearls, Glue Dots, Dimensionals, Sponge, SU Markers, Aqua Painter, Snips, Fancy Label punch