Showing posts with label Easter. Show all posts

Monday, March 11, 2024

The Easter Bunny is a Penguin with TCP


Easter is just a few weeks away!  Today I’m showing off the cutest NEW March Release items from The Cat’s Pajamas perfect for your Easter celebration!  This digi set called Spring Fling is the cutest retro set from TCP!  Who knew the Easter Bunny is a trio of penguins!?  


I coordinated the card with this brand new digi paper pack from TCP called Spring is Here.  It has the most delightful set of colours and patterns perfect for any Spring design.   All of my colour inspiration came from the patterned paper and I added retired TCP die accents including the swirly banner, and tiny Easter Eggs accenting the main image with a few florals tucked in.  
 

It’s a cutie!  Glad you could stop by today!  

Monday, April 3, 2023

Easter Bunnies with TCP


Popping in today with some sweetness for Easter.  Easter for me is a special sacred week.  On Palm Sunday at Church we had all our littles come and wave palm branches and sing and it just overwhelmed me again at how precious and important it is for our children to have joy and rejoice in their faith.  So, these designs are a bit on the “sweeter” side of an Easter Celebration, with all the fun of baby lambs and bunnies.  

I’m using some retired The Cat’s Pajamas goodies for my designs because they still make me smile, but I’ll link wherever we have new SVG or digi versions.  First up, an adorable mini-slimline card.   


These two look to be getting into a little egg mischief to me.  I’ve stamped and coloured the Follow the Bunny Stamp set with Copics, then used the coordinating dies to cut them out, I’ve placed them on an ink splattered background, with a cute Slimline Suburbs CutUps also retired from TCP.  A couple of holeless sequins add a touch of sparkle to the card. 


Little peep chicks adorn the inside of the card cause they’re just cute.  


And the coordinating tag is created with TCP’s retired Lamb, Bunny, Chick Cut Ups dies, (now Spring Animals in SVG) as well as eggs from TCP’s Happy Easter digi set, and they’re all placed on a TCP Tag die, splattered with ink.  Such a cutie don’t you think?  


They make a cute pair ready for an Easter basket for Sunday!   Thanks for joining me!  
 

Monday, March 14, 2022

Easter Celebrations at The Cat’s Pajamas- Take 2


Greetings friends!  I’m back with NEW March inspiration from The Cat’s Pajamas!  Part one of my designs this month is located HERE.  Today its all about Easter!  One of the most beautiful times of the year for my faith, and also a beautiful time to celebrate life, growth and hope.  I have two cards to show you today, one more playful and one more elegant.  This card uses the new Sugar, Sugar Digi.  

Just today my husband bought a huge bag of Cadbury Mini Eggs.  Oh my heart.  He needs to hide them because I LOVE that candy coated chocolate!  So, this card speaks my language about Easter chocolate.    Our favourite bunny is lounging in the Easter basket after a sugar coma of chocolate coated fun.  

Colouring is with Copics, with detail added in with Prismacolor Pencils, like the blades of grass, the texture of the basket and the sky on the tag.  The main image is printed on Copic XPress it Blending and cut with a retired tag die from TCP.  The background is sponged with Tumbled Glass Distress Oxide Ink.  


Other cool things on the design are new from TCP including the Grassy Patches Cutables and the Happy Spring digital patterned paper, it makes for such a fun spring card!  


Next up is a lovely Easter card with the new FREE Digital Download called Fancy Happy Easter.  The script and designs in the set are lovely!  I coloured the image with Copics and added in backgrounds and detailing with Prismacolor Pencils.  The mini-slimline design also uses our new Happy Spring Digi Papers,  tiny flowers cut to accent and holeless sequin accents.  


The pops of colour add such Spring freshness to the design.  

Here is a peek at the NEW items I used from TCP today....go check them out!  


Monday, March 7, 2022

TCP March Release Take I


Greetings friends!  I’m popping in with some awesome NEW inspiration from The Cat’s Pajamas for the March Release going on now!  There are some fun additions to this month’s release including digital patterned paper!  It was a first for me to play with digital paper files, but it was a blast to have the versatility of printing only what you wanted.  

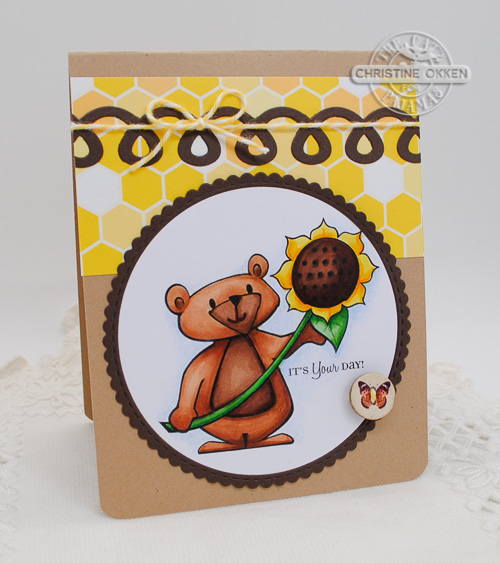
I have two designs to show you today beginning with our favourite buddy bear in this set called The Little Things.  I love that he’s holding up a sunflower, which is perfect for nods of support for Ukraine.  He’s coloured with Copic Makers, with accents and shadows added with Prismacolor pencils.  


To accent the design I used some TCP dies to frame him up, add some swirly accent, a bit of twine and a cute wood button.  The honeycomb paper is from our new Happy Spring Papers.  


Here is a peek a the Copics I used.  I used the same colours for all of my release cards this month, but you’ll see two more of them next week.  

This next design was totally inspired by Amy Kolling who did a floral wreath a few years ago with buffalo plaid in the background, I loved it so much that I thought this would be the perfect time to use it as inspiration for this pretty wreath.  


I’ve combined the Rabbit and Wreath cutable files (I’ve used the retired metal dies, but the files are the same), I just cut out the wreath and accents several times in different colours so I could combine them.  Then I tucked in some of the Easter Eggs from the Happy Easter set to fill in the wreath.  The layers give it a nice 3D effect.  

A bit of sparkle is added with holeless sequins and the added vellum softens the plaid, but still allows the pattern to show through.  


The sentiment is from a retired TCP die, and works perfectly with its delicate font.  

Here’s a peek at all of the new goodies I used!   Thanks for joining me today.  


Monday, March 15, 2021

Some Bunny Loves You


How about some Easter/Spring themed sillyness?  The Cat’s Pajamas has some fun new Digital Images out that are perfect for some fun.  This one is called Bunny Kitty, and our favourite Sprinkles is hiding in the flower patch trying to blend in for the season with some cute bunny ears.  He just wants to tell you he loves you :)  


Just a bit of Copic colouring on the flowers, ears and tie.  I wanted the image to match more to the patterned paper, (Echo Park Coffee and Friends)so I drew in some leaves tucked into the flowers, and it really ties them together nicely.   I added some sewing, and added the TCP Grass Die to ground the image.  


A perfectly peach grosgrain bow adds a bit of pretty detail.  


Copics I used are shown above.  

Don’t forget about the TCP Progressive Sale going on!  Its such a great time to get all the goodies you’ve been waiting for and March means 20% off your price tag!  


We’re down to our last 2 weeks of the TCP Tuesday Challenge, this month we invite you to help us close this Challenge down with your floral designs!  So perfect for Spring creating.  Link your creation here:  TCP Tuesday Floral Challenge and you are in the running for a $50 TCP Gift Code!  

Enjoy some more inspiration with these Kitties:

Friday, February 26, 2021

Power Poppy’s Magnolia Sunshine


The last few days have been so beautifully sunny.  I know it’s not Spring yet, we’ll still have cold weather or another cold snap for at least a month yet, but its so nice to get outside and feel the warmth of the rays on your face isn’t it?  I’m very much in Spring mode with designs and this is my third Spring floral design this week.  It just cheers me right up.  This time I pulled out Power Poppy’s winsome digital design Magnolia Sunshine.   I so wish we could grow Magnolia trees here.  They are so showy!  And though I really love the pink blooming ones, this time I thought I’d colour the magnolias to be more of the creamy white version.  


This beauty is so fun to colour.  Those pretty daffodils are such a nice shade of yellow to play with.  Colouring is all done with Copics and I accented the whole design with these pretty dies from Spellbinders.  The overall card is about 5 1/4 x 5 1/4 inches.  To keept that feminine feel to the design I added a white paper bow (TCP Die) that I ran through a polka-dot embossing folder.  It adds a nice touch of texture.  


The collection of Copics I used are below.  
 

And now, please also visit my Bloomie sisters Barbara and Broni for some more inspiration!  

Wednesday, April 8, 2020

Chillin’ With My Peeps


It doesn’t feel quite right that we won’t be celebrating together with our extended family this Easter.  One of the traditions is when the kids do an Easter Egg hunt with their little cousins.  Though we can’t manage that, I thought it would be fun to put together a little care package for them and we’ll drop it off on their front steps this weekend.  So, I put together a couple of simple designs with this cute set from The Cat’s Pajamas called Follow the Bunny.  This one will be for my nephew.  

I used the coordinating dies for this set and coloured up the scene with Copics.  


I accented with some gingham grass using TCP’s Grass CutUps, and used the Great Outdoors Stencil to created the clouds.  

Next up, for my niece.  


I just love this cute little trio of peeps!  And the sentiment is so fun.  It feels a bit like we’re going on an egg hunt outside.  


I combined both the Stencil and the Grass die on this card and added texture to the bunnies by using Copic Blending Solution on a washcloth and lifting the colour from the bunny.   

Thanks for chillin’ with me peeps!  

Sunday, April 5, 2020

Call to Your True Colours Artwork


Blessings on this Palm Sunday to you!  I wanted to share an original piece of artwork I recently painted.  Watercoloured with Daniel Smith Watercolours on Arches Cold Pressed Watercolour paper.  

This season I began an Easter Art Exhibition at our Church with other artists around the theme "Vision of the Christ”.  Today it went live on-line and this is the piece I submitted.  It’s Called “Call to Your True Colours”.  Here is my description of the artwork. 

Luke 22:60-61 “Just as he was speaking, the rooster crowed.  The Lord turned and looked straight at Peter”.  

DESCRIPTION OF THIS ARTWORK:

Though the rooster crowing must have been a moment of shame, fear and conviction for Peter, I think it equally as much was the moment Peter came to himself.  It was the call back to who he truly was.  A disciple of Jesus, a friend of the Lord, a man of conviction and faith.  Black roosters are never truly black, they reflect numerous colours in their feathers.  In this piece,  I tried to play up the underlying colours of the rooster to represent the call to Peter to come back to himself, and his true identity as a follower of Jesus Christ.  Now it is our call - come back to your true colours seen through Jesus’ eyes. 

Praying it invites and encourages you this Easter week! 

Friday, March 16, 2018

A Cup of Columbine


I have something so cheerful for your Friday!  Marcy has illustrated a new Colour Story Illustration for the month and it’s a gem!  It’s called Cup of Columbine.   There are two versions of the image with or without the baby robin and egg.  So, one is more simplified, and this one I’ve used shows off the baby bird and that cute egg.  I couldn’t resist playing with this one first.  Marcy does birds so well!

I printed the image quite large so it would cover almost the entire card face, and also lightened the lines up just a little bit so the image was more gray than black.  Marcy offers no-line versions of both the images, but I didn’t want to go quite that light, so I just made the black lines slightly more transparent in Word, decreasing it by about 30%.

Marcy thought this image would be a good opportunity to play with blues and purples so that’s what I did.  I found a gorgeous columbine that is a bluey-purple and then one that’s a regular purple.  I also LOVE LOVE LOVE Hosta, and the blue-green varieties are my favourite, so it was a joy to add that colour in there.  


It was so fun to colour that baby robin!  I wasn’t sure if they start to have a red breast when they’re little, but I found one type of baby robin that starts with a soft orange breast and that went perfectly with with columbine centres.  I added a little soft orange into the leaves of the columbine as well to tie it together bettter.  The sentiment is from Power Poppy’s set, Potted Primroses.  

I gave the napkin underneath a striped pattern in the blues that match the bluey-purple columbine.  And, I added the white polka-dots to the cup with a white gel pen.  It’s such a beautiful image!  


Lots of markers here!  

For some more beautiful inspiration, here’s the team playing along today...

Christine Okken
Cindy Lawrence

Julie Koerber
Katie Sims
Stacy Morgan
Tosha Leyendekker

and Marcy at the Power Poppy Blog
SaveSave

Sunday, March 4, 2018

Bunny Birthday with Pattern

This week I’m showcasing fun ways to use pattern in your designs!  Hope you enjoy!


Oh, I love the sweetness of spring and all things that remind us new life is coming!  Though I’m not a huge fan of the bunnies that roam our neighbourhood (and eat my tulips), I do love the cute paper variety.  Our niece just turned 9 and I was roaming through my stamps to make her a BD card. I found this sweet set called Good Times from a company I used to design for, There She Goes.  It has since closed, but they had some of the sweetest stamps - often illustrated by Torico - who now works for MFT.  

So, I felt like this sweet pair needed to be stamped up again.  I used my Misti to position the two bunnies (they are separate stamps), so I could mask them and tuck them close together.  I added some grass blades with my Micron pen under her feet to tie the two images together.  It kind of looks like a big sister and little brother, which is what they have in their little family.  


I thought they’d look adorable with some paper piecing and it would tie the whole card together with these great spring prints on the paper.  A bit of sewing on the layers, a sweet sentiment, from an older PTI set called Tiny Treats. I thought it worked perfect because of the “time” element and the little pocket watch he’s holding.   Can you tell that I coloured them slightly differently?  He’s done in cool grays (C00 - C3) and she’s in neutral grays (N1 - N5), they are both cooler grays but just different enough that it makes them look unique from each other.  


Here’s the Copics I used.  Hardly any actually - another benefit of paper piecing!  

Wednesday, April 12, 2017

Easter Lily


Hello lovely people!  Today I’m bringing you a special design made for Easter.  It is so meaningful to me in my faith walk to remember and celebrate Jesus sacrifice for me personally, the depth of His love for me and for the world, and hope for life!  The Easter Lily is a symbol of purity, virtue, innocence, hope and life.  Perfect for the season.  

I wanted to see if I could use Power Poppy’s beautiful new set Tiger Lily XL to create an Easter Lily, and overall, I think it worked pretty well!  It’s always nice to find more than one way to use a stamp.  

I started by stamping the large lily in Memento Summer Sun ink on Copic XPress It Blending card stock.  The light ink helps maintain as much of the white of the petals in the design as possible.  Then, I went to work colouring in the center of the flower in a bright green, next adding shadows to the petals in the depths allowing a lot of the white to show through.  By colouring the background in a bluey-purple it adds to the contrast, making the whites look even whiter.  


I decided to keep the design very simple to showcase the beauty of the flower.  Just adding a simple row of ric rack and the sentiment from Power Poppy’s set, Bloomin’ Wonderful stamped in Memento Pear Tart ink.  

Sometimes when I’m colouring a really large flower, I’ll cut off the edge of the design and flip it around to the opposite side of the card to add some contrast to the design.  You can see this little strip along the right side of the card.  It was originally on the left of the stamped design.   


Here are my Copics used for the colouring.  


Thanks for sharing the joy of the Easter celebration with me.  I’ll be back tomorrow with a card for Power Poppy’s Power & Spark Challenge!


Monday, March 20, 2017

TCP Easter Treats


Well hello again!  I’m back today with more Sneak Peek goodies from our surprise March Release at The Cat’s Pajamas!  All of these pretties will be available in the store!  And if you by them together, you get a lovely discount.   I have 3 cute Easter designs to show you with the new release items today.  


One of our favourite activities each Easter is to get the kids together and dye eggs.  It’s always fun to dip the eggs in the dye and see how they’ll come out, or use some type of resist (like white crayon) to create a design.  When I saw the awesome Easter Bunny egg dies that Alma made for us I decided to try and mimic our own dyeing of eggs at Easter. 


I started with the larger plain egg shape from the die, and cut a few out from watercolor paper.  Then I used some reinkers in yellow/orange, green and turquoise and added some colour to the paper.  I washed in some water first, and then let the reinker bleed where it wanted to from my brush.  This is what they looked like as they were drying.  They’d just be cute on their own hey?  But, why not take them the next level?!  You can add the outer design layer of the eggs by combining the more intricate inside die with the outer die.  It creates this pretty white layer of the design below!  


I layered all the pieces together placing the eggs in our TCP basket, cut from Kraft paper, with a bit of copic colour to give definition.  Next I framed the scene up with our County Fair die cut from green cardstock.  I added some pretty patterned paper to the flags and a strip to anchor the scene, and all that was placed on a white layer that I used some crazy stitching rows on, and a few buttons to match.  


Here’s the inside of the design using a sentiment from the Easter Bunny stamp set.  

Next up, I have a really fun idea just using the inside of the egg die on a layer of white with pretty patterned paper showing underneath. 


It’s so easy to create a really CAS Easter design with this Easter Bunny die!  All you need to do is cut the inner part of the patterned egg die on paper three times.  This leaves you with the inset egg, and you can pick what you want to show through from underneath.    

For fun I added some tiny eggs from the Easter Bunny set and using the tiny egg die from the Eggs in a Basket CutUps.   


I used the pretty ribbons from the Easter Bunny set for the eggs, some very springy plaid paper and then a few enamel dots to finish it off.  

Ok, now for the last little treat, you need to know that I love Easter Chocolate!  It’s hard for me not to sneak the eggs from my kids’ basket!  At Easter when we were kids, we’d get one big solid chocolate bunny and then other chocolate eggs too.  When I saw this great big bunny die from this release I thought about those big chocolate bunnies, bedecked with their little gingham bows, and recreated them in paper.  


This design is super easy!  Just cut two of each of the bunnies, score the ears of the back bunny and adhere them at the top part of their ears.  That way they could be used as a card, or even a place card for Easter dinner.  A wee bit of gingham ribbon and a tiny tag lets you know who they belong to.  Kathy Racoosin did an Easter place card recently with a bit of a similar style so I have to say credit goes to her for sparking my imagination!  


Here’s a peek at the new release items I used today!   


We’re also kicking off our newest TCP Tuesday Challenge....Spring!  It’s your chance to create with us with a Spring theme, and you could win TCP Cat’s Cash to the store!  


Pop on by The Cat’s Pajamas Blog for more inspiration from this release and then check it all out in the store!   Thanks for celebrating our surprise Spring Release with us!