Tuesday, April 30, 2013

Purple Petunias

In our front flower bed I often plant a row of annuals to go with my perennials.  Because it's west facing I usually choose hardy and heat tolerant flowers like marigolds and petunias.  So when I stamped out this beautiful flower from Bees and Blooms it got me thinking of some of the purpley-burgundy striped petunias I've planted in the past, so that's how I coloured them.


I've also been having fun with the A2 Curved Borders from Spellbinders and I thought it would make  an interesting edge to the card.  The blooms are stamped with Memento Tuxedo Black ink onto Flourishes Classic White, then coloured up with Copics for that purple-petunia look (even though they're really apple blossoms), then framed with black cardstock and Color Made Easy - Crocus Cardstock as the base.  


This is a quick and easy card.  I stamped the beautiful sentiment with Memento Elderberry ink, then looped some 1/8 inch velvet ribbon through the cutouts in the border design and added some pretty black rhinestones throughout to finish it off.   


I should give this to my husband who just ran a 5 K on Sunday.  I'm proud of him as it's just 3 months after major surgery.  :)  He's fearfully and wonderfully made!

Monday, April 29, 2013

Oh Snap

One of my favourite illustrators for fun and whimsical images is Torico.  She's got great style and lines and oodles of talent.  She illustrates for There She Goes, but she also has her own line of digi images at Birdie Brown, and each month she has freebies too!  I'm getting this one in under the wire for her April Challenge with her April Freebie images - which is also why you'll see 2 posts from me today, one now and one in the morning!   I had time because our youngest was home with an ear infection, so it was a lazy day.  Hope you don't get sick of me {wink!}, and the little guy is doing much better now too.


How could I resist a camera image right?!!  So cute!  Sorry - the picture angle is a bit hinky - I was trying to talk to my mom on the phone while taking pictures.  It didn't really work!  I'll have a few more pics to show you.  I printed off a couple of the camera and bird images so that I'd have a few pieces I could cut out and pop up for dimension, like the camera lens, bird and flowers.  I love those extra touches.


Coloring with Copics to match the MME paper - I think it's called The Station - a pack that was at Michael's.  Really rich neutrals, blacks and reds.   The sketch is deconstructingjens #99.  


Here you can see the dimension a bit better.  So cute!  

Copics:  R14, R83, R85, R89, W1, W3, W5, W7, 100 (Black), E50, E53, E35, E31, YG93, YG95, YG99

Sunday, April 28, 2013

Eyes to See


I think this is such a beautiful sentiment about life.  Often it takes me paying more attention to beauty around us to realize how beautiful life is, having eyes to intentionally see what's really there.  

I have a two more cards left to show you from April's Flourishes Release of sets.  I have loved working with them.  I knew these flowers from the set Garden Gate would colour beautifully on Kraft cardstock  with Prismacolor pencils, and I really love a windowed design.  The edges of the Kraft layer are cut with a Grand Nestabilities die because I thought the lattice feel would go well here.  After I stamped the image with Memento Tuxedo Black Ink I traced over an oval Nestabilities die, then carefully trimmed out the leaves and the line where the die would have cut.  It's just another way to do an out of the box style of cutting.  


Some lovely green silk, white pearls, Echo Park designer paper (For the Record) and some of our Color Made Easy Pistachio cardstock and it's all done!

Saturday, April 27, 2013

Project 52 - 16 & 17

The week before last week my husband and daughter were off on band tour and it was just me and the boys, so I didn't have many spare minutes for photography editing...so this week I'll show you two weeks of pictures.

The week with me and my boys was filled with sports.  The boys are both playing ball hockey again, and our older son is taking golf lessons for the first time.  So I did take some pictures of those events - they have the feeling of motion to them - mostly because the boys move too fast for me!


This is our little guy carrying the ball up the ice.  He is one speedy runner that's for sure and though he's in the younger bracket of his team, he's a very strong player.  I love his heart and how much he puts into each shift out there.  


Golf Lessons.  Our older son is learning proper technique for hitting the ball, what a great way to start the game, and my husband will be glad to have a golfing partner.  His coach is a pro-golfer, and the group lessons were really reasonable too.  Bonus!


Our older son in the red at the faceoff circle.  I love how his character shines on the ball hockey ice.  He is a leader.  His best position is centre but he'll play anything you ask of him.  I'm proud of the asset he is to his team.  It is his favourite sport of all the sports he plays.  God has gifted him with a lot of athletic ability, but ball hockey is his baby :)


I bought myself some tulips the other day.  Makes my little heart happy.  So I was playing around with my portrait lens in the next few pics.  


Just look at the triangle that forms in the bottom of the petals in this orange tulip - it's almost neon green to orange!  The light comes through the bottom of the petals where they don't overlap each other and gives this kaleidoscope effect that's amazing!  If you click on it you should be able to see it better.  


And in a different light the same tulip with the focus on the petals, not the inside.  They really are beautiful!  

Thursday, April 25, 2013

Heartfelt Thanks


Welcome to Friday friends!  We have a wide open Friday at Flourishes where the girls are picking any little set their heart delights in to show off to you!

I was asked to make some thank you cards for Administrative Professionals Day this year. I like to make each of them special as I know each person they are going to, so all of them get unique cards.  This year I made 9 of them, and this is the first one I'll show you.  


This is using the beautiful Hydrangea stamp set.  I've said it before and will say it again...love me those blue hydrangeas.  I think they are spectacular.  I stamped the image on Flourishes Classic White cardstock with Memento Tuxedo Black ink, then carefully trimmed around the image with a wee border.  I coloured up the blooms with some yummy copic colours, and then added a Perfectly Pierced Classic Window die behind the popped up flowers to really set them off.  I used some pretty bluey-purple paper I had in my stash (old Memory Box I think), and then accented with Iced Lime seam binding, white crochet lace, some pretty rhinestones and some embossing on the lovely Color Made Easy Pistachio green cardstock.   


Here's a tip on colouring greens.   Do you want some extra depth in those shadowed places of your leaves?  Want your image to really tie in together nicely?  Take one of your B markers that you used for the flower petals (in this case I think I used B63) and add some of that blue into the depths of your leaves, it makes all the difference in cooling the shadows of the greens and the tones then balance nicely together too.  


Be sure to check out the Flourishes Inspiration with the rest of the Senior Design Team....and check the Flourishes Blog for some exciting news I have to share!  For following in the footsteps of a small lady - I still have some big shoes to fill!  


  • Amanda Havon
  • Christine Okken (you are here)
  • Cindy Lawrence
  • Danielle Kennedy
  • Julie Koerber
  • Maki Jones
  • Silke Ledlow
  • Stacy Morgan


  • Wednesday, April 24, 2013

    CardMaker Blog Hopping with Gina K!

    It's a great day today as the CardMaker Magazine Blog Team is linking up with the Gina K Team to bring you some creative and fun inspiration!

    I created two cards with this month's adorable StampTV Kit Spring Parade.


    For this first card I took this pretty petaled flower bloom and inked it in white craft ink onto the Gina K card stock in the kit in this pretty teal colour, embossing with white.  After it cooled I came back and added little bits of colouring with my BG57 Copic marker.  Instant depth!


    To tie in the background stripedy paper from the kit to the main image I also stamped the leaves from the set onto the dp, and sewed the panels together.  Then it's just a wee bit of pretty ribbon and brads, and I love how it turned out!

    For this next card I went for a bit more of a whimsical feel...


    What do you think - butterfly or dragonfly?  It could be both right?  First I stamped and embossed the lovely butter/dragon-fly onto Gina K Black cardstock and then also did a second stamping onto White cardstock just cutting out the inner wings and popping them up for a real look of flight.  The paper from this kit is such a fun design.  


    I tied a double bow of gingham and this pretty teal organdy ribbon, and I love how it softens the effect.  

    A pretty pair of cards that were so fun to make!


    Now for more fun you can head on over to the lovely Sharon Harnist for more Gina K Inspiration! 

    Thanks so much Gina K for the fun!  Be sure you also head on over to Gina's Blog...she has something fun to give away today!  

    Monday, April 22, 2013

    Sunny Skies Tomorrow

    I just found out that a friend of mine tore her ACL and Medial ligaments in her knee!  Ack.  And this after already doing that to her other knee about a year or more ago.  :(  My heart goes out to her, especially since she'll need surgery...I just had to send her a cheer-up card.


    This week's TSG Challenge fit the bill with a sketch, and this cute little girl from the TSG set Under the Weather.  I coloured her up with Copics, matching to these fun papers from the Echo Park pack - Sweet Day.  Love that cloud paper.  


    Nothing too fancy schmantzy - just a note to let her know I'm thinking of her and praying for her recovery. 

    See you back here tomorrow for a fun Blog Hop with the CardMaker Magazine team!

    Copics:  C1, C3, C5, C7, BG10, BG11, BG13, BG90, BG93, Y13, Y15, Y17, E0000, E00, E21, E27, E29, E74, E79, E35, R01, R02.  

    Photography Inspires Me

    Hello Friends - sorry I missed my Project 52 photography post yesterday - just too much going on, but I'll double up next week.  In the mean time I have a U Inspire Me post over on the CardMaker Magazine Blog today that I hope you'll check out....I was inspired by a photo I took recently on our Carribean vacation and here's a sneak peek of what you'll see there....and I'll also show you how to do the Copic background for this design as well!   I hope you can check it out!


    Thursday, April 18, 2013

    White Picket Fence

    https://blogger.googleusercontent.com/img/b/R29vZ2xl/AVvXsEiOia4hyphenhyphen8TspPg6ZzPyiSDRDmbjNOvy5jtWPjE4YzuNKeVmj61SruSqzVQl3ed2ZeGcgyiLyIq2WHW6B6EgaS4c6S6Ih4tNnHyYPEQr-Awla04ZyKFbsncICABSWegqJaZySaYtZ-IOkjs/s1600/Free+for+All+Friday+with+Border.jpg


    Hi all! Just like we do every Friday after our release, our designers pick up their favorite new sets and let their creativity go crazy with a "Free for All Friday!" The goal is to show off those new images and give you even more ideas on how to use them!


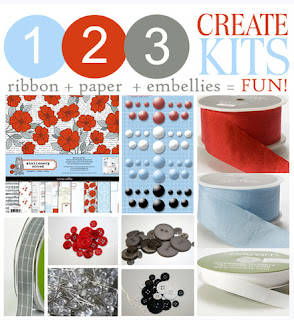
    I decided to play again with the lovely Garden Gate set  (that I obviously love so much!) and our new 123 Create Kit called Stationary Noted...it's just so gorgeous.  I stamped the gate image onto Flourishes Classic White with Memento Tuxedo Black ink.  I die cut out the shape with this gorgeous Spellbinders die (Decorative Labels 22), and then mounted it on our Flourishes Perfectly Pierced Classic Window Die, on Color Made Easy True Blue cardstock.  I wanted to keep a cool and neutral palette to go with the papers, so the colouring with copics is all C00 - C7's and then the little pops of red roses, and blue delphinium.  


    Don't you just love the gray ribbon sliding through the die?  I think this kit and this set are Flourishes at it's finest!  


    Also, time is running out for our New Release Bundle Bargain! Today is the last day to get all of our new sets at 10% off when you purchase them in a bundle. If you want to know more, just click HERE to see the bundle in the Flourishes store!

    Ok, now it's time to hop on over and see.....
    Hope you have a fabulous weekend and we’ll see you all back here soon!

    Wednesday, April 17, 2013

    Flower Spray Frames


    I'm back with another card made with April's New Release sets from Flourishes!  The Spring Blossoms Set completes our Blossoms Collection seasons and it's so pretty!  One thing I love about how Marcella designed the sets is that she always incorporates some elements that can be used as framing or accent pieces, corner elements etc.  I chose to take these pretty magnolia blooms and frame out the sentiment.  

    I began by cutting out a Perfectly Pierced Victorian Ovals die from Flourishes Classic Ivory card stock with Memento Tuxedo Black ink, then I stamped two of the magnolia blossoms in the die and stamped two extras two be able to trim out.  I coloured these up with Copics, trimmed out my extras and then popped the largest bloom up in the center of each side.  


    The piercing in each of our Perfectly pierced dies adds such an elegant detail!  I added some facted rhinestone accents, crochet lace, creamy seam binding and our Color Made Easy Candy Pink card stock.  


    I hope you enjoyed stopping by today!  I'll be back tomorrow.  Hope to see you then.  

    Monday, April 15, 2013

    Happiness Sneaks In

    I had a lot of fun with this latest release for Flourishes, and I made a lot of cards, so I hope you don't mind me showing off some more of these new cards in the next weeks.  


    I really love this set called Garden Gate.  I know I've said that already!  I wanted to do something with a real garden feel this time.  I stamped the gate image onto Flourishes Classic White card stock with Memento Tuxedo Black ink, die cutting it out with a Spellbinder's Die, adding a second larger shape with the die onto MME designer paper.    That really cool edge is a new Spelbinders die called Borderabilities A2 Curved Borders One and I cut out two layers, one on our Color Made Easy - Poppy Cardstock and one on our Flourishes Classic White.  I love how it adds visual interest and draws your eye.  


    For accents I added some seam binding in Basque Red, some white pearls and a pretty trinket leaf pin.  

    That sentiment is so special isn't it?  "Happiness often sneaks in through a door you didn't know you left open".  


    BG0000, BG10, BG11, Y15, RV32, RV34

    There's the list of a whole host of copics I used.  

    Sunday, April 14, 2013

    So Grateful Socks

    Have you seen The Cat's Pajamas latest release?  EEE so full of fun!  A sweet little package arrived for me with my order while we were gone...I was delighted to be able to ink a little up this weekend.


    This month's TCP Challenge is Flowers as the Focus.  Now one of my favourite stamps from the new release is this awesome Sock Monkey - but he has no flowers.  So I had to get a little more creative.  I stamped Socks and coloured him up, then stamped the bouquet from another TCP set - Bloom, coloured it up and cut it out leaving Bun Bun out and adding the bouquet to Socks.  It turned out pretty cute :)


    Now because I was cutting the bouquet out around Bun Bun the Bunny that is in the Bloom set - there was a bit of a spot in the top center of the bouquet that looked very empty; so where I knew I wanted to place the popped up the bouquet, I drew in some little flowers on the main image with my Copic Multiliner and it makes a multi-dimensional bouquet.  

    I tried to colour up Sock to really have the feeling of heathering that my son's sock monkey has.  Just little flick strokes with my W1 - 7 markers.  


    I think you might be able to see a bit more of the dimension on the bouquet in this shot.  

    So cute he just makes me smile!