Showing posts with label FLLC FLLCDT. Show all posts

Thursday, May 27, 2010

Oh...Let's Go Here!

A little taste of summer for you today on Flourishes Friday.  Danielle has a Friday Focus on all things summery over at the Flourishes Blog, and since I'm feeling a longing for summer and all things WARM I thought I'd create a dreamy summer scene today.

Doesn't this look like a place you'd like to spend a lazy summer day?   The set is called Beach Life from Flourishes and I stamped it with Memento Tuxedo Black on Flourishes Classic White cardstock, especially designed for copic markers.


I used several different types of marker strokes to create different parts of the coloring with my Copics on this one.  Some side to side streaky color on the sky, and some pointillism on the sand and grass.  I love the really rich and deep colors.  I matched the print from the SEI paper (Jocelyn) to the Morrocan Screen CB folder and then added some beautiful Basic Grey square shaped gems from Flourishes, aren't they just delish?  And they go perfectly too and capture that decadent vacation feel.  I can almost feel the wind and spray from the ocean!


Here's a pic of the markers I used, because there were so many, if you have trouble reading the numbers, just click on the picture and you can see them larger. 


Want to see some more beautiful Flourishes inspiration today? 

Check out these fabulous girls:  Cindy, Danielle, Dawn, Julie, Laura, and  Leslie
Recipe:  Stamps - Flourishes - Beach Life;  Ink:  Memento Tuxedo Black;  Paper;  Intense Teal (Prism), Tempting Turquoise, Green Galore, Flourishes - Classic White, SEI Jocelyn Designer Paper;  Accessories:  Big Shot, Labels Eleven Nestabilities, Labels Ten Nestabilities, Oval Punch, Dotted Scalloped Border Punch, Basic Grey Square Rhinestones, Polka-Dotted Sheer Ribbon, Copic Markers, Moroccan Screen CB Folder, Dimensionals

Wednesday, April 14, 2010

Fanciful Flourishes

Are you like me and love the look of damask and flourished designs?  There's something so elegant and versatile about them.  Today we have a fantastic set designed by Becky Fleck that incorporates the elegance of flourishes, damask in three different styles, and is creative about how you can put them together. 

I'll start with this Vellum Flourished Butterflies card.  There are two parts to this butterfly stamp, the flourished stamp, and the solid background.  You can layer them or use them separately.  I started by stamping the solid butterfly stamp on the white background layer (cut with Labels 8) in this pretty purple ink (Lavendar Lace).   Then I used the same size Label cut in cardstock vellum and stamped the flourished butterflies in White Craft ink and embossed them.  Then I took this fantastic new tool from Flourishes the Retractable Blade, and cut out the vellum layer of the butterflies, leaving the body intact.  After placing these two layers off-set from each other, I raised the butterfly wings. 


Here is a closeup where you can see the embossing in more detail, as well as the Stardust pen and the fancy piercing.  So pretty isn' it?  I think it's the silk ribbon that just puts it over the top though. 


Now how about something very dramatic as a change?  On this card I used two of the damask elements to create a type of "patterned paper" look.  I chose really strong color contrasts in the Razzleberry and Kiwi Kiss.  The Razzleberry is the larger damask image, and the Kiwi is the smaller damask.  You could use tons of different color combinations here too. 


I realized that the U Scallop Oval punch works perfectly with this large EK Success Scallop.  These pretty embellishments in the center area are new in the store from Prima - Say it in Pearls....back in stock soon :)  They are GORGEOUS and really fit with this type of card.  Focal Nesties Shape is Labels Six. 

Here's a couple of pictures that show you the scallops front: 

And back. 


My other DT sisters have fantastic things to show you again today: 


Dawn BurnworthJulie Koerber, Leslie Miller, Stacy Morgan, Danielle Kennedy, Cindy Lawrence, Laura Fredrickson

To enter to win this great set see the Flourishes Blog to enter.  Winners will be chosen and posted on Saturday.   And be sure to join us for the Release Party at the Splitcoaststampers Flourishes Forum, Friday Night 8 PM Mountain Time.  Never been before? Please come, it's an hour of fun, full peeks at the new Releases, games, more chances to win and lots of fun chatter! 

Tuesday, April 13, 2010

Flourishes Release Week Begins!

I have two fantastic sets to show you today for the April Releases at Flourishes

The first is a perfect set for those celebrating a very special accomplishment in their life.  Graduation!  It has some great elements that can stand alone or be used together to create a great card, or set of cards for those in your life.  It could also be used for back-to-school or teacher cards as well. 

I have a clean and simple design for you with the set, Hats Off to You


I actually started this card with the ribbon....I just love the stripe to this ribbon in the Flourishes Store.  I stamped one of the sentiments from the set "Hats off to you" in white Craft ink on Kraft cardstock.  On the main panel I stamped all the hats as if the whole class were throwing them up.  I added the sentiment around the main scalloped circle in a curve.  One of the best things about clear stamps is that you can curve them and see where you are stamping.  The piercing is with an Ecstacy template. 


Simple, but also easily re-creatable in case you have a lot of Congrat's cards to make, and you could easily use your own grad's colors. 

Around the Arbor

Now for the very beautiful set Around the Arbor, this set combines beautiful items in a garden that you'd want to relax in, along with some lovely sentiments.  I call this one Secret Garden.  :)


I started by coloring in the trellis and gorgeous vining roses with Copic markers (Daffodil Collection, Tiger Lily Collection, Evergreen Collection, Poppy Collection, and Flesh Tones).  I framed it with the Spellbinders Foliage Frame, and then took some pretty scalloped ribbon in Apple Green, and attached it behind the frame with Scor-Tape in a diagonal pattern like the trellis design. Here's another angle.


And a closeup, you can see some of the glittery touches I added with my Stardust pen ...


And there are so many other pretty parts to this set too!  Be sure to stop by my Design Team sisters to see their beautiful creations with these sets.

Want to win these great sets ???  Go to the Flourishes Blog to enter your name on today's post.  We'll be drawing for all the winners on Saturday there! 

Thursday, April 8, 2010

A Little Twinchie Fun

Happy it's another Flourishes Friday :)  Today we're beginning our pre-release challenge for a great set of new stamps to be released a week from today!  You will LOVE them too!

So, what's our challenge?  What's 2 by 2 and loves to take center stage? It's a "twinchie" and it's what our release week challenge is all about. To take part, all you need to do is make a 2 by 2 inch segment the focal point on your card.   I liked them so much I had to make 2 Twinchies the focal point of my card!

Actually there are a lot of Flourishes stamps that are perfect for this challenge because so many of our stamps have the image in different scale sizes.  I took out this beautiful Lilac set and inked the smaller lilac blooms twice and colored them with Copic Markers (Petunia and Meadow Collections)   I took my color palette from this yummy new Basic Grey Paper Green at Heart, it's a perfect match to Razzleberry and Melon Mambo cardstock from SU. 


Below you can see the fluttering butterflies and the fancy flourish edges.  Two types of ribbon too - dotted sheer in Apple Green (which I LOVE!) and Scalloped Edge in Bright Pink.  Ok, so maybe the two ribbons were a little overkill, but it's a bright card :) 


So now I KNOW you want to jump in and create with Twinchies too!  You have until Friday, April 16th at 5 PM EST to enter for your chance to win our entire April release! Use Flourishes stamps if you have them, but if you don't please play along anyway. If you upload to SCS, please use the keyword FLLCAPR10. Keep in mind, in order to be eligible, you need to link your creation to the Flourishes blog post using the inlinkz linky. Good luck! We can't wait to see what you create!

Here's the links to all the other fabulous Flourishes DT girls and their Twinchie creations today!

Cindy Lawrence, Danielle Kennedy, Dawn Burnworth, Julie Koerber, Laura Fredrickson, Leslie Miller and Stacy Morgan

Thursday, March 25, 2010

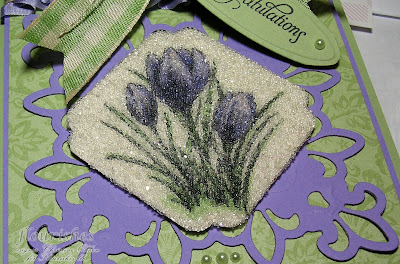
Stained Glass Crocuses

Welcome to Friday!  For us it's the start of Spring Break tonight so my kids couldn't be more excited.  I have a very spring like card to show you today for Flourishes Friday too. 

Recently in my blog hopping I saw Laurie Wilson do a technique that I had done a long time ago but had forgotten about, and in my SU order I got a new container of Microbeads....so the timing was perfect. 


Doesn't it look like stained glass?  Ok.  I'm just smitten with this creation so I have lots of pictures of it to show you. 

How do you do it?  Well....I colored the crocuses from A Year in Flowers with the Hydrangea Copic Collection and the Fields Collection, and ran it through a Labels 12 Nestabilities.  Then I took red-line tape or sticky strip and lined the entire image in strips with the tape, cutting off the excess over the sides. (I was so sure I had taken a picture of this to show you, but my memory card must have been out of the camera!  Sorry!)  Then you place this in a tray of some sort and take off the top layer of the sticky strips and gently cover the entire image with microbeads (careful microbeads are SUPER bouncy)  Burnish the beads onto the image by turning upside down and pressing.  This will give you the effect you're looking for!  It's all glittery and shimmery. 


Completely cool isn't it? 

Here's another view  - each time you turn it, the light hits it a different way and the colors take on a different look too.


And here's a closeup of the ribbon treatment.  I took a length of sticky strip and then ruffled the silk ribbon on top of it bit by bit, then added the green gingham overtop.  Then cut the sentiment out and looped it through the ribbon with some linen thread. 


I like it so much I think I'm going to use it for one of our former students' Bridal Shower next month! 

Well, the other Flourishes girls have some great things to show you today too!

Cindy Lawrence, Dawn Burnworth, Danielle Kennedy, Julie Koerber, Laura Fredrickson, Leslie Miller, Stacy Morgan

Recipe:  Stamps - Flourishes - A Year in Flowers II, Tag Lines;  Ink:  Memento Tuxedo Black;  Paper:  Certainly Celery, Lavendar Lace, Certainly Celery Prints DSP, Flourishes Classic Ivory;  Accessories:  Big Shot, Ribbon Tags Trio Shapeability, Labels 12 Nestability, Fleur De Lis Pendant Die, Silk Ribbon, Gingham Ribbon, Sticky Strip, Microbeads, Copic Markers, Dimensionals, Linen Thread, Basic Grey 1/2 Pearls.

Thursday, October 22, 2009

Friday Focus - Fancy Folds

It's another Flourishes Friday Focus, and this week it's ME who's the Hostess focusing on something to tickle your creative fancy  :)  Over at the Flourishes Newsletter I have a full tutorial on my own Fancy Fold card design, so I invite you on over to take a look at how this was made.  Here's the finished project

Closed:


and open:


I call it a Christine Tri-Fold Book :)   The musical instruments and Holly and bows from the brand new Drummer Boy set were colored with Copic Markers, Evergreen, Fields and Water Collections, and then cut out with the Large Octagonal Nestabilities, and then adding the bows and holly popped up.  Kaiser Rhinestones as accent.  Lots more pictures at the Flourishes Newsletter too. 

For this card I took some great instruction from Valerie Stangle on how she made a vertical Z-Fold Card from World Cardmaking Day.  She's so creative with her Scor Pal!!


I love the different and classy look to this card!  I watercolored and sponged the doves scene from the new Dove and Holly set in deep colors, Soft Suede, Bravo Burgundy and Always Artichoke.  I did an-out-of-the-box cutting of the Doves with my Labels One Nestabilities.

Here is a picture of the card open:


The embossed layer is done with the Finial Press Embossing folder, and I bordered the bottom with the Fancy Scalloped Pierceabilities, and the background paper is 7Gypsies Savannah.  I LOVE how the Finishing Touches brads look on this card as the accents too.

And here is a picture all the way open so you can see the back panel:


The sentiment is from the new Christmas Music set. 

The Design Team Girls have used their own Fancy Folds today so here's their links to check them out too!


Recipe:  Christine Tri-Fold:  Stamps:  Flourishes Drummer Boy;  Ink:  Memento Tuxedo Black, Always Artichoke;  Paper:  Soft Sky, Always Artichoke, SU Wintergreen DSP, Flourishes Classic White;  Accessories:  Big Shot, Large Octagon Nestabilities, Corner Rounder, Scor It, SU Poly-twill Ribbon, Kaiser Pearls, Copic Markers, Dimensionals, Scor Tape

Z Fold Doves:  Stamps:  Flourishes Dove and Holly, Christmas Music;  Ink:  Black Stazon, Bravo Burgundy;  Paper:  Bravo Burgundy, Soft Suede, Flourishes European Watercolor Paper, 7Gypsies Savannah DSP, SU Thoroughly Modern DSP, Big Shot, Labels One Nesties, Finial Press Embossing Folder, Fancy Scallop Pierceabilities, Modern Label Punch, Oval Punch, Scalloped Oval Punch, Copper Finishing Touches Brads, Satin Ribbon, 1 3/8ths Circle Punch, Dimensionals.

Thursday, October 15, 2009

Christmas at my Door

There is just nothing like a beautiful pine wreath on your door at Christmas.  I absolutely love the smell of a real Christmas tree or wreath.  And Marcy has given it to us once again in this gorgeous Christmas Wreath set, the detail on it is just amazing! 


I watercolored the wreath on Flourishes European Watercolor paper with both reinkers and Stampin' Write Markers.  After coloring, I wanted to give the wreath ornaments some shimmer, so I took out my Lumiere and painted over top of the coloring on the ornaments.  I also added a White Gel pen to the tiny mistletoe berries. 

To give the card it's ornate feel I used the Lattice Borderabilities on some of my Memory Box Spiceberry paper and added the olive Scalloped Green ribbon.  This set also has beautiful fonts for the sentiments too.    Wouldn't you love to have a wreath like this in your home? 


Then I decided to go a little country by using the smaller wreath in the set and Wednesday's Sketch Challenge on SCS.  I just love the new Basic Grey Eskimo Kiss DSP so I used that as my color palette to color these wreaths with Copics. 


And I forced myself to use buttons on these double row of ribbons  :)  (I know - we're both shocked) But buttons seemed to suit this card.  This close-up gives you a little more detail on the wreath too. 


The Design Team really has some gorgeous samples with this set today!


You can win this set by entering today at the Flourishes Newsletter

And please join us tonight 8 - 9 pm MTN time for the Release Party at the SCS Flourishes Forum!

Recipe:  Stamps:  Flourishes Christmas Wreath;  Ink:  Stazon, Riding Hood Red;  Paper:  Confetti Cream, Always Artichoke, Memory Box Spiceberry DSP, Accessories:  Big Shot, Lattice Borderabilities, Oval Punches, SW Markers, Reinkers, Aqua Painter, Dimensionals, Bronze Kaiser Pearls, Scalloped Ribbon. 

Country Christmas Wreath:  Stamps:  Flourishes Christmas Wreath;  Ink:  Memento Tuxedo Black;  Paper:  Pink Pirouette, Cool Caribbean, Flourishes Classic White, Basic Grey Eskimo Kisses DSP;  Accessories:  1 3/4 Circle Punch, Copic Markers, Kaiser Pearls, Corduroy Brad, SU Buttons, Glue Dots, Dimensionals, Scalloped Ribbon, Velvet Ribbon, White Silk Ribbon

Wednesday, October 14, 2009

Twinkling

Well, you're going to love today's sets from Flourishes.  One is a lovely background, and one a must have vintage set that's going to blow you away!

I call this one Twinkle in His Eye!

Isn't this Santa amazing? 

I think he is drawn so beautifully!  Flourishes has another Rock Star illustrator in the house, her name is Becky Fleck, and you'll have to check out Julie's blog for more info about her.  We have the best illustrators!

I decided to give him some subtle coloring with my Prismacolor Pencils, and then overtop of his beard, mustache, his eyes and the white of his hat I added Spica atyou pen for total glitter.  I gave his glasses gold frames with my Zig Painty pen too.


I layered Santa on some fabulous Flourishes Glittery paper (currently out of stock - but should be back soon).  This paper is gorgeous with its sparkly pattern.  And the white layer is the debossed Petals a Plenty embossing folder from SU.  Finishing it off with some special piercing, red rhinestones and the beautiful double layered satin and he's very Twinkling!

Then I took the beautiful Holly background and did a 180 in design style... for some Silverberry Merry.


I used this beautiful Holly Background set to create different layers of impact.  It's stamped in Silver Encore ink on the back Sage Shadow layer, then embossed in Silver on the Silver metallic paper layer, and then overstamped over the sentiment from Santa, I Believe in Sage.  A little silver faux stitching on the piercing and some silver cording over the vintage crochet ribbon, and the beautiful Memory Box Dewfrost paper and it's complete in soft sweet simplicity!

The Design Team has gorgeous samples again for you today.  Be sure to check them out and leave a little love :)


And to win this set today see the Flourishes Newsletter....

And...join us in the Season that Sparkles Challenge - you could win the whole new release!

And be sure to join us for the Release Party this Friday over at Splitcoaststampers 8 - 9 PM Mountain Time.  So much fun, and lots of prizes to be given away!

Recipe:  Twinkle in His Eye:  Stamps:  Flourishes - Santa, I Believe;  Ink:  Memento Tuxedo Black, Real Red;  Paper:  Real Red, Whisper White, Flourishes Designer Paper, Flourishes Classic White;  Accessories:  Big Shot, Petals a Plenty Embossing Folder, Labels Eight Nestability, Pierceabilities, Piercer, Dimensionals, Double Sided Satin ribbon, Red Kaiser Rhinestones, Spica atyou Glitter Pens, Prismacolor Pencils, Zig Painty, Key Tab Punch. 

Silverberry Merry:  Stamps:  Flourishes - Holly Background, Santa, I Believe;  Ink:  Silver Encore, VersaMark, Sage Shadow;  Paper:  Sage Shadow, Silver Metallic, Memory Box Dewfrost;  Accessories:  Big Shot, Labels 8, Silver Embossing Powder, White Crochet Ribbon, Silver Metallic Cording, Silver Brads, Dimensionals, Zig Painty, Piercer.

Tuesday, October 13, 2009

The Holly and the Ivy

I don't know if any of you have this experience, but there are times when I open up a Flourishes set that I just GASP outloud with delight!  This set today is one of those gaspy in a good way sets!  Marcella just draws such beautiful detail that if you love to stamp....if you love to color you can't help but appreciate all the potential in a set. 

If you haven't guessed already there's a bit of a theme in some of the sets this month....the music of Christmas.   Have you heard the Christmas Carol "The Holly and the Ivy"?  And the 12 Days of Christmas...? 

I have two cards here and a bit of a tutorial on sponging too, so read on :)  This on is my Two Turtle Doves...


This gorgeous pair of doves is watercolored on Flourishes watercolor paper with a combination of Stampin Write Markers (an SU waterbased marker), and reinkers.  I actually got my color palette from this pretty 7Gypsies Nottinghill paper.  After coloring I decided to give it some depth by sponging.   I've received a few questions recently on how I sponge, so here's a quick tutorial.   Below is the image just watercolored.  Pretty, but missing something. 


Beside, you can see that I ran the colored image through my Labels 5 Nestabilities, then stamped and cut out a mask with Eclipse tape and taped it over the image.   I sponge with my SU round sponges cut into quarters.  I dab my sponge onto my ink pad then test how much ink I have on it onto a scrap piece of paper.  If I have the right level of ink (not too much- you can always add more layers), then I dab onto the paper.  I LOVE how watercolor paper takes sponging.  Because the paper has tooth, it grabs the ink so beautifully.  Then once I have a dabbed look I like I use more squishing or sweeping motions to get deeper color.    The mask holds tight and you have the perfect color around the image.  Because I also used my Nestability template around the edges, it gives me a border that doesn't get sponged either. 

Here is the image close up with the sponging.  I love the glow it gives the doves. 


For the second card think of the Christmas Carol, "The Holly and the Ivy". 


I used the small holly and ivy stamp from the set and stamped it down a horizontal row and then watercolored.  I cut it with my Borderabilities, and then added the Blossom Two Nestie to accent the shapes, with gorgeous velvet ribbon too.   It just looked like it needed something else so I added the pretty piercing and then when the card was all done, added Crystal effects to the berries.  The sentiment is just a part of the entire sentiment inked for this card. 

There are so many stunning samples of this set over at the other Design Team members' blogs, you'll have to check them out. 

Cindy Lawrence, Julie Koerber, Latisha Yoast, Laura Fredrickson, Leslie Miller, Stacy Morgan,  Sharon Doolittle

And to win this amazing set today:  The Flourishes Newsletter


Recipes:  Two Turtle Doves:  Stamps:  Flourishes - The Holly and the Ivy;  Ink:  Black Stazon, Night of Navy;  Paper:  Night of Navy, Baja Breeze, Flourishes Watercolor Paper, 7Gypsies Nottingham Designer Paper; Accessories:  Big Shot, Labels 5 Nestabilities, Fancy Tags Nestabilities, Silk Ribbon, Kaiser Rhinestones, Sponge, Eclipse Tape, Dimensionals, Reinkers, Stampin Write Markers
 
The Holly and the Ivy:  Stamps:  Flourishes - The Holly and the Ivy;  Ink:  Black Stazon, Always Artichoke;  Paper:  Bravo Burgundy, Memory Box Spiceberry DSP, Always Artichoke;  Accessories:  Big Shot, Borderabilities, Blossom Two Nestabilities, Velvent Ribbon, Kaiser Pearls, Piercer, Dimensionals, Reinkers, Crystal Effects.

Monday, October 12, 2009

Angels We Have Heard on High

It's SUCH a big New Release week at Flourishes (can you believe SIX new sets are coming???),  so we had to add an extra DAY of Sneak Peeks!  The Design Team Girls are joining with the Friends of Flourishes Blog Team today to show you 2 of the sets being unveiled later this week. 

The Friends of Flourishes have issued us a Sketch Challenge, and I combined the brand new Musical Score background set, with the beautiful Angel from the Rejoice set.  I love that the background is the music and words to the Christmas Carol - "Angels We have Heard on High", so I thought they were a perfect match. 


I used different combinations of purple to make this card look very regal, along with a very collage style of layering of the elements. 

The octagonal nestie shape is sponged with White Craft ink using the Impressabilties Flourishes template.  It gives it a lovely soft almost bleached look.  I've also cut this layer along the bottom with the Lattice Borderabilties template, sponged and gave it pearl accents. 

The white layer of the musical score is sponged, and then I added the embossed Angel that had been stamped on cardstock vellum and colored from behind (stained glass window style), with Copic Markers, and then over top with Spica atyou pens, to give it pretty sparkle.


There are so many wonderful things for you to see between the FOF Blog Team, the DT and the other wonderful new set ....

Flourishes Newsletter ....to win the Sneak Peek sets today! 


Recipe:  Stamps:  Musical Score, Rejoice;  Ink:  White Craft, Elegant Eggplant, Perfect Plum;  Paper:  Elegant Eggplant, Perfect Plum, Whisper White, Cardstock Vellum;  Accessories:  Big Shot, Large Rectangles Nestabilities, Large Scalloped Rectangles Nestabilities, Octagonal Nestabilities,  Curly Label Punch, Lattice Border Borderabilities, Impressabilities Flourishes, Sponge, White Embossing Powder, Copic Markers, Spica atyou pens, White Kaiser Pearls, Silver Finishing Touches Ribbon Slides, Silk Ribbon, Dimensionals.

Thursday, October 8, 2009

Sparkling Journal

It's another Flourishes Friday...and today is a Pre-Release challenge looking foward to a wonderful Flourishes Release in the week ahead.

So...put your thinking caps on because we're inviting you!   Glitzy packages, the new fallen snow, a Christmas ornament shimmering from the lights on the tree - all of these things equal magic during the holiday season! Capture that sparkle on a card and share your creativity for our A Season That Sparkles Challenge! KEYWORD: FLLCOCT. This contest will close Friday, Oct. 16th at 4PM CST. Winner gets our entire release for October!

Want to see something sparkly from me?  It was about time for a new journal for me (I finished the last page on my old one last week).  It's the place where I write what I'm learning, what God is teaching me, my prayers, my thoughts...even sketches and project ideas.  So I thought why not combine something sparkly with something useful and important to me that I'll use all year long.


I colored these beautiful cherries with Copic Markers (a number of different reds on the cherries and the Evergreen Collection on the leaves.)  After coloring I masked the cherries and leaves with Eclipse Tape and then sponged with Olive ink.    I framed the piece with a Frameabilities Foliage Frame that I also sponged to give it highlight, then a Labels 8 shape and Olive Silk Ribbon

Now for the sparkle.  To give the leaves some subtle sparkle I colored them over with the Spica atyou pens.  These pens have super sparkle because they have teeny tiny glass elements that reflect light in them. 


For the cherries ...after the whole journal was put together (and I mean every part :) )  I added Crystal Effects to parts of the cherries, laid the whole journal in my large embossing tray and poured those crazy bouncy little Microbeads overtop.  You have to let this dry a good while so it sets up well.  It gives a nice sparkle, but also a 3D look.  Below you can get more of the effect. 


Lastly...some Kaiser Rhinestones ....and it's a Sparkling Journal!  I'm looking foward to using it in the next year. 

Come and see what the other Design Team Girls of Fabulousness have created with sparkle today!

 
Recipe: Stamps: Flourishes Cherries and Peaches; Ink: Memento Tuxedo Black, Old Olive,  Very Vanilla Craft; Paper: Bella Rose DSP (SU), Old Olive Patterned Paper (SU), Flourishes Classic White, Old Olive;  Accessories:  SU Board Book Art Journal, Scalloped Eyelet Punch, Spiral Punch, Big Shot, Frameabilties Foliage Frame, Labels 8 Nestabilities, Copic Markers, Sponge, Eclipse Masking Tape, Kaiser Pearls, Olive Silk Ribbon, Spica atyou Glitter pens, Crystal Effects, Microbeads.

Saturday, October 3, 2009

World Card Making Day with Flourishes

Second post for today :)  Scroll down for more! 

The first Saturday of October is a time when card makers worldwide kick the holiday card making season into high gear. It's World Card Making Day! And this year, Flourishes is teaming up with other Splitcoast Member Companies to help inspire YOU! Better yet? If you get in on the action, you might just win some goodies courtesy of Flourishes. Click HERE and join us in our sketch challenge that kicked off tonight at 7 PM Eastern. You have until Midnight EST on Sunday to upload your cards. All of those that played will have their names thrown into a hat and three lucky people will win a goody bag courtesy of Flourishes with paper, a ribbon grab bag and a stamp set inside! :-)

Here's what I created with this great sketch. 


I think that the new Indian Summer paper by Basic Grey is fantastic, and it looks perfect with the new Seasonal Wreaths set.  I colored the wreath really vibrantly with copics to really bring it to life.  I layered it on a debossed (Finial Press Embossing Folder) piece of Dusty Durango, and added a Floral Accent, and gems from K & Co, as well as a half bow as accents.  The rest is all pretty papers. 


Here's an added bonus! We're partnering with Operation Write Home (formerly Cards for Heroes)to help spead the love around. If you'd like to send your challenge cards on to this fine cause that sends cards to our troops serving overseas,all you need to do is click on this link for details on how to send some cards their way!  OWH link is: http://operationwritehome.org/

Have fun and Happy World Cardmaking Day!


Recipe:  Stamps:  Flourishes Seasonal Wreaths;  Paper:  Dusty Durango, Bravo Burgundy, Flourishes Classic White, Indian Summer Basic Grey;  Accessories:  Copic Markers, Big Shot, Finial Press Embossing Folder (SU), Ticket Corner Punch, Circle Punches, Dimensionals, Purely Pomegranate Satin Ribbon, Glue Dots, K & Co Gems. 

Thursday, October 1, 2009

It's all about the Finishing Touches

What do you think takes a card from good to great? 

Sometimes I believe it's the special finishing touches you add that take a card up that extra notch, becoming a showpiece.  It can be something special, or simple.  But the right accent can really make a difference.

Today the Flourishes Design Team wants to show you ways to take your card from good to great with our very own Finishing Touches.  These accent pieces are fantastic!  They come in three finishes, gold, copper and silver, and in a variety of styles, fancy brads, pins, ribbon slides....all in gorgeously done.  What I really love about Flourishes Finishing Touches they are high quality, yet light weight.  So they don't bulk up the weight on your card. 

Today I wanted to show you the very classy Finishing Florals. They are beautiful enough that honestly they could be the showpiece/focal image on the whole card.  but I chose to make a dramatic statement with them as an accent. 


I colored these leaves with Copic Markers in several selections (Evergreen, Tiger Lily, Delphinium...Neutrals...etc), to match with my starting point...the great 7Gypsies paper Savannah.  It has pretty dusty blues, golden yellows, burgundies and greens, all on a muted neutral palette.  So, I colored the leaves and then sponged some Sahara Sand on the main image, weighting the sponging on the bottom to give it a glow on the top. 

I folded my other paper selection (Basic Grey Indian Summer to have the look of paper ribbon.  Then I added the pretty ribbon in a tailored treatment with the gorgeous Flourishes Flower brad in the center. 


Gives it such an elegant and finished effect don't you think? 

Come see all the other beauties by the Design Team today: 

Cindy Lawrence Faith Hofrichter Julie KoerberLatisha Yoast,  Laura FredricksonLeslie Miller

Be sure to stop by tomorrow...Flourishes is participating in the World Cardmaking Day festivities at Splitcoaststampers.com.  LOTS of fun going on with the Member Companies including giveaways for you! 

Recipe:  Stamps:  Flourishes Falling Leaves;  Ink:  Tuxedo Black Memento, Sahara Sand; Paper;  Buckaroo Blue, Soft Suede, Classic Ivory Paper (Flourishes),  7Gypsies Savannah DSP, Basic Grey Indian Summer DSP;  Accessories:  Big Shot, Labels Six Nestabilities, Corner Rounder Punch, Dimensionals, Flourishes Ribbon, Flourishes Finishing Touches Fancy Flowers Brad (copper), Copic Markers, Sponge.