It’s a sizzling summer here, so I’m going to cool it down this week and make it all about watercoloring! I mentioned before that I’m taking an online watercolour course (Watercolouring for Card Makers: Intermediate Techniques). I’m about half way done the class. I don’t go through it too quickly so I have time to practise, do the assignments, and also do regular life! Two thumbs up from me for what I’ve been able to learn. Though I have some background of watercolouring, that was way back in high school and goodness knows that was a long time ago.
Today’s card is one of my exercises from the class, to work on layering of colour. Because watercolours are usually quite transparent, when you layer one colour on top of another colour, all the colours show through. It’s called glazing. The most important part however, is allowing each layer to dry before adding the layer overtop. How you can tell a layer is dry is that the paper is warm to the touch, not cool. If it’s cool, it’s still damp and your colours will get muddy, or you’ll get what’s called “bloom” where you introduce too much water into a spot that’s drying. I talked about that in this post. This is one of the reasons watercolouring is such a patient process, you have to wait for the drying time. You can use a heat tool between layers, but I don’t always like to do that. It pushes around your colour sometimes in a more artificial way.
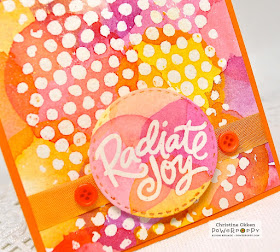
Anyway! On to the card! I embossed the dotted layer with a Tim Holtz Stencil, Bubbles, in clear EP on Arches Cold Pressed Watercolour paper. Then, I used a simple circle die on my cardstock and randomly washed in one of the warm colours, using the die cut circle as a template on the paper. I usually painted about 3 circles of the same colour somewhere on the panel, cleaned off my circle die, and then left it to dry before adding another colour. Then you just take your time and layer the different colours with as many layers as you like. I was using a combination of Daniel Smith Watercolours and Gansai Tambi Watercolours. It’s important to choose colours that are analogous colours (or beside each other on the colour wheel). If you choose complementary colours (opposite each other on the colour wheel, they’ll just layer to make a muddy brown. For instance, if I was using yellow, I wouldn’t add purple, or do red and green together. So, here I’ve used yellow, orange, red, and a pinkish-red together.
You can see where colours layer over each other you get a “new” colour. I used the same technique for my sentiment using Power Poppy’s incredibly encouraging set, M-Powering Words. Man I love that set! It’s got such great sentiments! I embossed the Radiate Joy first, and then watercoloured over top.
Just some simple orange-a-liscious seambinding and buttons complete it. I feel like it does radiate joy, and hopefully it will encourage the receiver!
Thanks for dropping by gang! Enjoy your Monday!


pretty colors you used, and like the layering of them!
ReplyDelete