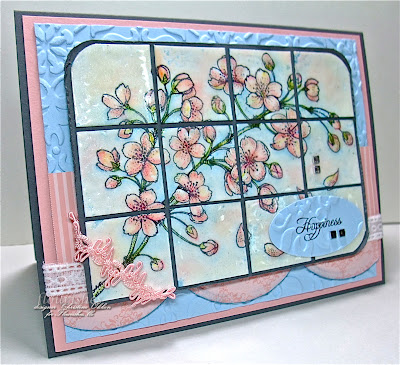
I pulled out one of my all time favourite stamp sets from Flourishes - Cherry Blossoms and colored it up with Prismacolor pencils, then cut it into 1 x 1 inch squares. After you cut it then I added UTEE embossing powder over VersaMark ink and heat embossed (this is where all the fussiness comes in). I actually like the bumpy look it gives each tile...sort of an old world feel. And the embossing seems to deepen the coloring as well. After they cooled I sponged each square with some Marina Mist ink and then attached it to the Basic Grey cardstock with Scor Tape. I also spritzed the squares with some Pearl Glimmer Mist to give them a touch of shine. Which you can catch a little of below.
Stamps: Flourishes - Cherry Blossoms; Ink: Memento Tuxedo Black, Marina Mist, VersaMark; Paper: Blushing Bride, Bashful Blue, Basic Grey, Flourishes Classic White, Blushing Bride Prints DSP; Accessories: Big Shot, Victorian Embossing Folder, Large Scallop Punch, Corner Rounder, Oval Punch, Square Rhinestone Gems, Pink Loop Trim, White SU Ribbon (ages ago!), Sponge, Prismacolor pencils, OMS, Blending Stumps, UTEE, Heat Tool, Glimmer Mist


10 comments:
wow christine I love this.
Like the soft colors you have used.
just another beauty.
greetings karin
Christine what a GORGEOUS design and colors!! WOW!
This is gorgeous! I love those faux tiles. :)
Gorgeous card Christine. Love the flower image and how you rounded the corners. Pretty colors. :o)
That is such a gorgeous image and perfect for this tile technique. Stunning card!
Christine, I have a question about your tiles -- do you know how big to make the piece of cardstock they're on or do you just guesstimate, adhere them, then trim the base? Obviously, I guess, I do the latter and am wondering if there's an easier way! :)
Queen Mary...I'm not sure how to contact you but I'll try this first...you asked about the tiles. I used the SCS tutorial found here: http://www.splitcoaststampers.com/resources/tutorials/fauxtile/ and she said to try and have the tiles approx 1 x 1. I tried to cut down my focal piece to an even number (mine was 3 inches by 4 and a bit) so my tiles were 1 x just over 1.
I hope that helps?
Christine
I have been wanting to give this technique a try too, I am not very patient on the drying time, but I love the results and yours is just Lovely!
What a stunner!!
Very pretty technique. Thanks for sharing it with me.
Joan
MN
Post a Comment