The other day after my husband came home from work he got a call from the Mac/Apple store where he gets things for his work computer and they informed him that his name was drawn from 600 entries to WIN as in FREE, a MacBook laptop! We were just over the moon! If you've been following me at all you know that computer issues have been ridiculous for us this year with the boat anchor oops, I mean desk top PC we have at home. Very honestly it's just not made to do as much as I'm asking it to do. So we were talking about our next purchase being a Mac. And I was thinking it would take us about a year to save for it, and here God just drops it in our laps. Sigh :) I'm so happy. It's taken a while to move info over (and I'm so glad my husband knows what he's doing) and it will take me a while to understand everything, but I'm so thrilled. Just the load time on pages alone is a fraction of the time I was waiting/wasting before on the old computer. Surfing the net is WAY more fun now! And I know work will be much more effective with this computer too. And it looks so darn cute on my desk too!
Today's tutorial may look different as I have new editing/photo software on iPhoto, but so far so good, I'm learning as I go here. I'm going to show you a few fun things with Copics today. One thing I realized when doing this tutorial is that I really color better when I'm not stopping to take pictures a long the way. But, I hope you'll get the ideas. I have some adorable new PI girls from MFT that are perfect for coloring with Copics.
Now why are Copic Markers so popular with card markers right now? Well, here's my thoughts, really they come in almost every possible color under the sun, they have superior blending ability, and you can create fantastic effects with them, and honestly - coloring is FAST with Copics. As compared to watercoloring which is a much more patient art - Copics color smooth and speedy. Which is really nice.
This cutie patootie is called Lather, Rinse, Repeat. I knew I wanted to use these papers from My Mind's Eye - Home, so I went to my Copics to match some colors.
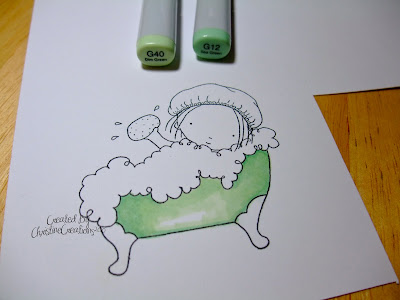
First layer of color on the tub. I saw Sherrie Siemens leave an area without color on her blog recently - this way as you're coloring you fill that in last and it will remain the lightest color....you'll see what I mean as we go.
Here I've added a little more depth in my second layer. This isn't super smooth looking, but it will get that way.
I've smoothed out the color a little by coming back with my G40
Then below I've added another layer of G40 to the whole tub - see below how the lighter area is more highlighted? I used smooth circular motions with my G40 to blend.
To me I wasn't getting quite enough darkness in my depths, so I added another deeper green
A little more "smoothing"
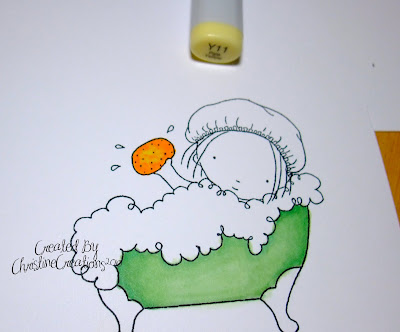
Now I want my paper to dry just a little bit so I move on to the sponge.
A nice little bit of depth with the darker Y38
And then I wanted it to look more "spongey" so I came in with my Y15 and spotted up the center of the sponge with the tip...this lifted some of the color and added it a softer yellow.
Then the fun part, I knew I wanted to make a polka-dot -flowery tub. So I took my blender pen and added some dots to the tub which lifts the color. This is one round with the Blender Pen, but I ended up doing two rounds, it just whitens it more.
Then I came back with my Copic Multi-Liner pen and drew in swirly flower petals, sort of with the feeling of the swirly bubbles. Fun isn't it?
Next I wanted to add some really light swirly color to the bubbles so below it's a very light BG0000
And with a few more colors, just with light swirly strokes, because bubbles have greens and pinks shimmer in them too. You might not even be able to see the color in the picture - but it's there :)
Next we move on to the skin. A light layer of E00 to start with. Moving in up and down curved motions to match the lines of her round face.
Below I've given some depths to her face edges with some "feathering" strokes with E21, put your marker down and then lift slightly as you lightly flick out, it leaves a softer outward edge.
I've come back and smoothed out the colors with my E00 in long strokes and then added some pink cheeks with R01.
Now onto some hair....she's a blondie so I start with Y21
Then fill in with Y23 and some E31. I find that yellows sometimes are so smooth looking when you lay the color down that you hardly have to blend them.
Now the claw legs on the tub. Because my paper from Mind's Eye has a warm grey in it I chose warm greys for the tub.
Below this looks really dark, and I probably could have used an intermediary shade, but I didn't! It just means blending well.
And after blending, it still wasn't smooth enough so I did even more blending with the W3 after this picture.
Now her cute little shower cap, and again I'm leaving some highlighted area for coloring in on the last layer.
Below with a little Y38 feathered in...
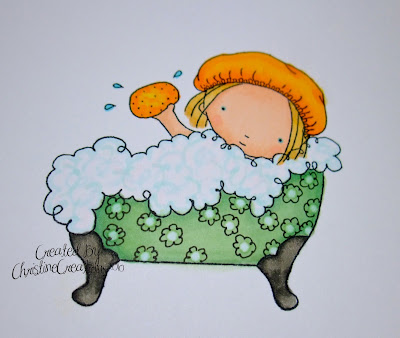
And below she is all colored with a final layer of Y17 on the shower cap :) I think she's so adorable!

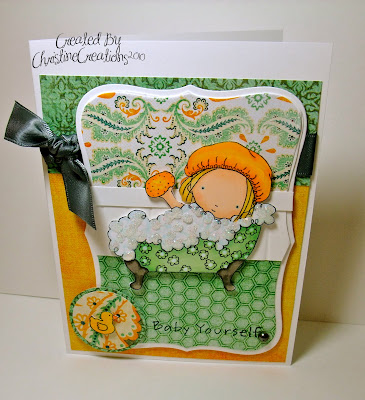
And here's the card I made with her: You can click on her to make it bigger, my photo angle is a bit wonky and I already gave the card away.

Totally thrilled with how this came out. I loved this paper and how some of it looks like the old honeycomb tiled floors we used to see. I added "beadboard" to the wall with some scored white paper, and then some patterned "wallpaper above". And you just can't go without that rubber duckie!
Can you see the bubbles? I added Crystal Effects and Dazzling Diamonds glitter to shimmer it up.
Oy how much cuter can it be! Hope you've had fun watching me color and I hope you feel more confident diving in and playing with these great markers!
Stamps: MFT - Lather Rinse Repeat; Ink: Memento Tuxedo Black; Paper: Whisper White, Flourishes Classic White, My Minds Eye - Home DP; Accessories: Big Shot, Labels 8 Nestabilities, Circle Punch, Copic Markers, Crystal Effects, Dazzling Diamonds Glitter, Dimensionals, 1 1/4 circle punch, Basic Grey Satin Ribbon, Scor It.


13 comments:
Great Copic tutorial. Hopefully some day I will have some!
LOVE the laptop story. God is SO faithful and knows our needs more than we do! I am always humbled and blessed by how He works to provide for our needs. I was having some intense conversations for over two months with some of the Board members and pastors around some issues I felt God wanted me to bring to their attention (never easy being the prophet!) and it was wiping me out big time! Needless to say, that is when my blog candy winning streak began! I won some Verve, got some Verve GCs and also won some blog candy! I was almost in tears after number four. Yes, we serve an awesome God! Enjoy your new gift :D
Thanks for the tutorial. I struggle with my copics and any tips are welcome!
God gave me these words just this morning as I was emptying the dishwasher and "glowing" like carzy (the humidity here has been intense for days). "Beads of sweat sit on my brow, Beads of blood were on His." Whoa - stopped me short ... what an awesome God we serve! He blesses us so! Enjoy your new laptop!
Your card is gorgeous and as always - the colorling is awesome! Have a great day!
Christine, your tutorial is awesome and I will apply all of your tips in my coloring attempts ;D...still having some major issues,LOL!! Oh my, a Mac...how awesome is GOD!!! God will bless you when you least expect it and you are ever so deserving!!! Congratulations, on being the winner of such an awesome prize!!! Hugs and blessings, Sabrina
This is such a pretty card! I love your colouring and thank you for the step-by-step!
hi christine
you have did a wunderful job,
too let see this prosess.
beautiful paper and the colors fit well together.
greetings karin
What a great card!! I'm thoroughly enjoying your creative process postings!! I hope that you keep those up. A macbook?!?! What a wonderful blessing!! I'm so excited for you.
Beth Greco
Awesome care, and that so much for the tutorial!
I'm so happy for you that you got a spankin' new Mac! Congratulations! Thanks too for the Copic tutorial. I don't own them yet, but I'm still learning all I can so that when and if I do get some, I'll know a little about using them! Your card is just AWESOME with your great coloring! TFS!
Awwwhhh....this is super cute. Great tutorial on how to color with copics as well. I really appreciate all your efforts!
Thank you for the fabulous tutorial...I'm just learning how to use these things, so it was very helpful for me to see how you're doing it.
This is a super cute card and I love the tutorial on coloring. My favorite is how the bubbles turned out on this card. Just wonderful Christine!
Ahhhhhhh this is super wonderful, Christine! I'm so glad you show us this coloring tutorial...thank you so much!
Post a Comment